
Note: You will need Adobe InDesign software to use this method. Burda Style has an alternate method here.
It took me a few days of pondering to figure out how to easily create a tiled pdf. I really wanted a fast way to do it using the computer. I knew that I could create a pattern in InDesign or Illustrator and make a full size pdf. But breaking up the pdf into tiled pages was a problem. Then I remembered I could print tiled pages from InDesign and the solutions started to fall into place. For the details, read on.
How to Create a Tiled PDF Pattern
Step 1: Create a full size pattern in InDesign. For example, my shoulder bag pattern is 18 inches by 28 inches so I created a one page InDesign document slightly larger than the pattern.
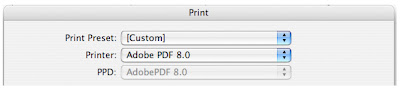
Step 2: Choose Print from the File menu (Command+P). In the Print dialog box, select Adobe PDF 8.0 from the Printer drop down menu.
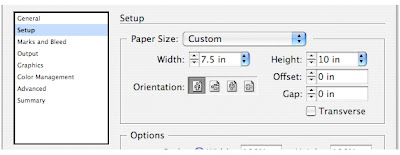
Step 3: Click Setup in the list of options on the left. From the Paper Size drop down menu, select Custom. I entered a paper size of 7.5 inches by 10 inches. I chose this size so that when the pdf is printed on 8.5 by 11 inch paper, the design and crop marks will easily fit inside the printable area.
Step 4: Next, in the Options area, click the Tile check box. The image on the left will show the arrangement of the pages on the design. Choose the amount of overlap by typing in the text box. The more overlap there is, the higher the number of pages.
 Step 5: Click the Print button. The file will appear on your desktop. Open the file in Adobe Reader or Acrobat to print.
It's really that easy. I always use the Export feature to create a pdf in InDesign so it hadn't occurred to me to use the Print feature. Then when I first tried it, the crop marks weren't printed well on the paper. Thus, the smaller custom paper size makes the whole image printable. Happy pattern making! I'd love to hear how this works for you.
It took me a few days of pondering to figure out how to easily create a tiled pdf. I really wanted a fast way to do it using the computer. I knew that I could create a pattern in InDesign or Illustrator and make a full size pdf. But breaking up the pdf into tiled pages was a problem. Then I remembered I could print tiled pages from InDesign and the solutions started to fall into place. For the details, read on.
How to Create a Tiled PDF Pattern
Step 1: Create a full size pattern in InDesign. For example, my shoulder bag pattern is 18 inches by 28 inches so I created a one page InDesign document slightly larger than the pattern.
Step 2: Choose Print from the File menu (Command+P). In the Print dialog box, select Adobe PDF 8.0 from the Printer drop down menu.

Step 3: Click Setup in the list of options on the left. From the Paper Size drop down menu, select Custom. I entered a paper size of 7.5 inches by 10 inches. I chose this size so that when the pdf is printed on 8.5 by 11 inch paper, the design and crop marks will easily fit inside the printable area.

Step 4: Next, in the Options area, click the Tile check box. The image on the left will show the arrangement of the pages on the design. Choose the amount of overlap by typing in the text box. The more overlap there is, the higher the number of pages.
 Step 5: Click the Print button. The file will appear on your desktop. Open the file in Adobe Reader or Acrobat to print.
It's really that easy. I always use the Export feature to create a pdf in InDesign so it hadn't occurred to me to use the Print feature. Then when I first tried it, the crop marks weren't printed well on the paper. Thus, the smaller custom paper size makes the whole image printable. Happy pattern making! I'd love to hear how this works for you.


