

A week or so ago, I posted a photo of my sewing room on Instagram with my relatively new cutting table in the very center. I got a few questions about the table so I decided that I would do a video review of it. I give you my thoughts and experience with the table over the last couple of months and show how easy it is to lift and collapse the “wings” aka table extensions.
So why did I JUST get a cutting table recently? Well, I’ve been cutting my fabric on the floor for years and it’s always worked fine. In my last house, I had a dining room with a table that I’d occasionally use for cutting. When I moved to my new (smaller) place a couple of years ago, I had to give up the dining table and I’ve been cutting exclusively on the floor since then. The only problem really with cutting on the floor is that it’s hard on the body and sometimes my back will start to hurt.

So, when I decided to start carrying fabric in my shop, I decided that I needed to finally get a cutting table. (In preparing this post, I actually found notes on cutting tables from three years ago!) I needed something quick and cheap so I turned to Amazon. After a bit of research, I found the Sew Ready Studio Designs Cutting Table. I wanted something with an adjustable height and something that would fold down as small as possible. As I mentioned, I live in a pretty small house (about 900 sq ft) so there isn’t really room to keep a big cutting table assembled to full size all the time. This table goes up to a height of 39.25” and folds down to a width of 12.25” by 36” long. Plus, it’s on wheels so I can move it around as needed.
I was able to assemble the table by myself except for the very last step of turning it right side up. So, be aware that the table is very heavy. My biggest, and probably only issue with the table is that it’s a challenge to change the height due to the weight and the 12 challenging screws that need to be unscrewed and re-screwed to adjust the height. If you plan on finding a height and sticking with it, then that won’t be too big of a deal.
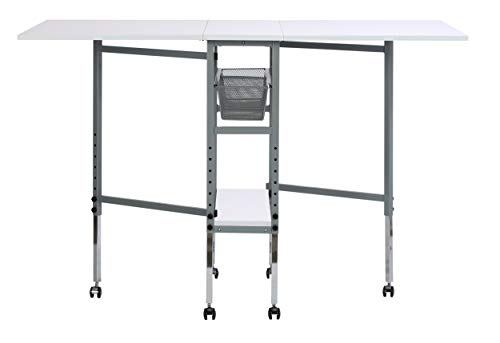
I’m really happy with this table and I’ve been using it a lot, for everything from cutting fabric orders, to tiling patterns, as a photo backdrop and of course for cutting out my own projects.
If you’d like to check out this table on Amazon, you can click right here. (This is an affiliate link, so if you purchase, I will receive a small commission. Your price will remain the same.) And if you feel like shopping more of my sewing picks, I have an Amazon influencer shop with all my faves.
I hope that you enjoyed this video review. Do you have a cutting table in your sewing space?






These semi-fitted tops and sundress feature a square neckline, side bust darts and are fitted at the back with a combination of narrow elastic and criss-crossed lacing. View A is a crop top that ends at the waistline. View B has a ruffled peplum and ends at the high hip. View C is a dress with a calf-length skirt and ruffle at the hem.
The pattern is a hybrid of a traditional pattern that you need to print and a zero-waste style pattern. You will need to print (or project) the front bodice and front facing pattern pieces. The remaining pattern pieces are rectangles that you can draw directly on your fabric (or paper) and then cut out, saving you paper and fabric.
This digital pattern includes an illustrated, step-by-step instruction booklet, a print-at-home layered pattern for letter or A4 size paper, a US copy shop pattern, an A0 size pattern and a projector pattern. All pattern files have layers. Pattern files are separated by cup size so that you can easily print only the pattern pieces that you need.
Visit the sewalong for more information, tips and tutorials.
Model is 5’11” and is wearing a size 12 C/D cup.
THIS IS NOT A PHYSICAL PRODUCT. After checkout, you will receive a link to the pattern that will be active for 24 hours after you click it. Prices are in USD.