
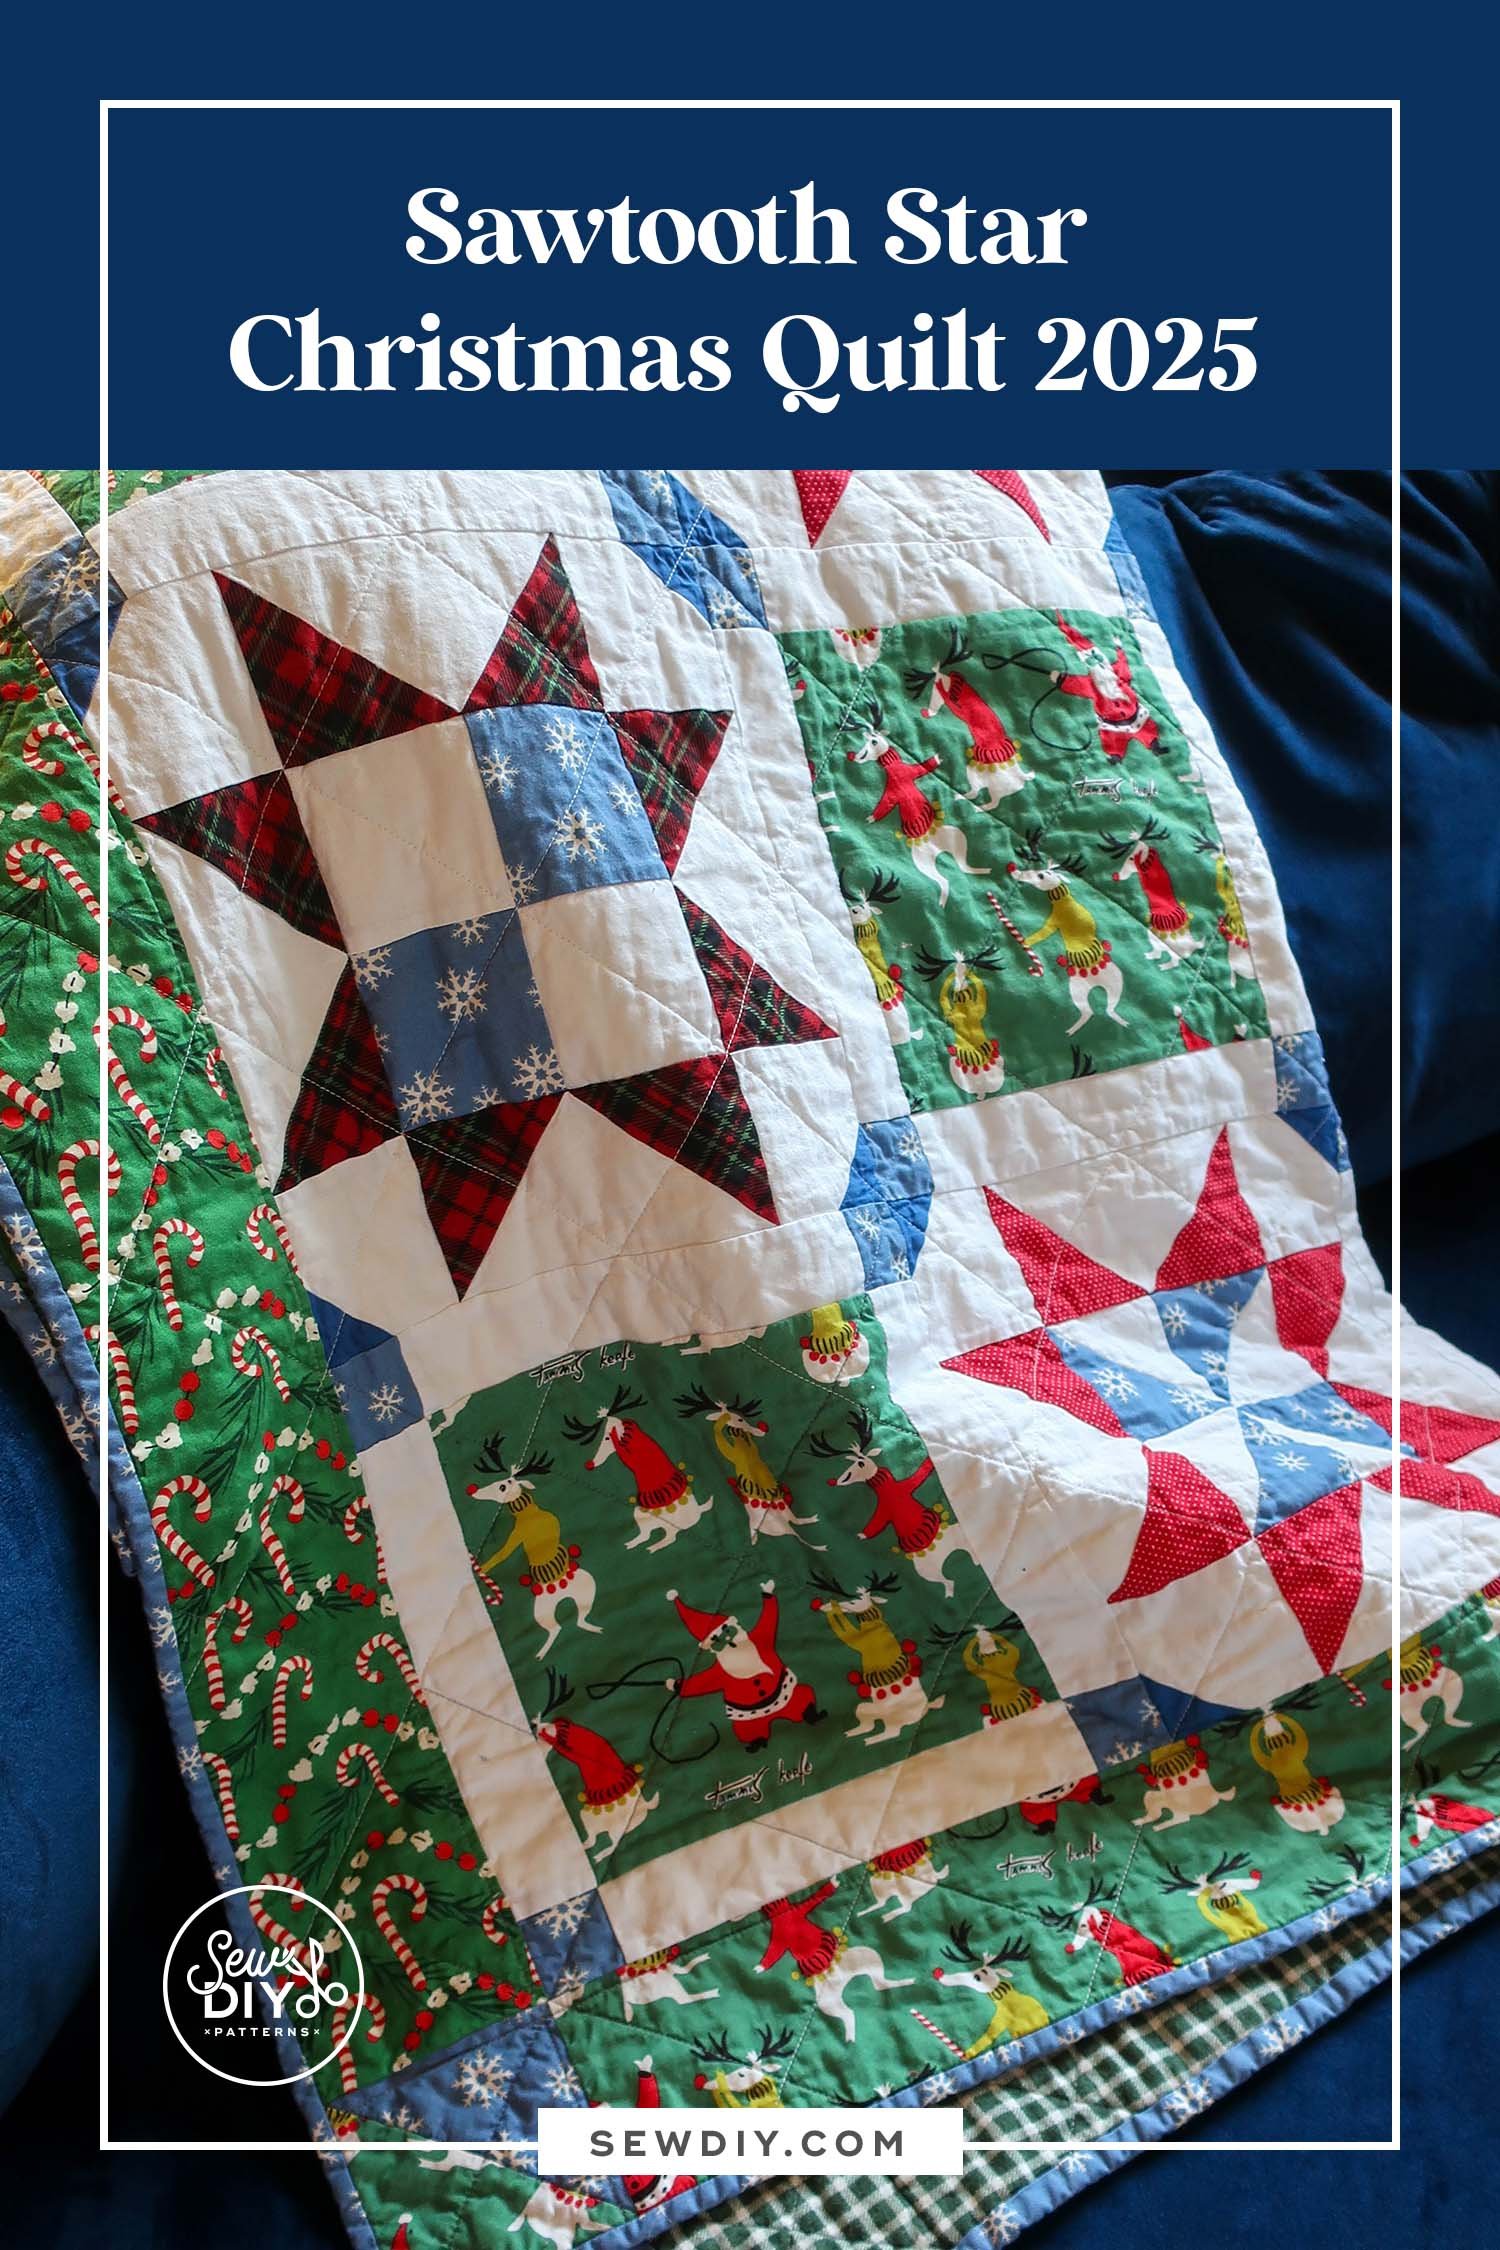
Hello sew-friends! One of my last projects of 2025 is a patchwork quilt. At the end of October, I paid a visit to my local craft supply thrift store, Seattle ReCreative and found a few bundles of Christmas themed quilting cotton. I was immediately inspired to make a Christmas quilt. And because I can't do anything the simplest way, I also decided to design my own quilt. In this post, I’m sharing my process of designing and making this quilt as well as some basic dimensions for the blocks, in case you’d like to make your own.
For many years now, I've wanted to get more into patchwork quilt design so I thought this would be a good trial run. I even bought the quilt design software EQ8 and have been teaching myself how to use it. In general, I use Adobe Illustrator for my design and drafting but I like that EQ8 comes with a lot of traditional block designs built in. Plus, it can list fabric cutting and you can export vector pdfs.
FABRIC
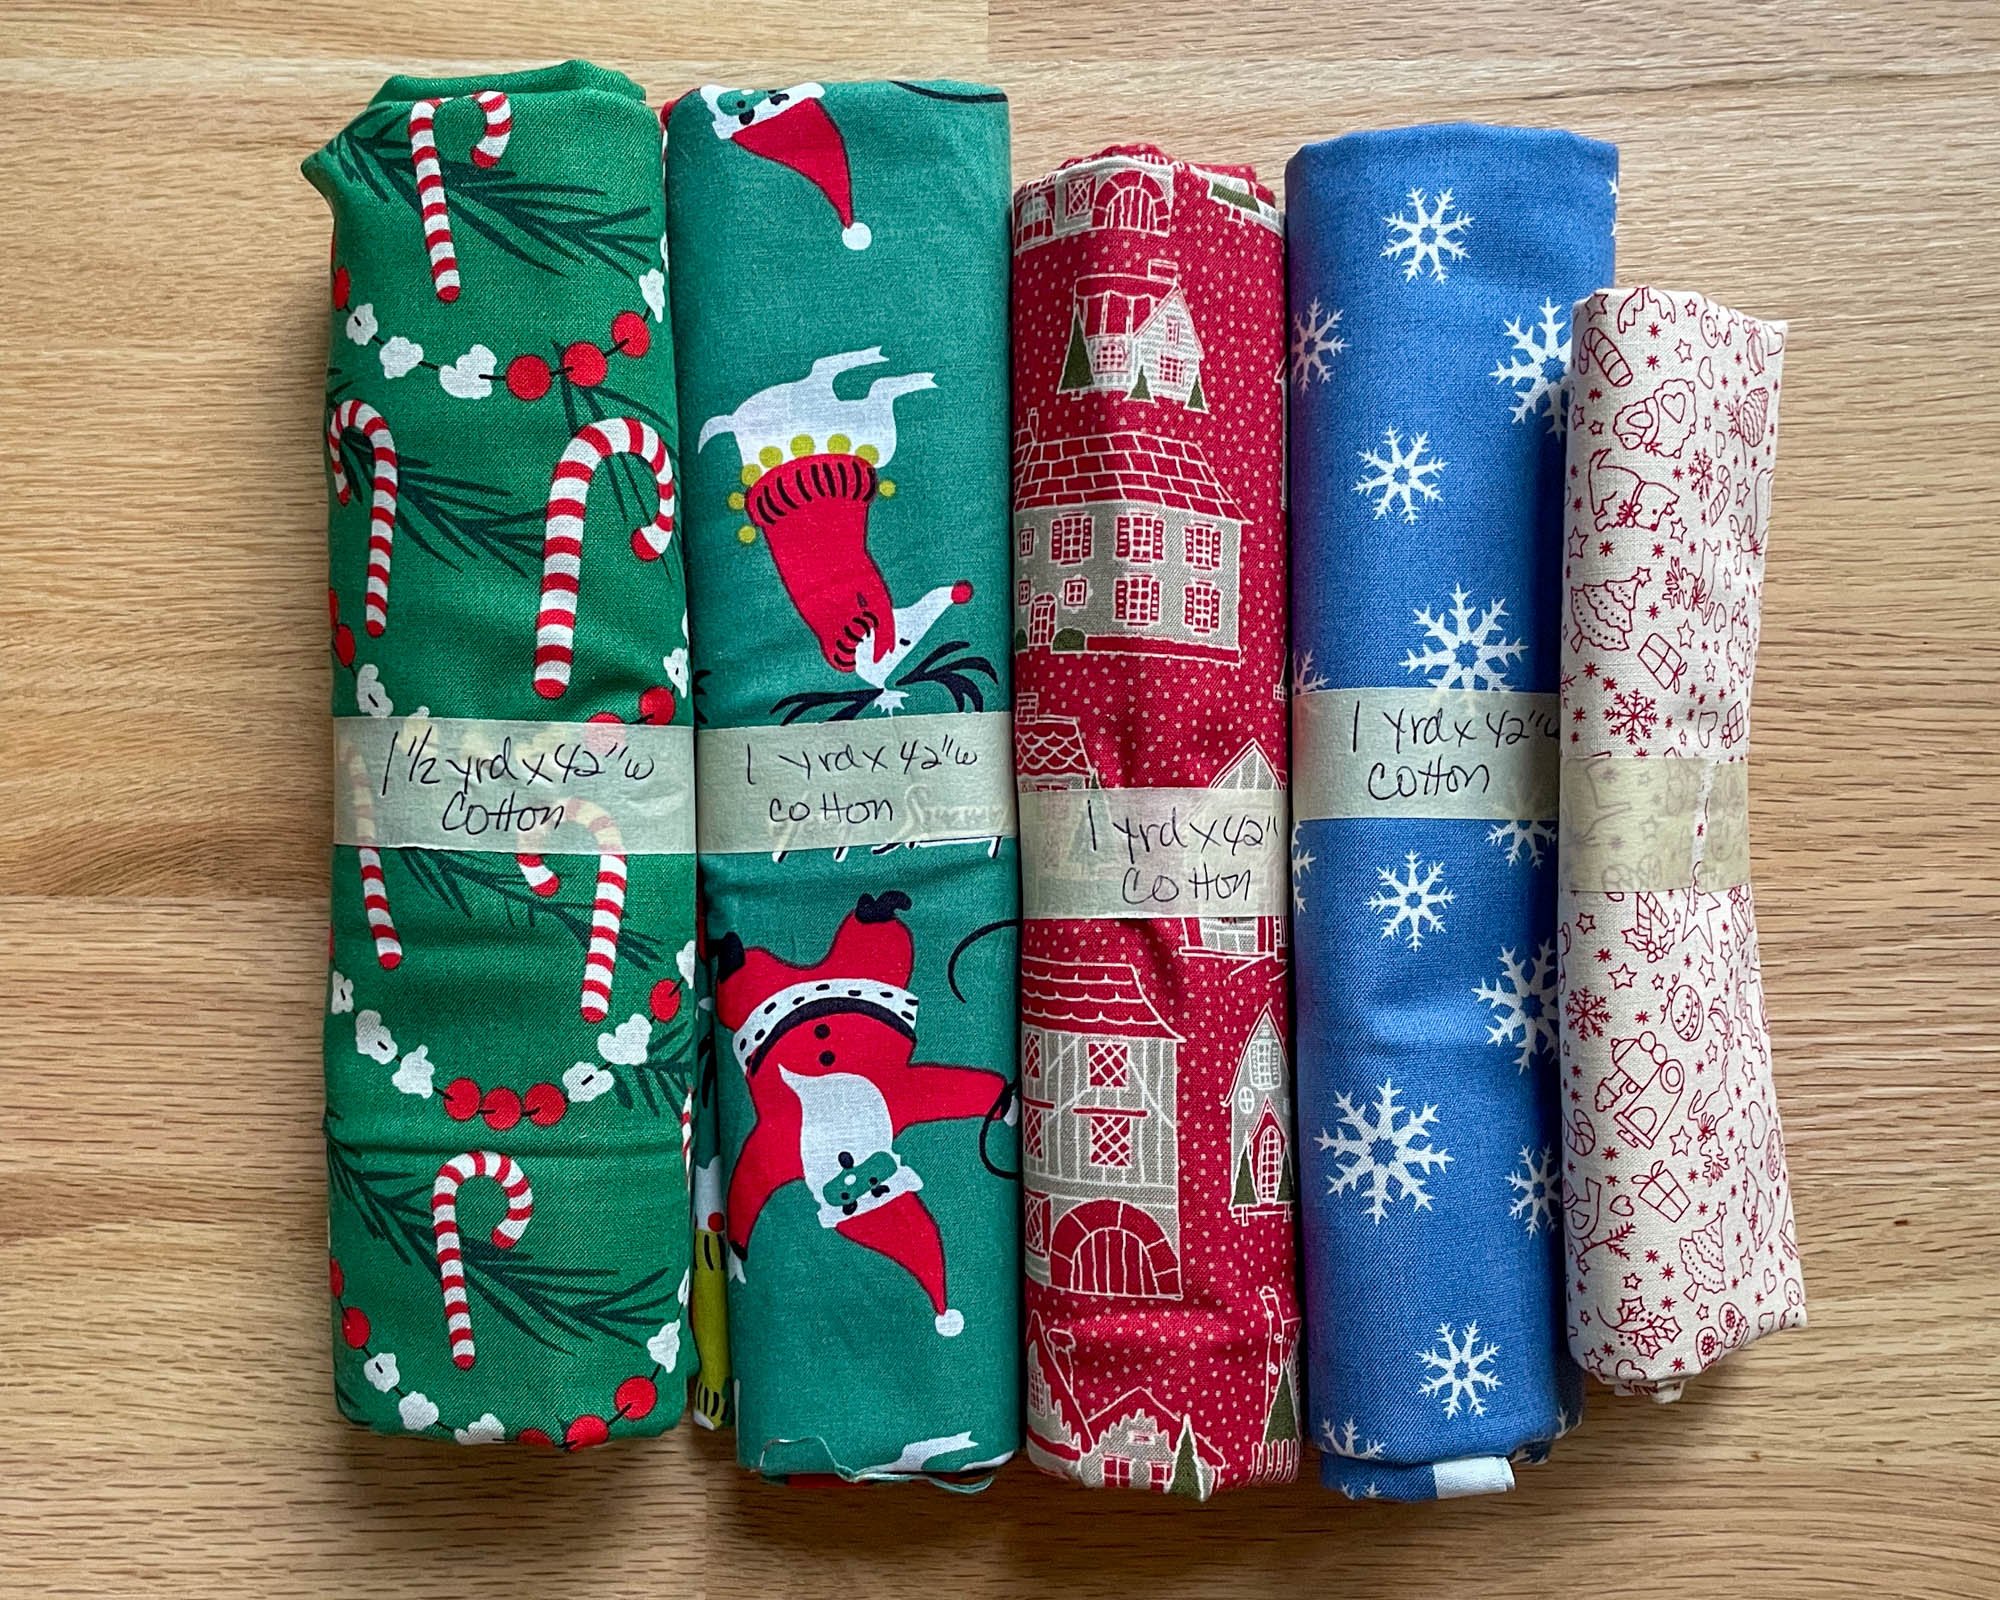
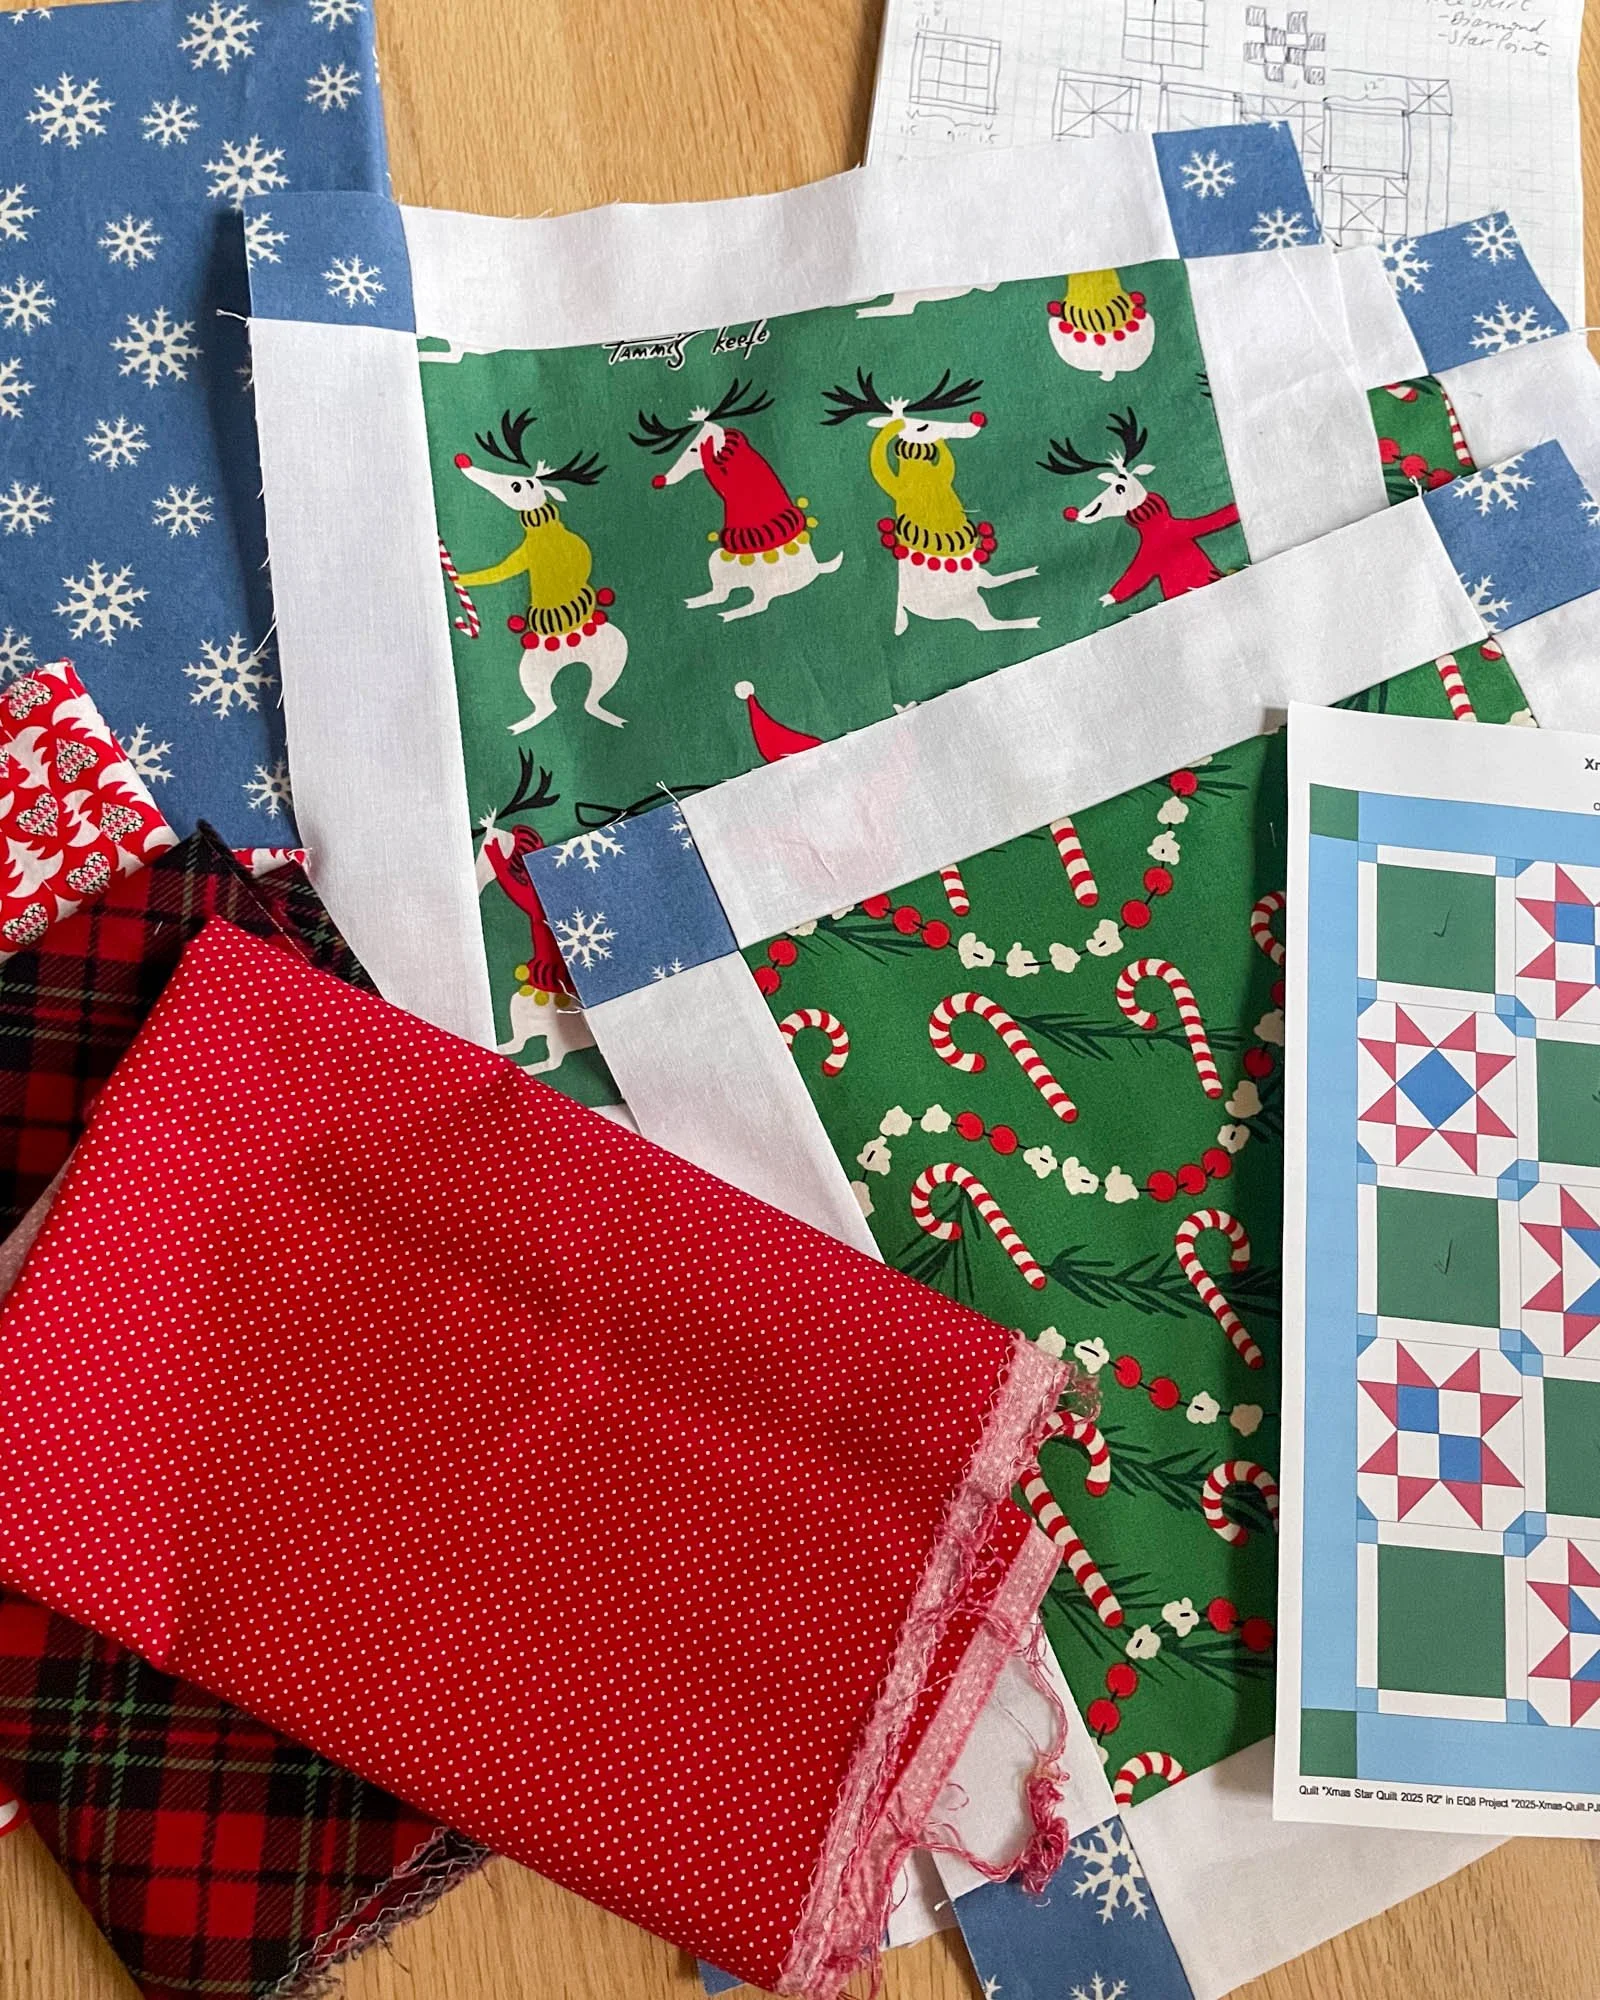
But back to this quilt! Let's start with the fabric. At the thrift store, I bought two dark green fabrics with directional prints (one yard and 1.5 yards respectively) and one yard of a medium blue fabric with white snowflakes. These fabrics are more cool toned than warm so I decided to pair them with white background fabric and cool-toned reds from my stash. I think the colors do go well together. When taking photographs, the green fabrics often show up much darker than they appear in real life. And that had me questioning whether the contrast was too much.
Something that I learned early on with patchwork is that if you want the shape of the design to show up, you need to have fabric with high contrast. This quilt definitely has high contrast between the colors and the white.
For the backing fabric, I purchased plaid flannel sheets. A full size was big enough that I could use the flat sheet for the backing and there's still a lot of fabric left over. I'm making pajama pants and made a few drawstring gift bags. I'm very happy with the flannel backing because it's nice and warm. For the batting, I used Quilters Dream Cotton in twin size.

DESIGN
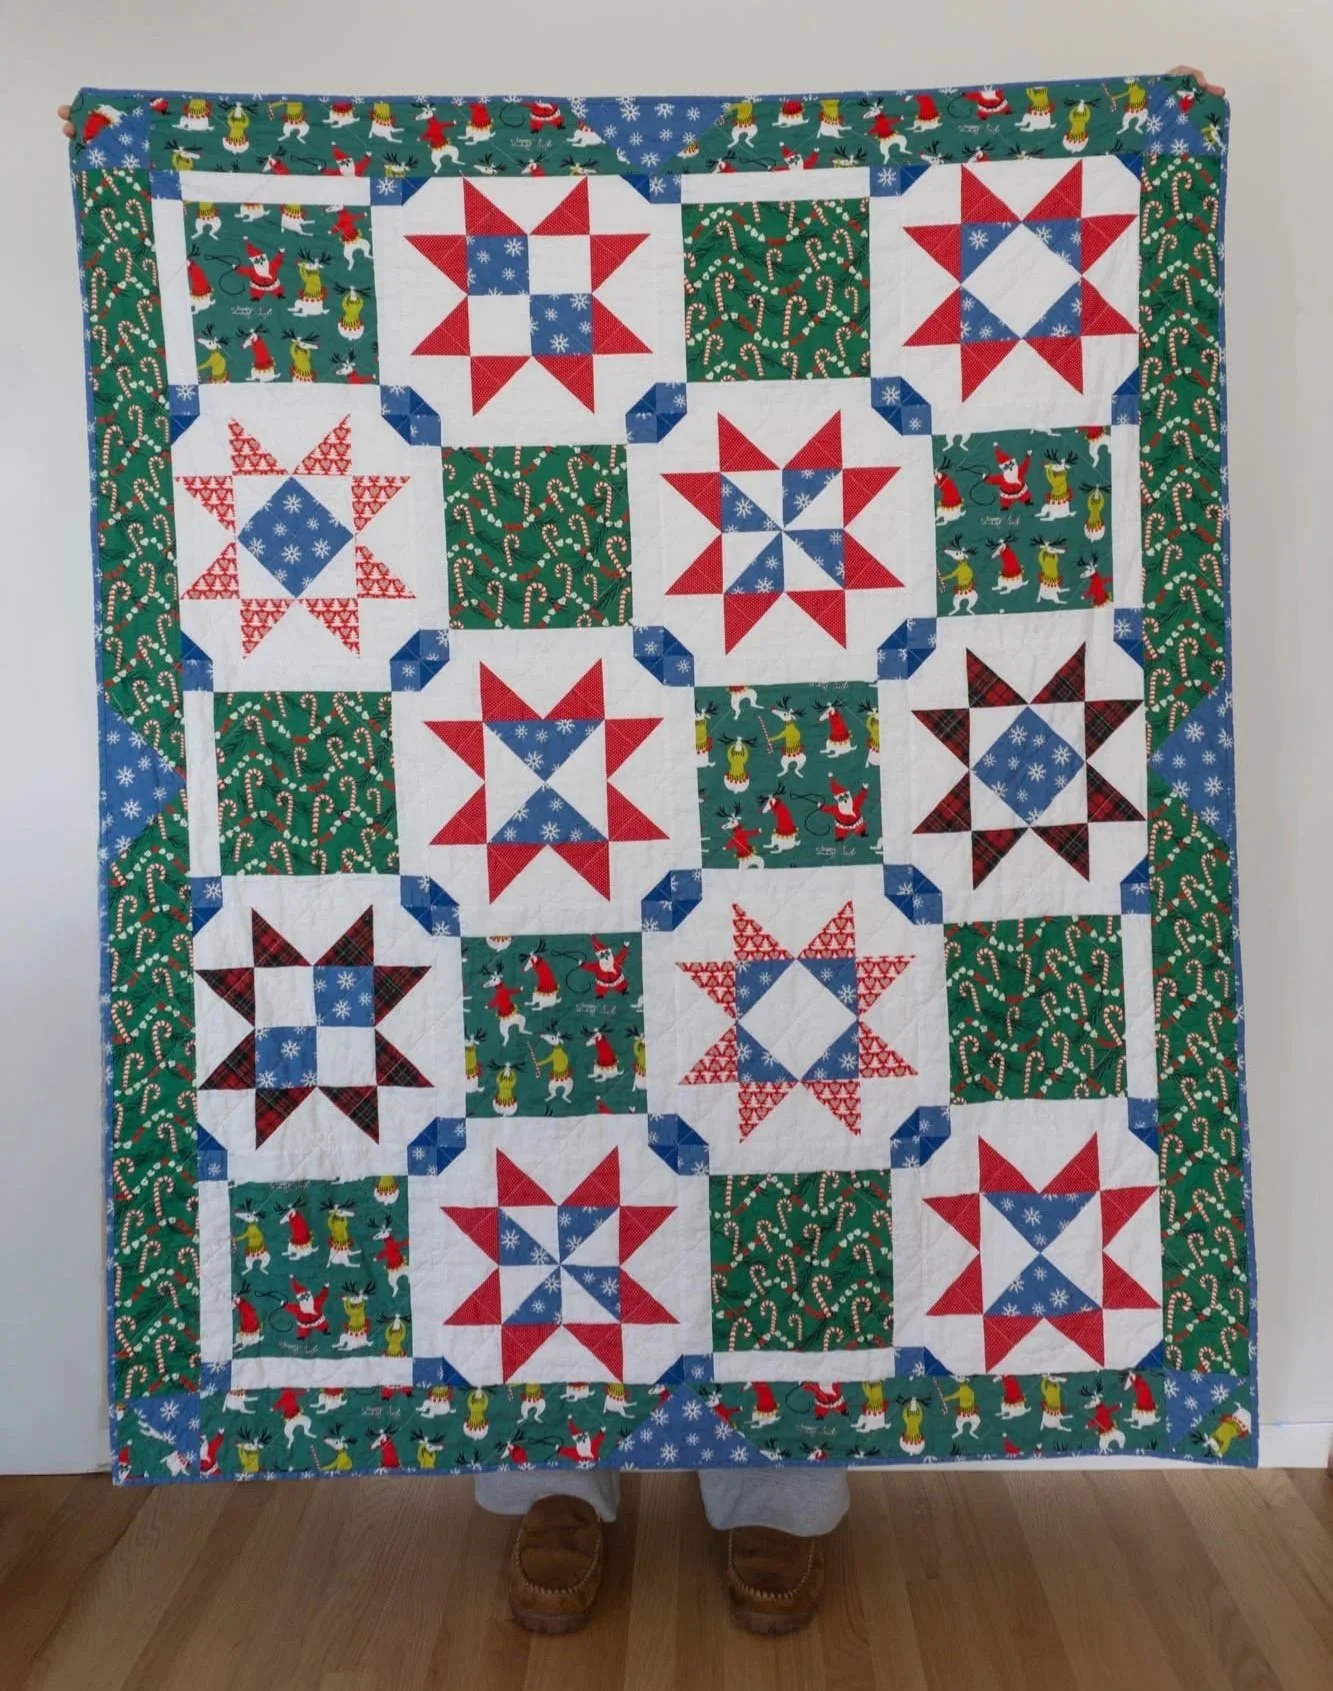
Above is my finished design using EQ8. You can see the final dimensions and swatches of the colors. My plan was to use this quilt as a lap quilt on the couch. I'm pretty tall and like to be cozy so I made it on the bigger side with a finished size of 56"x68". There are 20 blocks (each 12" square) arranged in 4 columns and 5 rows, and 4" wide borders on each side.
My first goal with the design was to make blocks that showed of the green directional print fabrics. One of them has Santa and reindeer and I wanted that fabric to be big enough to show off the design. I decided to make the finished blocks 12" by 12" square. For the green fabrics, I made an uneven nine-patch style block with a big center square (finished size 9" square) and smaller borders (finished size 1.5" wide). There are 10 of these green uneven 9-patch blocks.
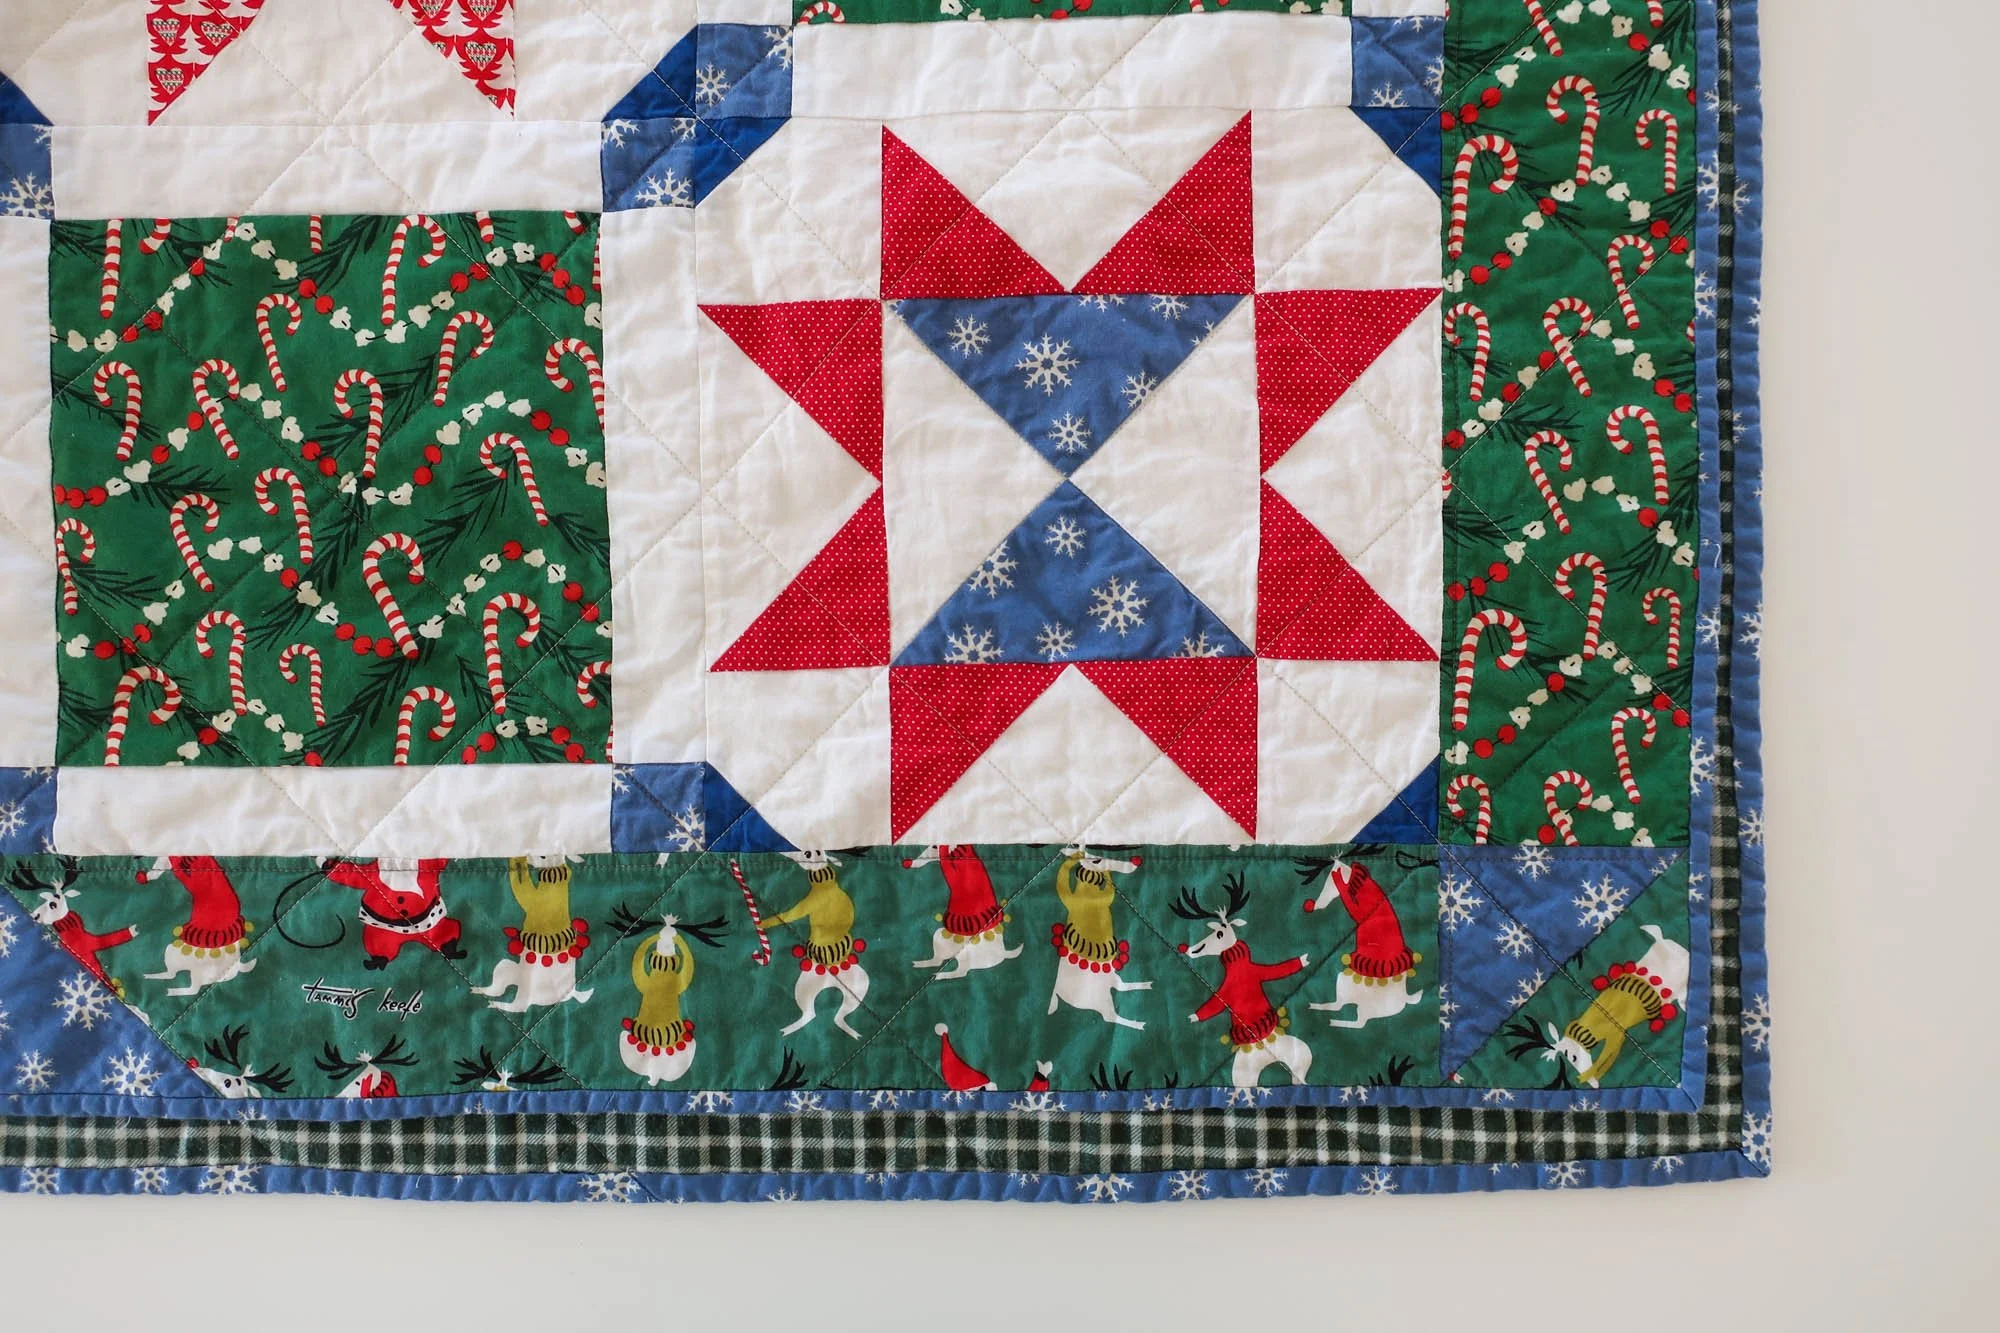
Next, I wanted to have some variety to the quilt so I decided to make Sawtooth Star blocks with different designs in the center. Each of the points of the star are made with red fabric and the centers are pieced with the blue snowflake fabric and solid white. I love the variety in this quilt but doing all of those different designs did take a lot more time. There are 10 star blocks and 5 different interior designs (each one is used twice).
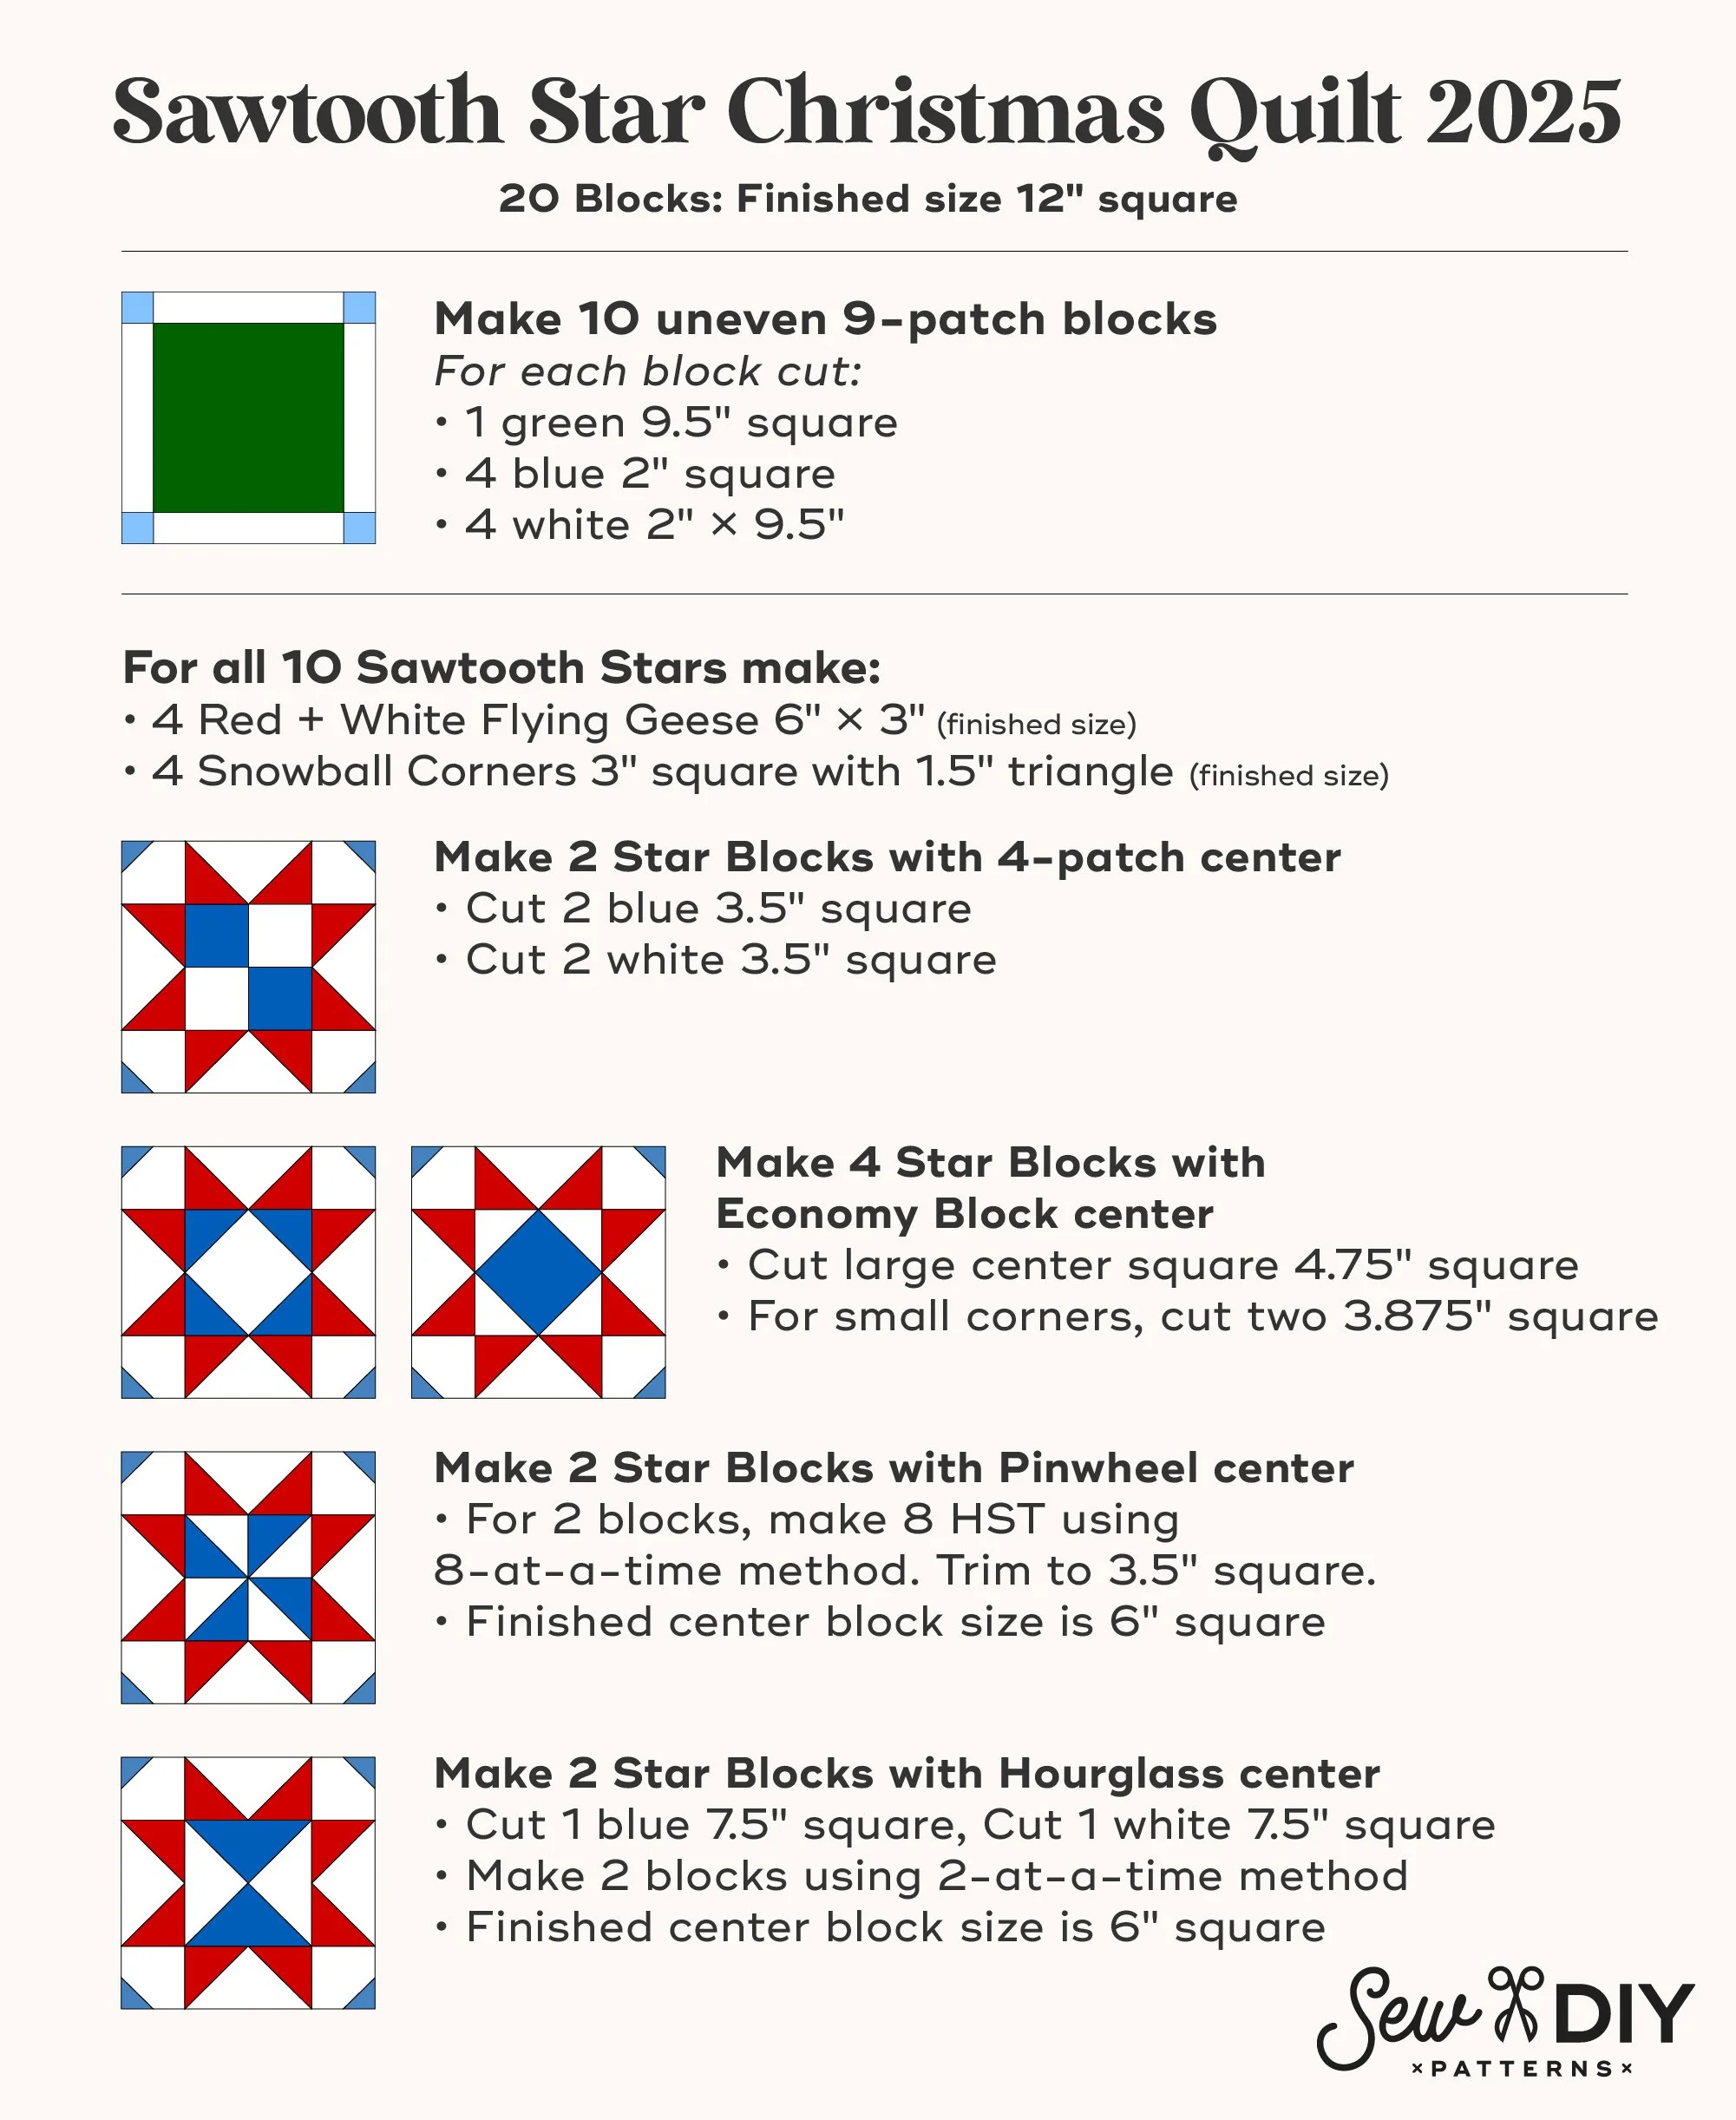
Above is a rough outline of the blocks used for the center of quilt. The finished size of each block is 12” square. First, I made 10 blocks featuring the green fabric in what I’m calling an uneven 9-patch.
For each uneven 9-patch you need to cut:
1 green 9.5" square
4 blue 2" square
4 white 2" × 9.5"
For every Sawtooth Star block, you need to make 4 flying geese blocks with a finished size of 6" × 3". I used this tutorial from Cotton & Joy to make the flying geese 4-at-a-time and for the directional fabric. The tutorial includes cutting measurements for the flying geese.
For the centers of the Sawtooth Stars, I made 4 different block designs. The center of the star blocks needs to be 6” square when finished.
Make 2 Star Blocks with a 4-patch center. For each block:
Cut 2 blue 3.5" square
Cut 2 white 3.5" square
Make 4 Star Blocks with an Economy Block (aka Square in a Square) center
For the Economy Blocks, I used this tutorial from Quilting Jet Girl and made two with a white center and two with a blue center.
Cut large center square 4.75" square
For small corners, cut two 3.875" square
Make 2 Star Blocks with a Pinwheel center
I used this tutorial from Hailey Stitches to make 8-at-a-time half square triangles. For this block you’ll need HST that are 3.5” square. The 8 HST can then be used to make TWO pinwheel blocks.
For 2 blocks, make 8 HST using 8-at-a-time method. Trim to 3.5" square.
Make 2 Star Blocks with Hourglass center
I used this tutorial from Hailey Stitches to make two Hourglass blocks at one time.
Cut 1 blue 7.5" square, Cut 1 white 7.5" square
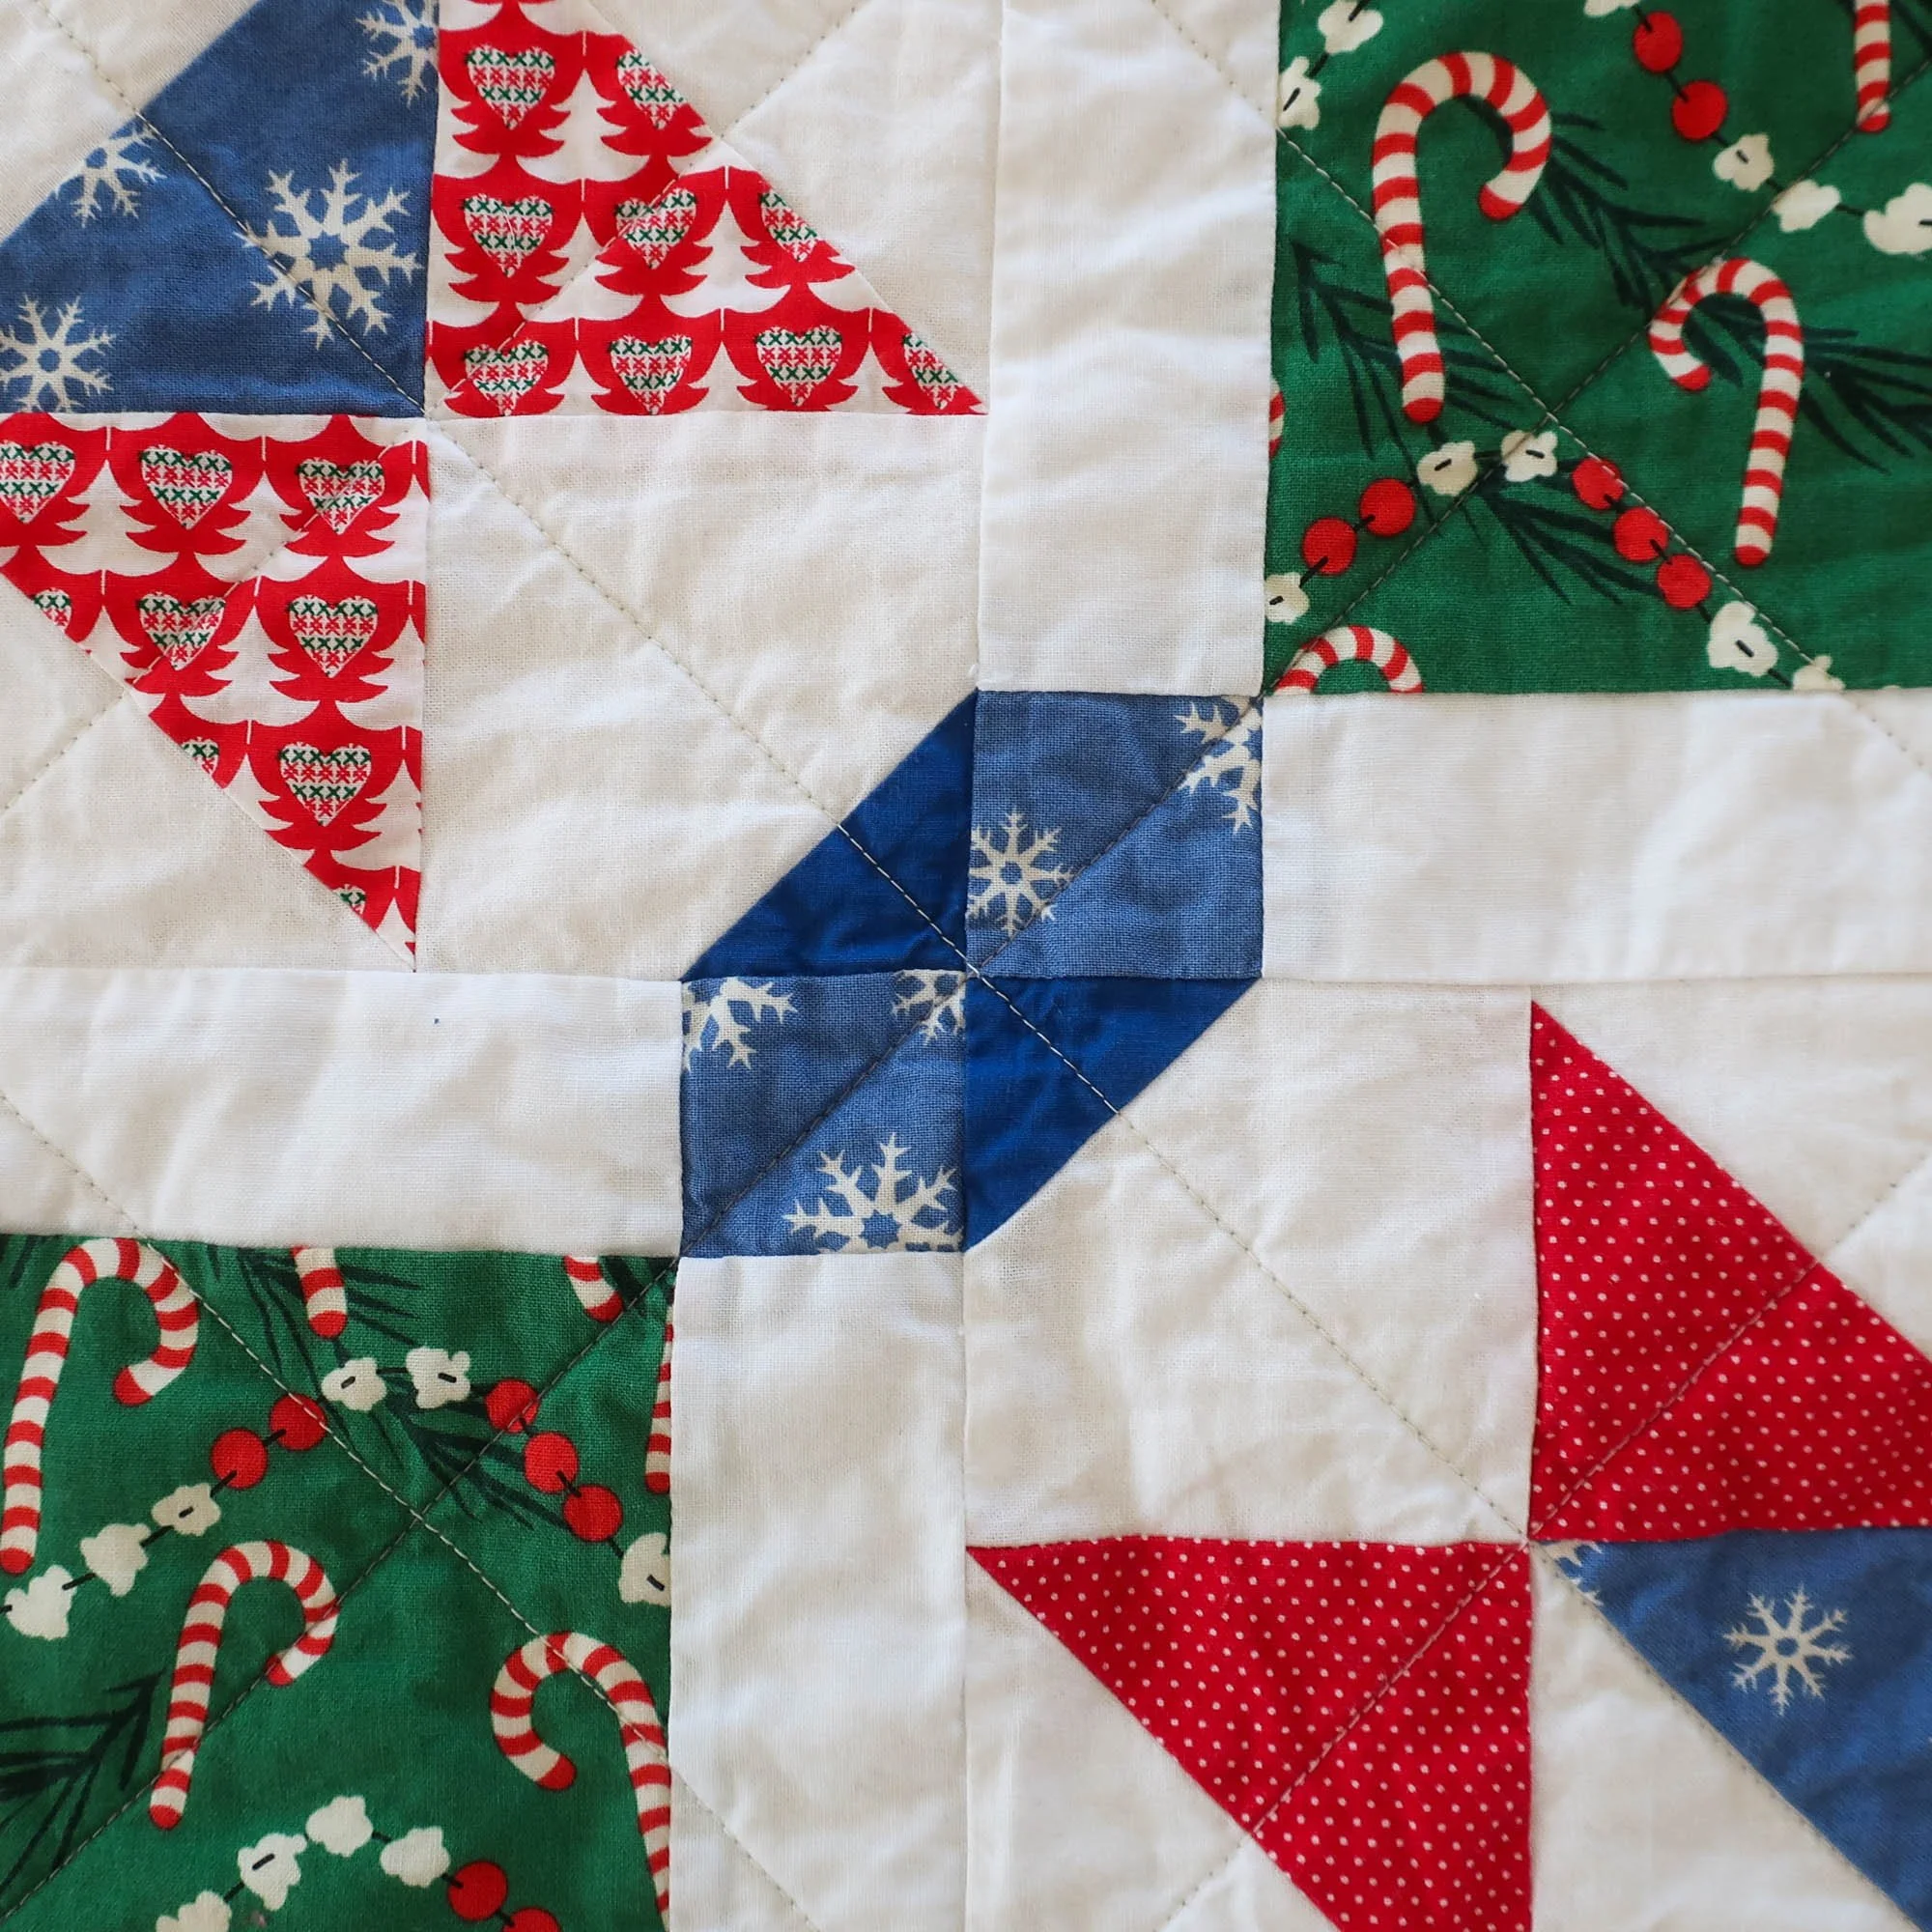
To be extra fancy, the corner of each Sawtooth Star block has a little triangle sewn into it. When all the blocks are sewn together, the triangles align with the corner squares in the green blocks to create diamonds. I am rather proud of this design element.
These square blocks with a triangle in the corner are sometimes called Snowball blocks. For these, I cut the white corner squares 3.5” x 3.5”. For the blue triangles, I cut blue squares 2” x 2”. I aligned the raw edges in the corner and stitched down the diagonal of the small blue square. I didn’t do any squaring up and (thankfully!) they aligned really well with the other blocks.


PIECING
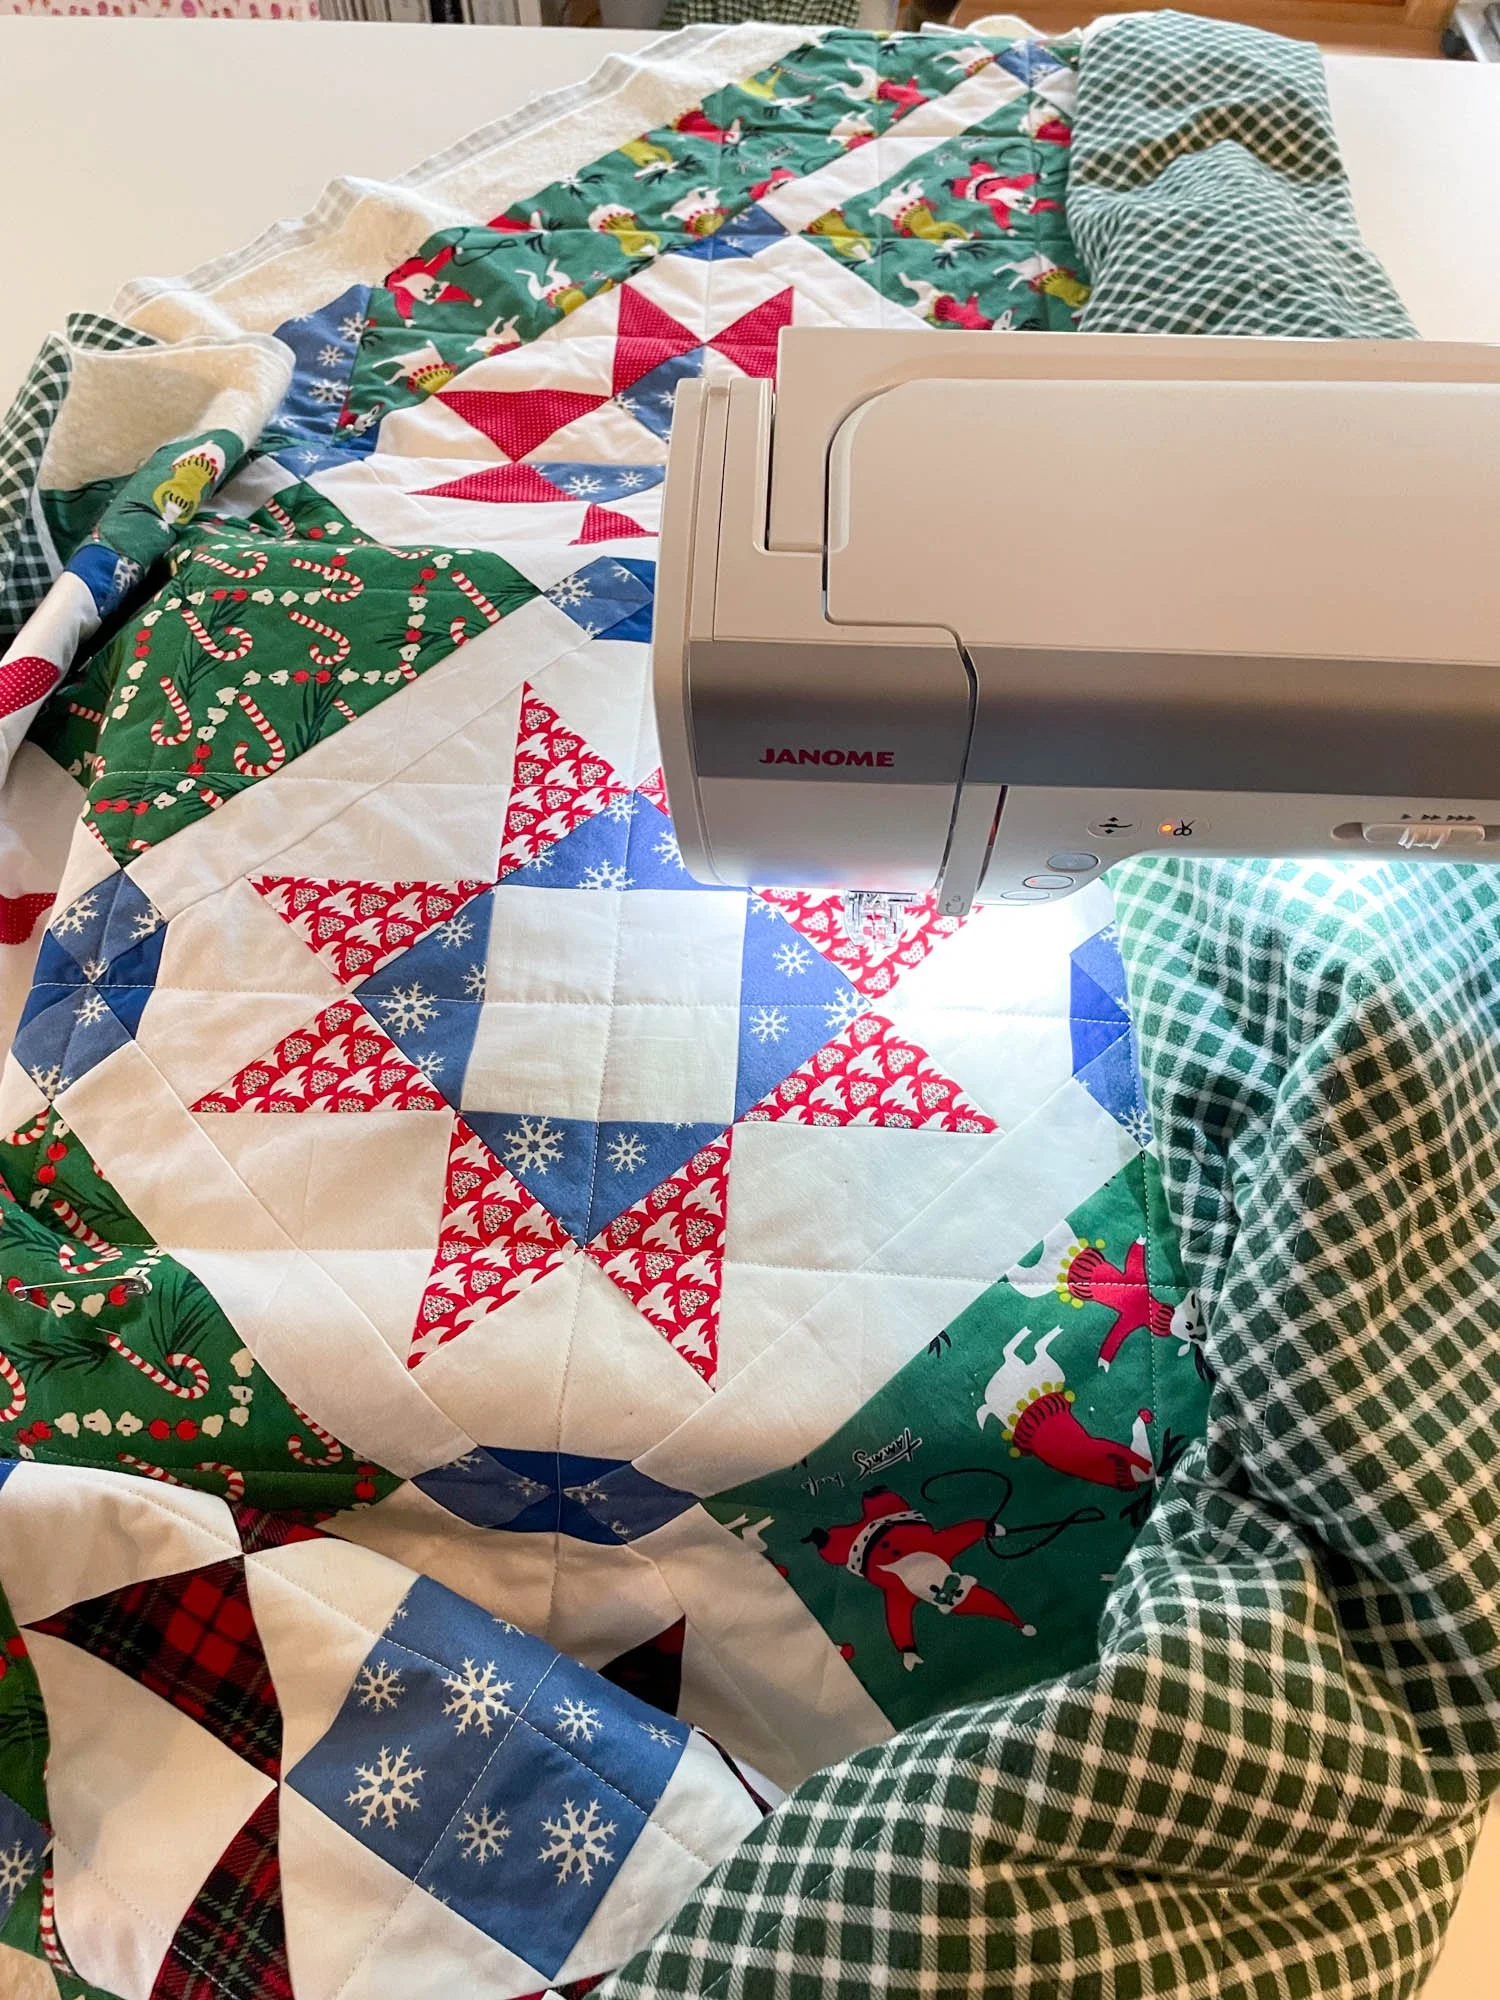
Assembling the 9-patch style blocks was really quick and easy. The Sawtooth Stars took a bit more planning, cutting and stitching and probably 4 to 5 times the amount of time. After sewing the 20 blocks, I decided on a layout and sewed them together to form the center of the quilt.
And only then did I design the borders. I still had a lot of green fabric left so the borders are cut mostly from the green. The corners are 4" half square triangles using the snowflake print and the reindeer print. For each border, I pieced a snowflake triangle pointing in to the center. I had to be pretty careful cutting these pieces because the fabric is directional but it all worked out.
QUILTING
I pin basted the quilt layers together and quilted using my Janome Memory Craft. I set my machine up on my cutting table so that I had more room for the quilt and could stand while sewing. I did the quilting over the course of a couple days and my body was really tired by the end! I decided to do diagonal stitching lines, about 4" apart. The lines that go through the green blocks are stitched with gray thread and the rest with white thread. Mostly, I used a hera marker to mark the stitching lines.
BINDiNG
I used the blue snowflake fabric for the binding. I cut 2.25" bias strips and then pressed the strips in half. From the right side of the quilt, I machine stitched the raw edge of the binding to the quilt. Then I pressed the binding to the wrong side and stitched down the folded edge by hand.
CONCLUSION
I have washed the quilt and it has a nice crinkly look to it now. I did pre-wash my fabrics too btw. Overall, I'm really happy with how the quilt turned out and I'm looking forward to using it for years to come. The flannel backing makes it extra cozy and warm. I was really obsessed with making this quilt and finishing it before Christmas. And while I was successful and I enjoyed making it, I didn’t do my usual holiday baking and movie watching. In retrospect it felt like a less festive season because I was sewing. BUT, I really love being in the flow with a project. Just something that I noticed.
If you decide to make something similar, I’d love to hear about it. And let me know if you have any questions. Happy sewing!


