Dana Jumpsuit Tester Roundup

Dana Jumpsuit Tester Roundup

One of the most essential steps of pattern testing is testing the pattern, to test both the instructions and the actual pattern pieces. I have so much gratitude for all of my testers and their willingness and enthusiasm to try out a new pattern. The Dana Jumpsuit is my most complicated pattern and most “out there” design to date so it was really exciting to see people sew up their jumpsuits and love them as much as I do. So, today I’m sharing a few photos from my group of amazing testers. Hopefully, you will be as inspired by them as I have been.

How to select your size of the Dana Jumpsuit

Today, I’m sharing some tips for how to measure yourself and select your size of the Dana Jumpsuit pattern. First, I’ll show you how to measure yourself, and then we’ll take a look at the size chart and go through the process of selecting your size. Watch the video above for lots of details, plus some light comedy when I attempt to measure my torso with a too short measuring tape.

How to calculate your SBA/FBA

Your "Sewing cup size” is the difference between your upper bust and full bust measurements.

1” difference = A cup

2” = B cup

3” = C cup

4” = D cup

5” = DD cup

etc.

For example, if your upper bust is 35” and your full bust is 39”, then your sewing cup size is a D cup.

This pattern is designed for a C-cup. If you are an A or B cup, I recommend doing a small bust adjustment (SBA). If you are a D cup or larger then I recommend doing a full bust adjustment (FBA). If you are a D-cup, you may be able to get away without doing an FBA.

How to calculate torso length

How to determine torso length adjustments

In our example, we have a torso measurement of 75” and the finished measurement for our size is 75.5”. I recommend having at least 3” of torso ease so we’ll need to add 2.5” to the finished garment to get a comfy fit. When you add torso length, you’ll add it evenly to the front and back so we’ll want to add 1.25” in length to the torso. Your personal proportions will determine if you need to add (or subtract) length to the bodice or to the crotch depth. For help altering the crotch depth, check out this post.

Need more help sewing the Dana Jumpsuit?

I’ve developed an online video sewalong (e-course) that takes you through all the steps of making the Dana Jumpsuit from selecting your size and making fit adjustments to sewing an invisible zipper and neckline facing. Along the way, you’ll get all my tips and tricks for getting great sewing results, as well as additional insights into the design and how to make it work for you. You can learn more about the course here.

Additionally, I’ve pulled together a few of my existing tutorials that may be helpful while sewing this pattern. You can check out those resources here. Happy sewing!

Dana Jumpsuit PDF pattern
US$16.00

The Dana Jumpsuit is the perfect mix of sophistication and sport. Make the pants version in velvet or silk for sophisticated nighttime look or sew up the shorts length in a rayon crepe or cotton chambray for a carefree, summer romper. The front waist tie creates subtle shaping while maintaining total comfort.

This all-season jumpsuit features a dramatic front waist tie, a scoop neck, set-in elbow-length sleeves, an invisible back zipper and optional center front top stitching. Choose between a high curved or a deeper V-shaped back neckline.

This digital pattern includes an illustrated, step-by-step instruction booklet, a print-at-home layered pattern for letter or A4 size paper, a US copy shop pattern and an A0 size pattern.

Model is 5’11” and is wearing a size 12.

THIS IS NOT A PHYSICAL PRODUCT. After checkout, you will receive a link to the pattern that will be active for 24 hours after you click it. Prices are in USD.

Dana Jumpsuit Video Sewalong
US$59.00

This video sewalong will take you through all the steps of making the Dana Jumpsuit, from selecting your size and making fit adjustments to adhering interfacing, sewing an invisible zipper and attaching a neckline facing. Along the way, you’ll get all my tips and tricks for getting great sewing results, as well as additional insights into the design and how to make it work for you.

NOTE: The Dana Jumpsuit pattern must be purchased separately. You can find it here.

Who this is for?

This video sewalong is perfect for someone who wants to uplevel their sewing skills and learns well from a video format. This is an intermediate level pattern so it’s perfect for you if you’ve sewn a few beginner patterns before and would like someone to guide you through one that is a little more complicated.

How does it work?

You will receive lifetime access to 17 video sewing lessons, plus additional written and illustrated content to support the videos. This course is self-paced, so you can go as quickly or slowly as you’d like. After you purchase the e-course, you’ll receive an email with a download link. The pdf download will then give you instructions for accessing the private site with the video lessons.

LESSONS

1. Introduction to the pattern

2. How to select your size

3. How to print and assemble your pattern

4. Pattern piece review

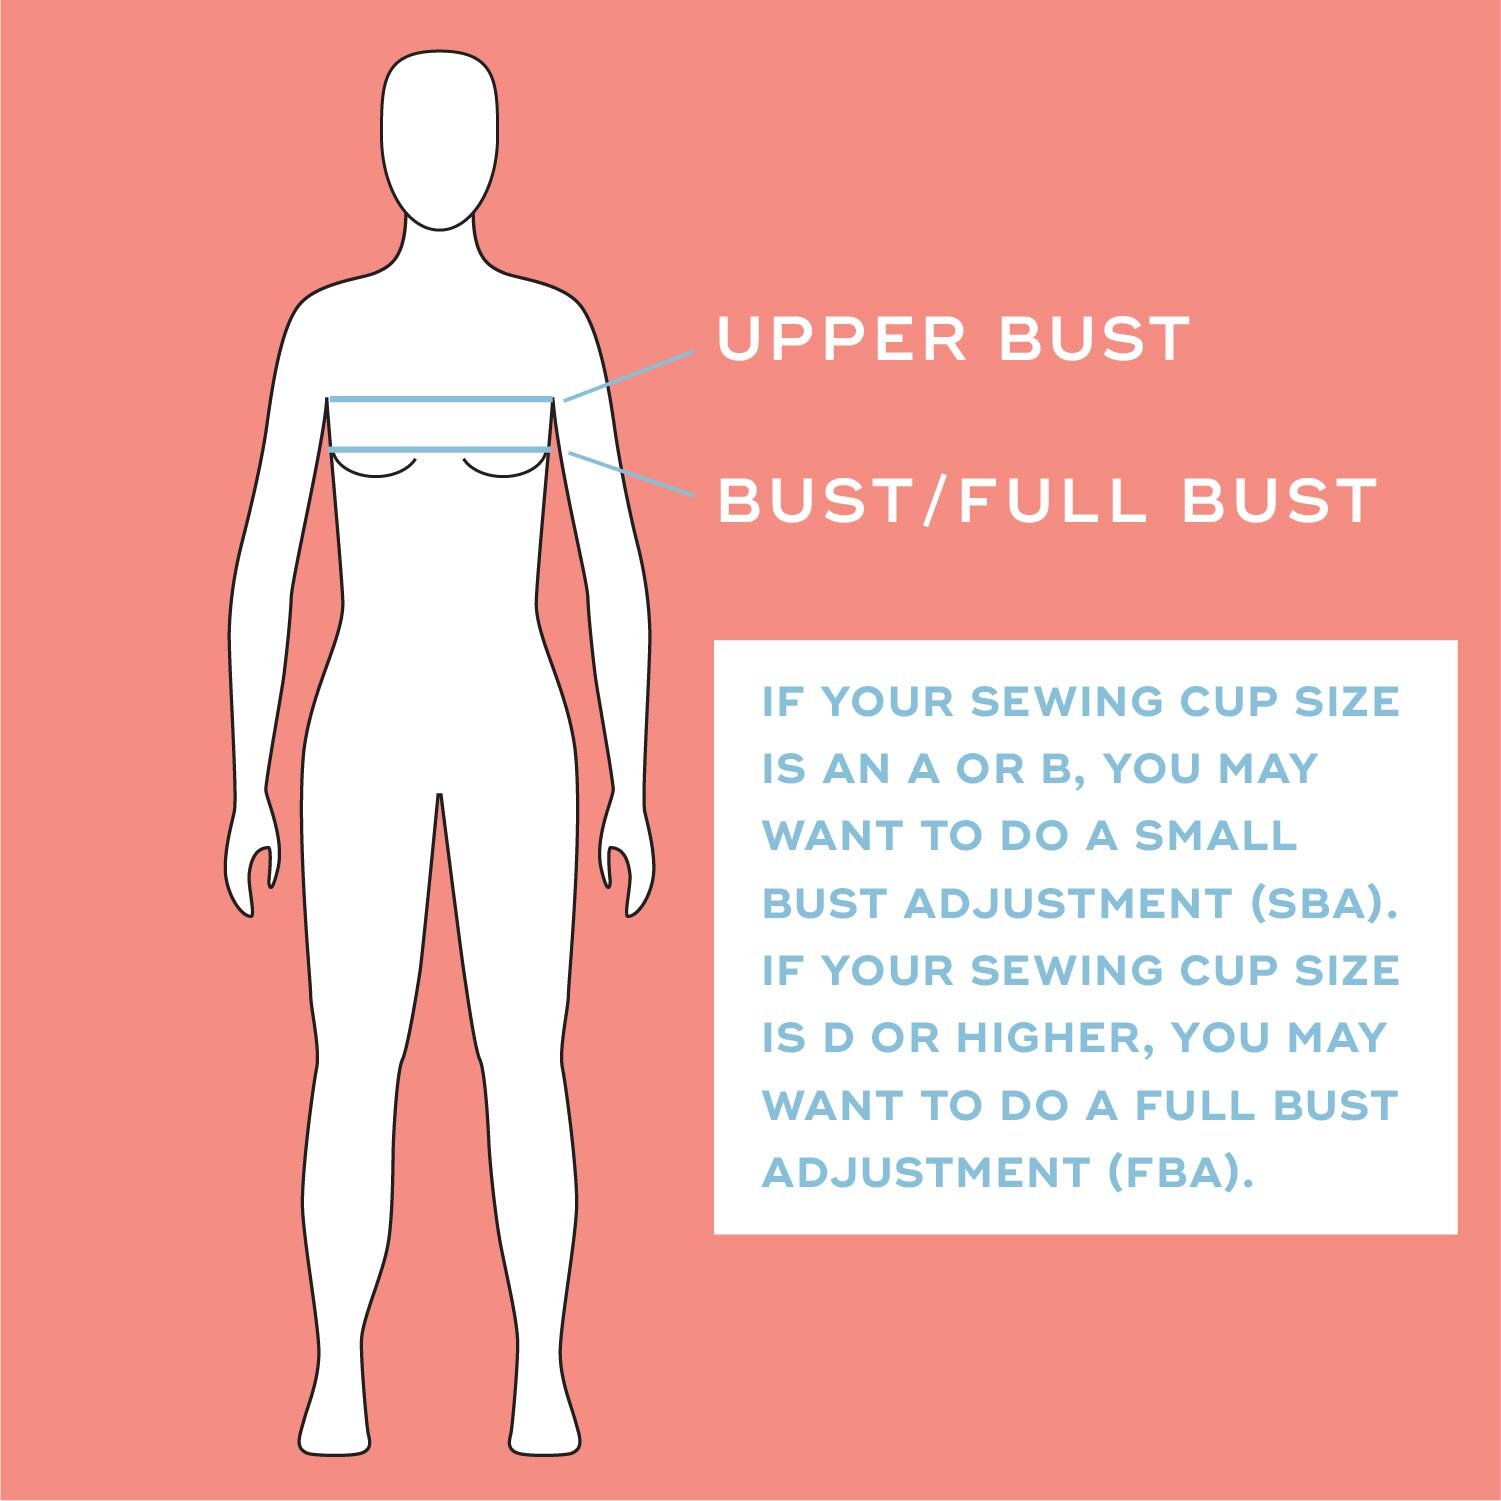
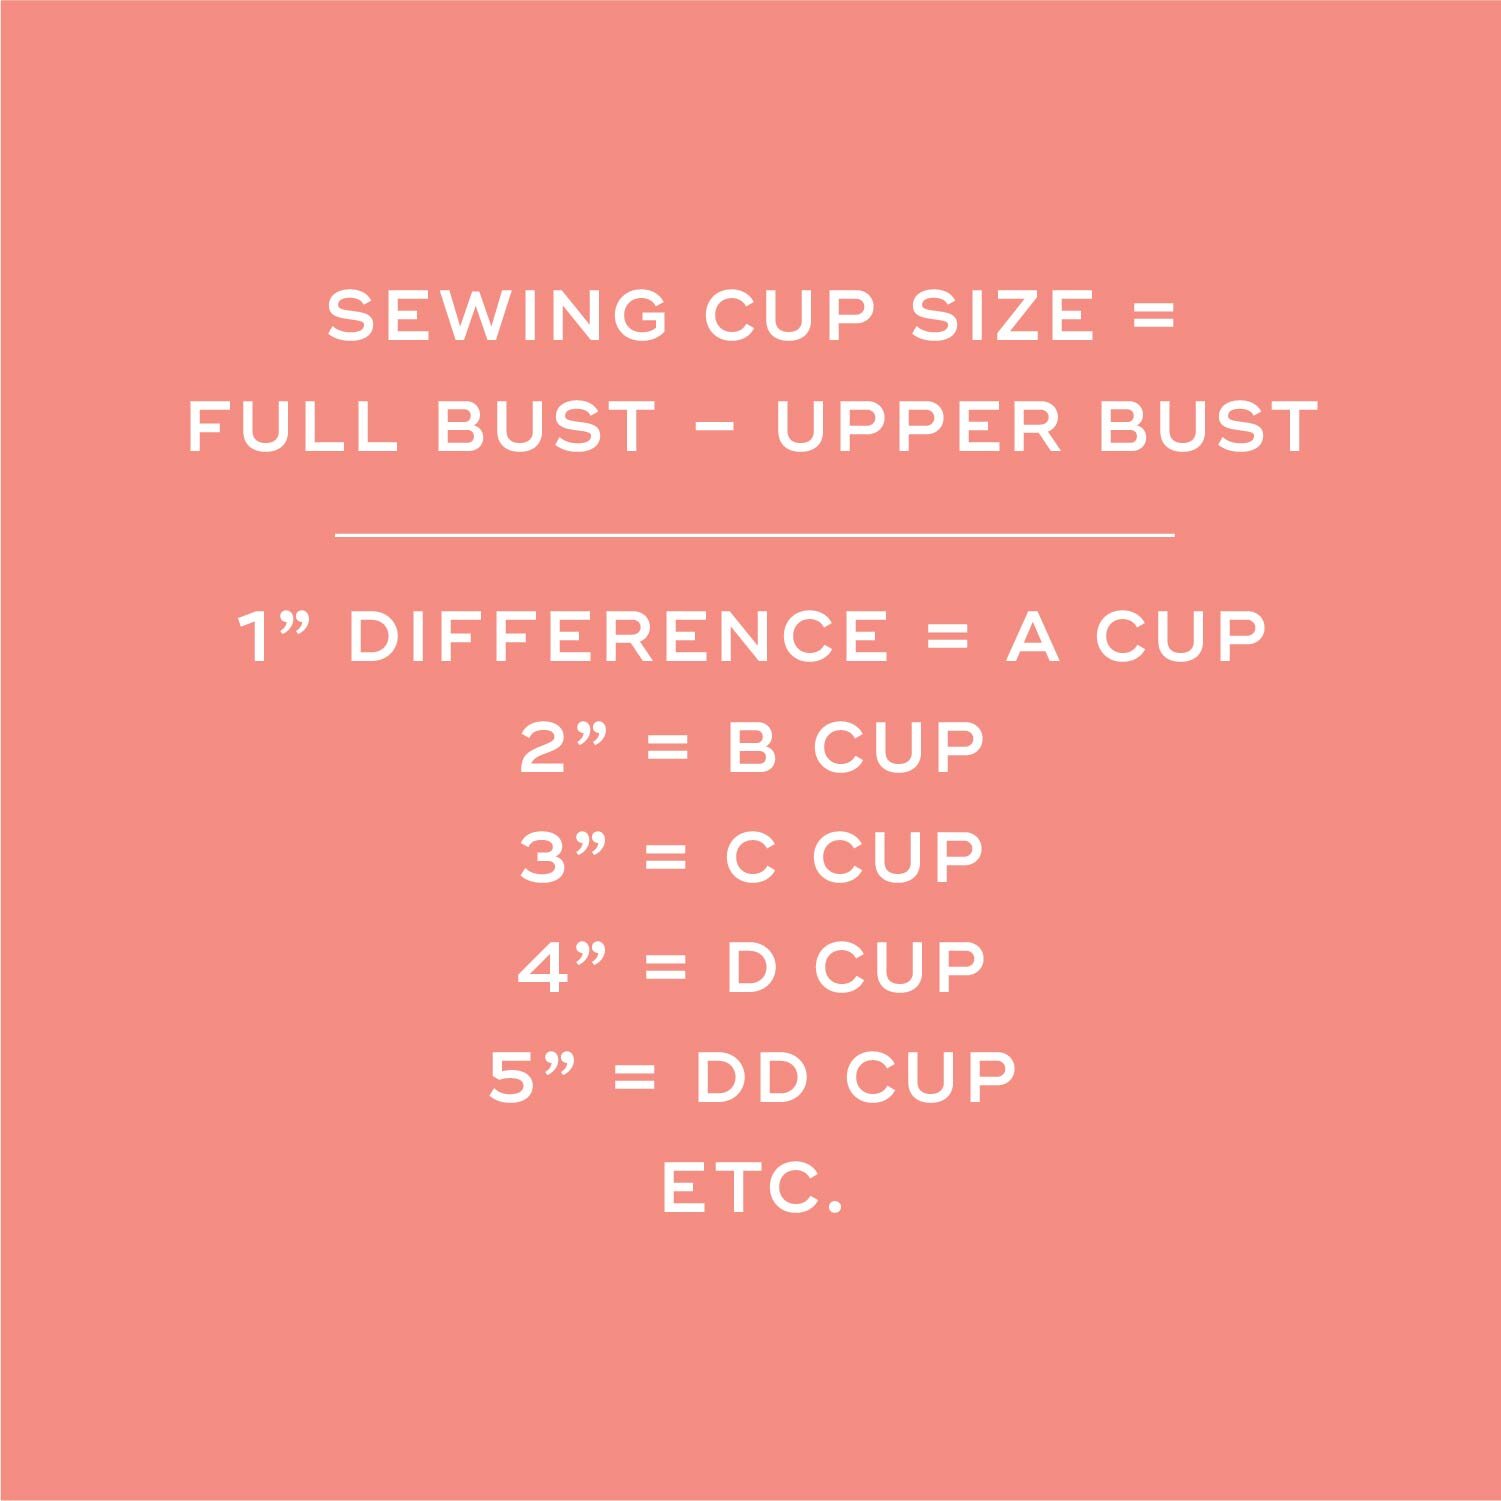
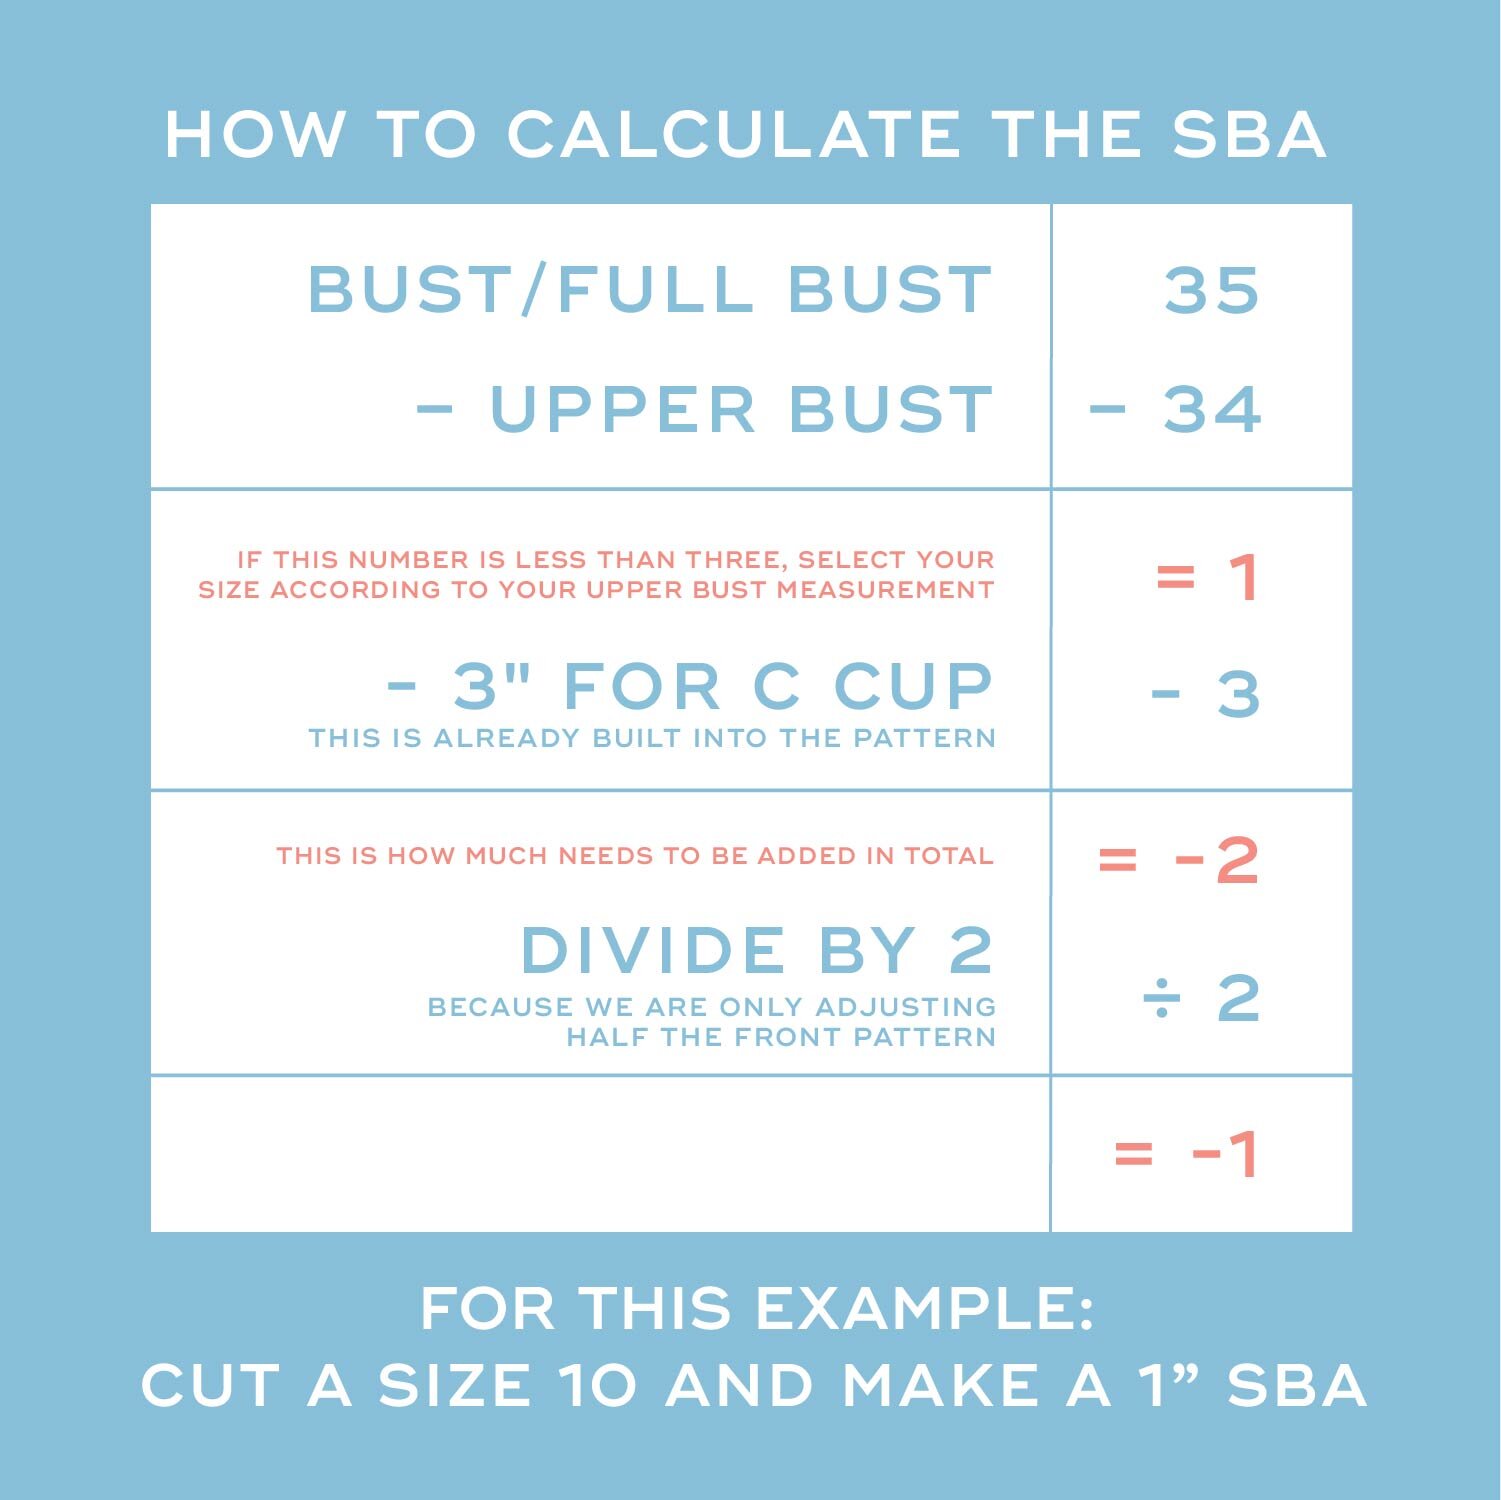
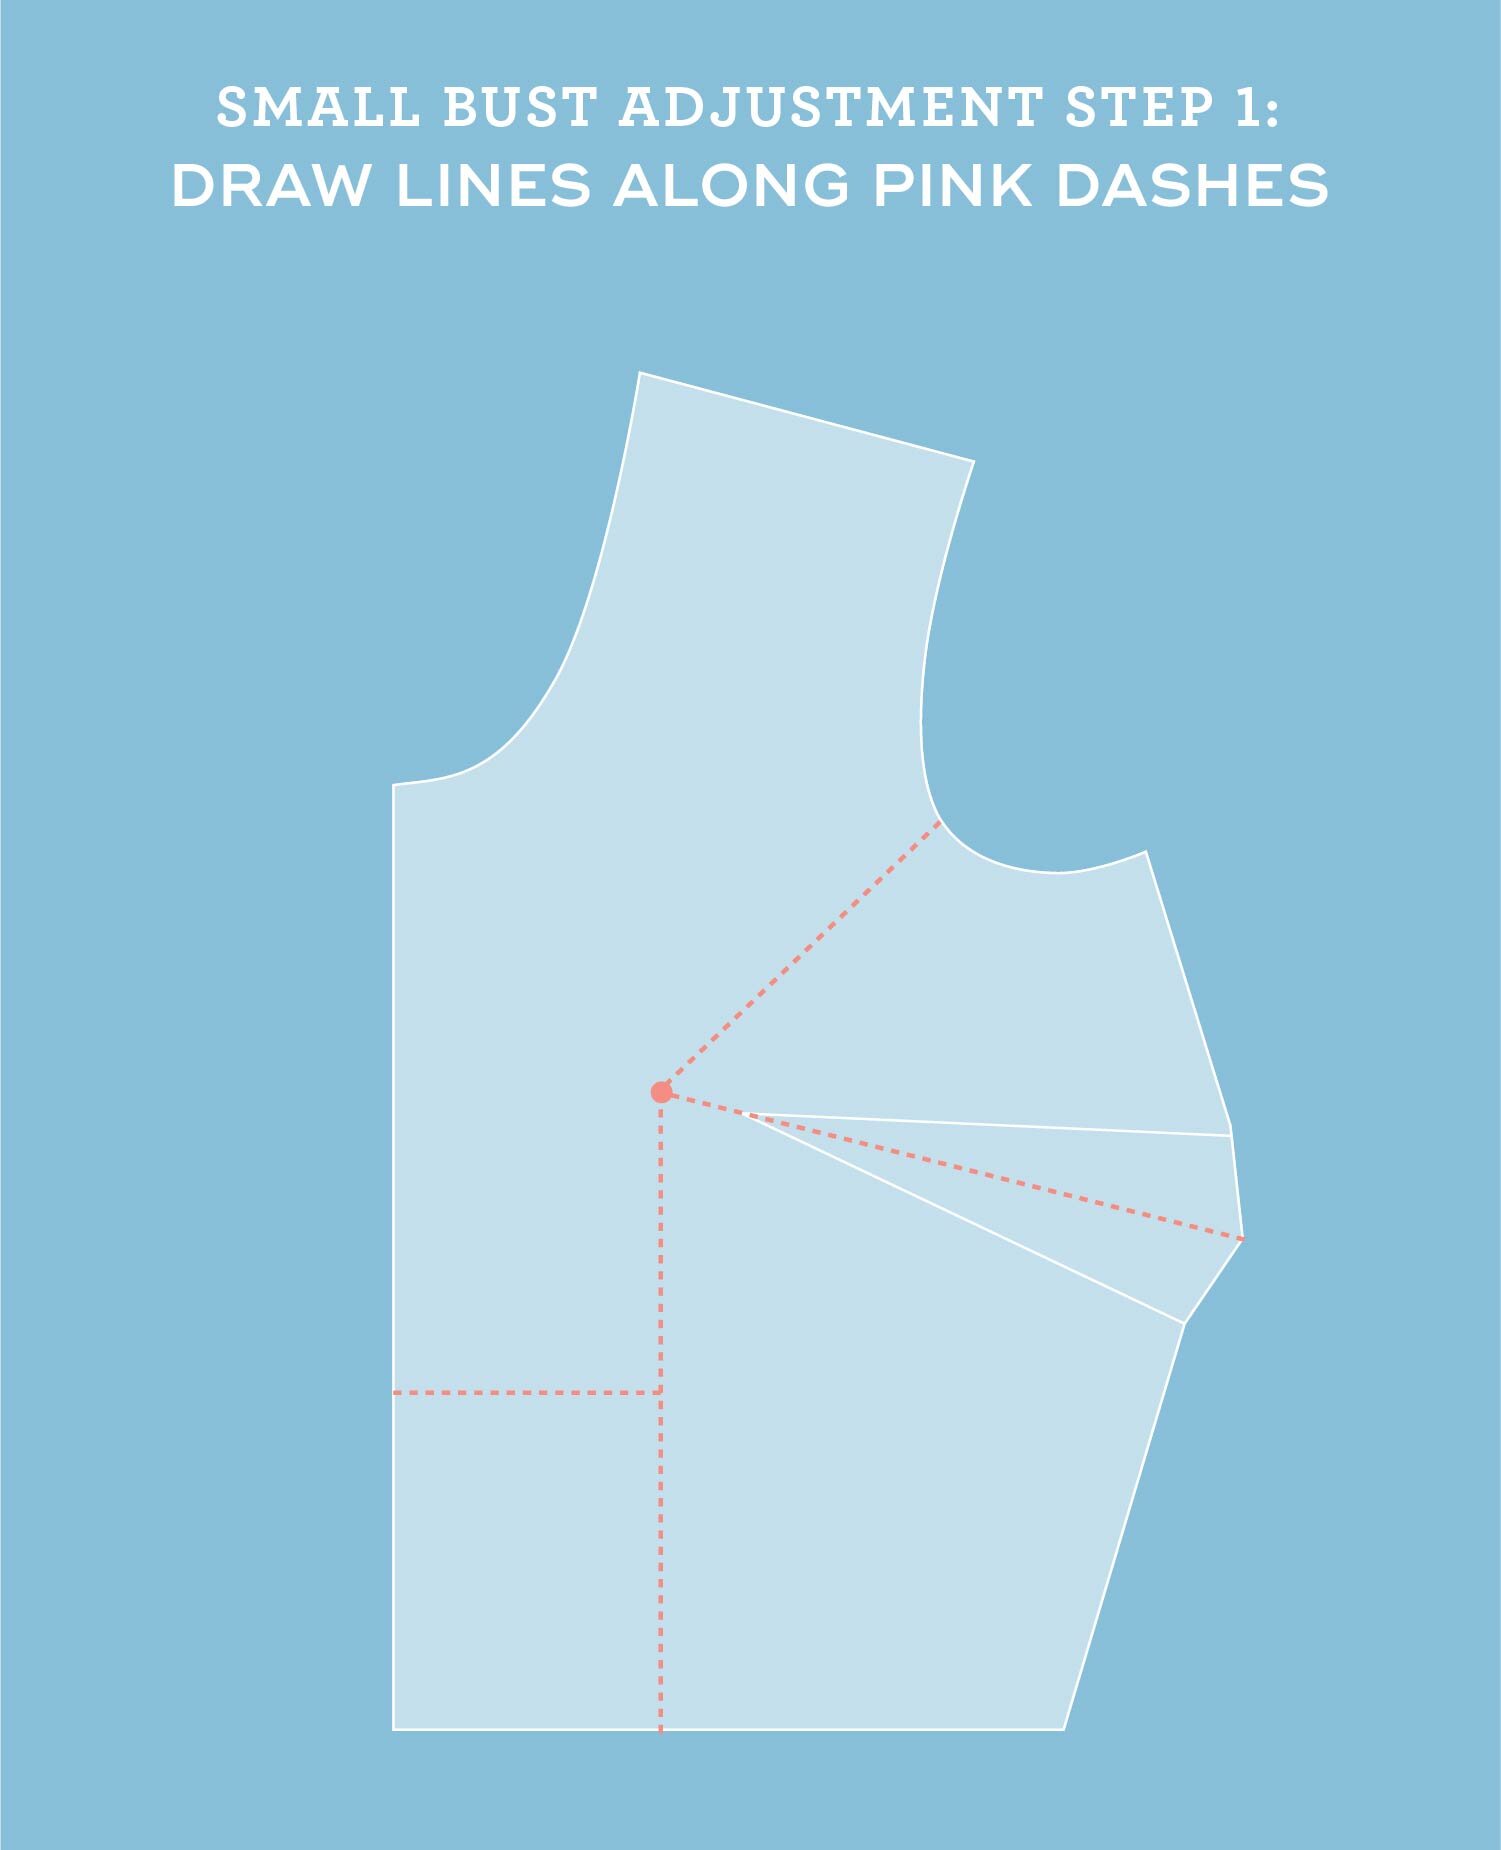
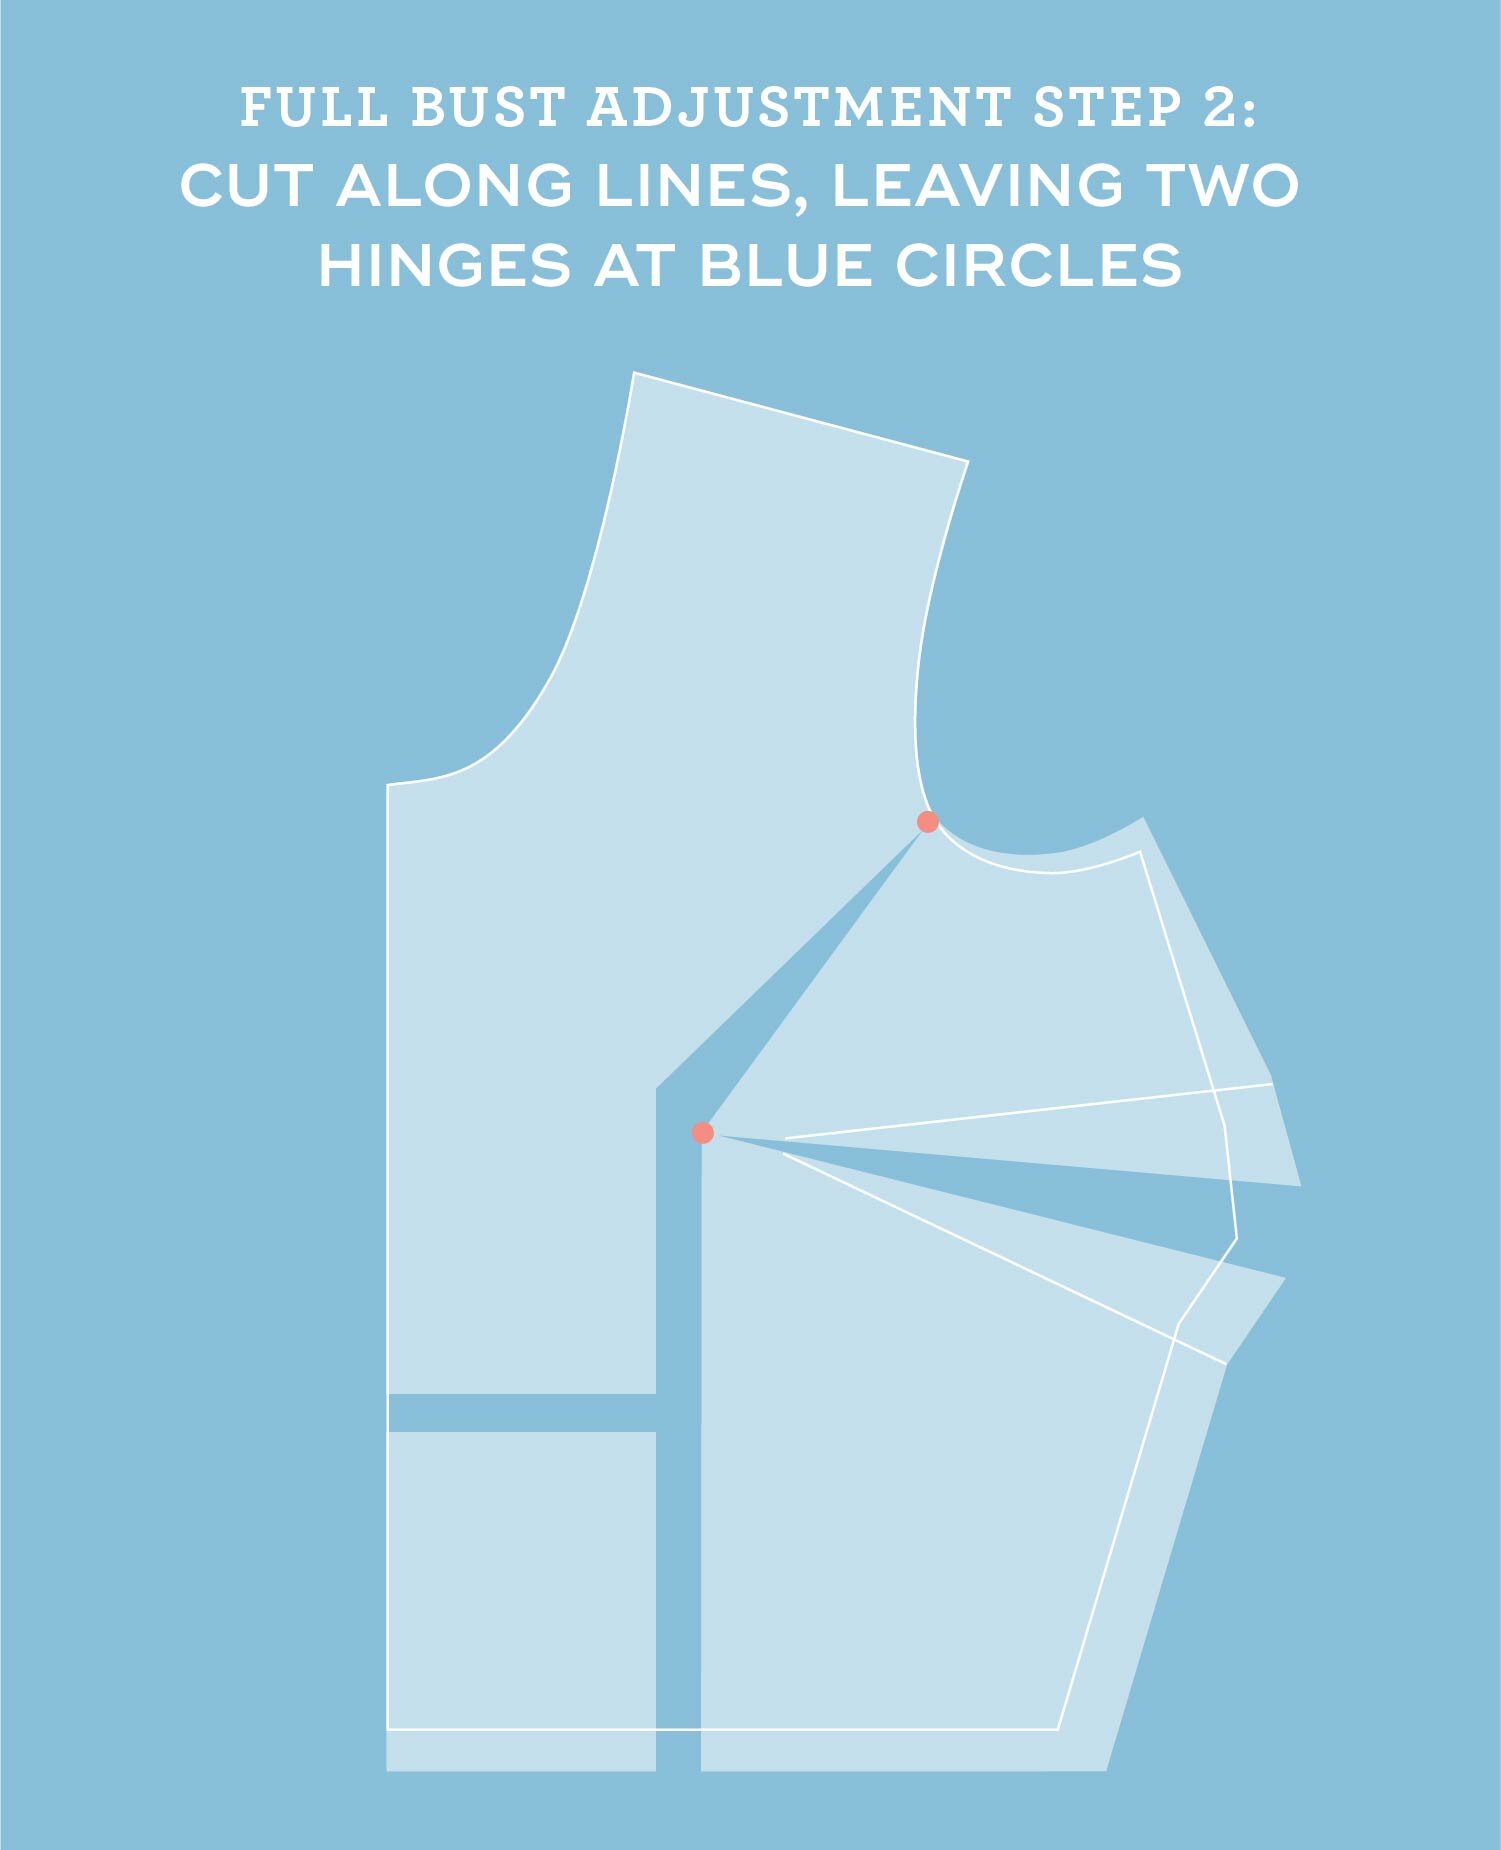
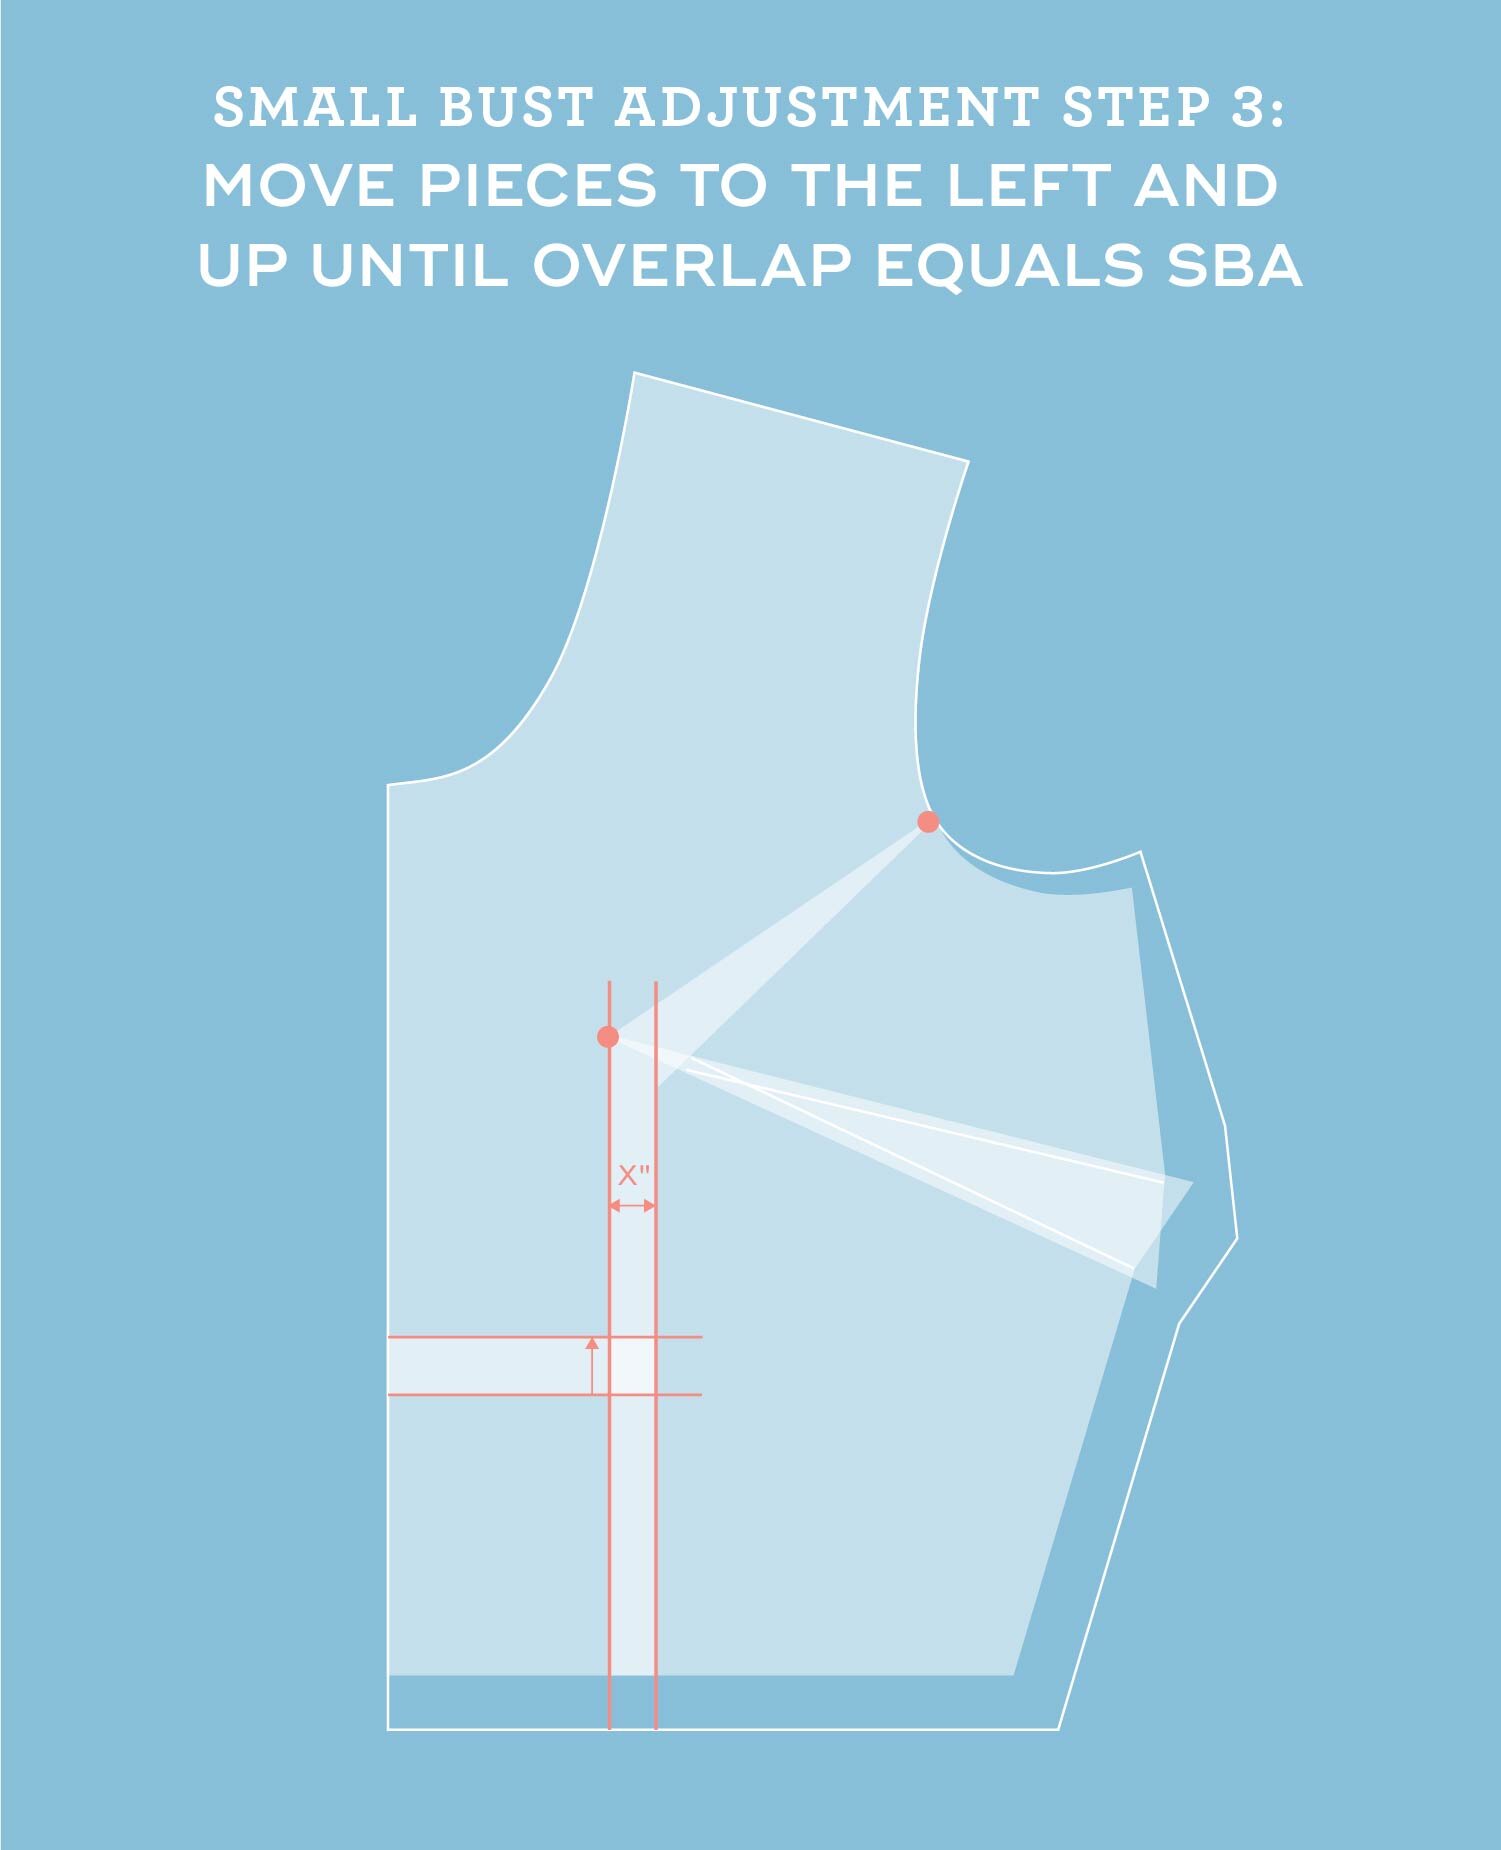
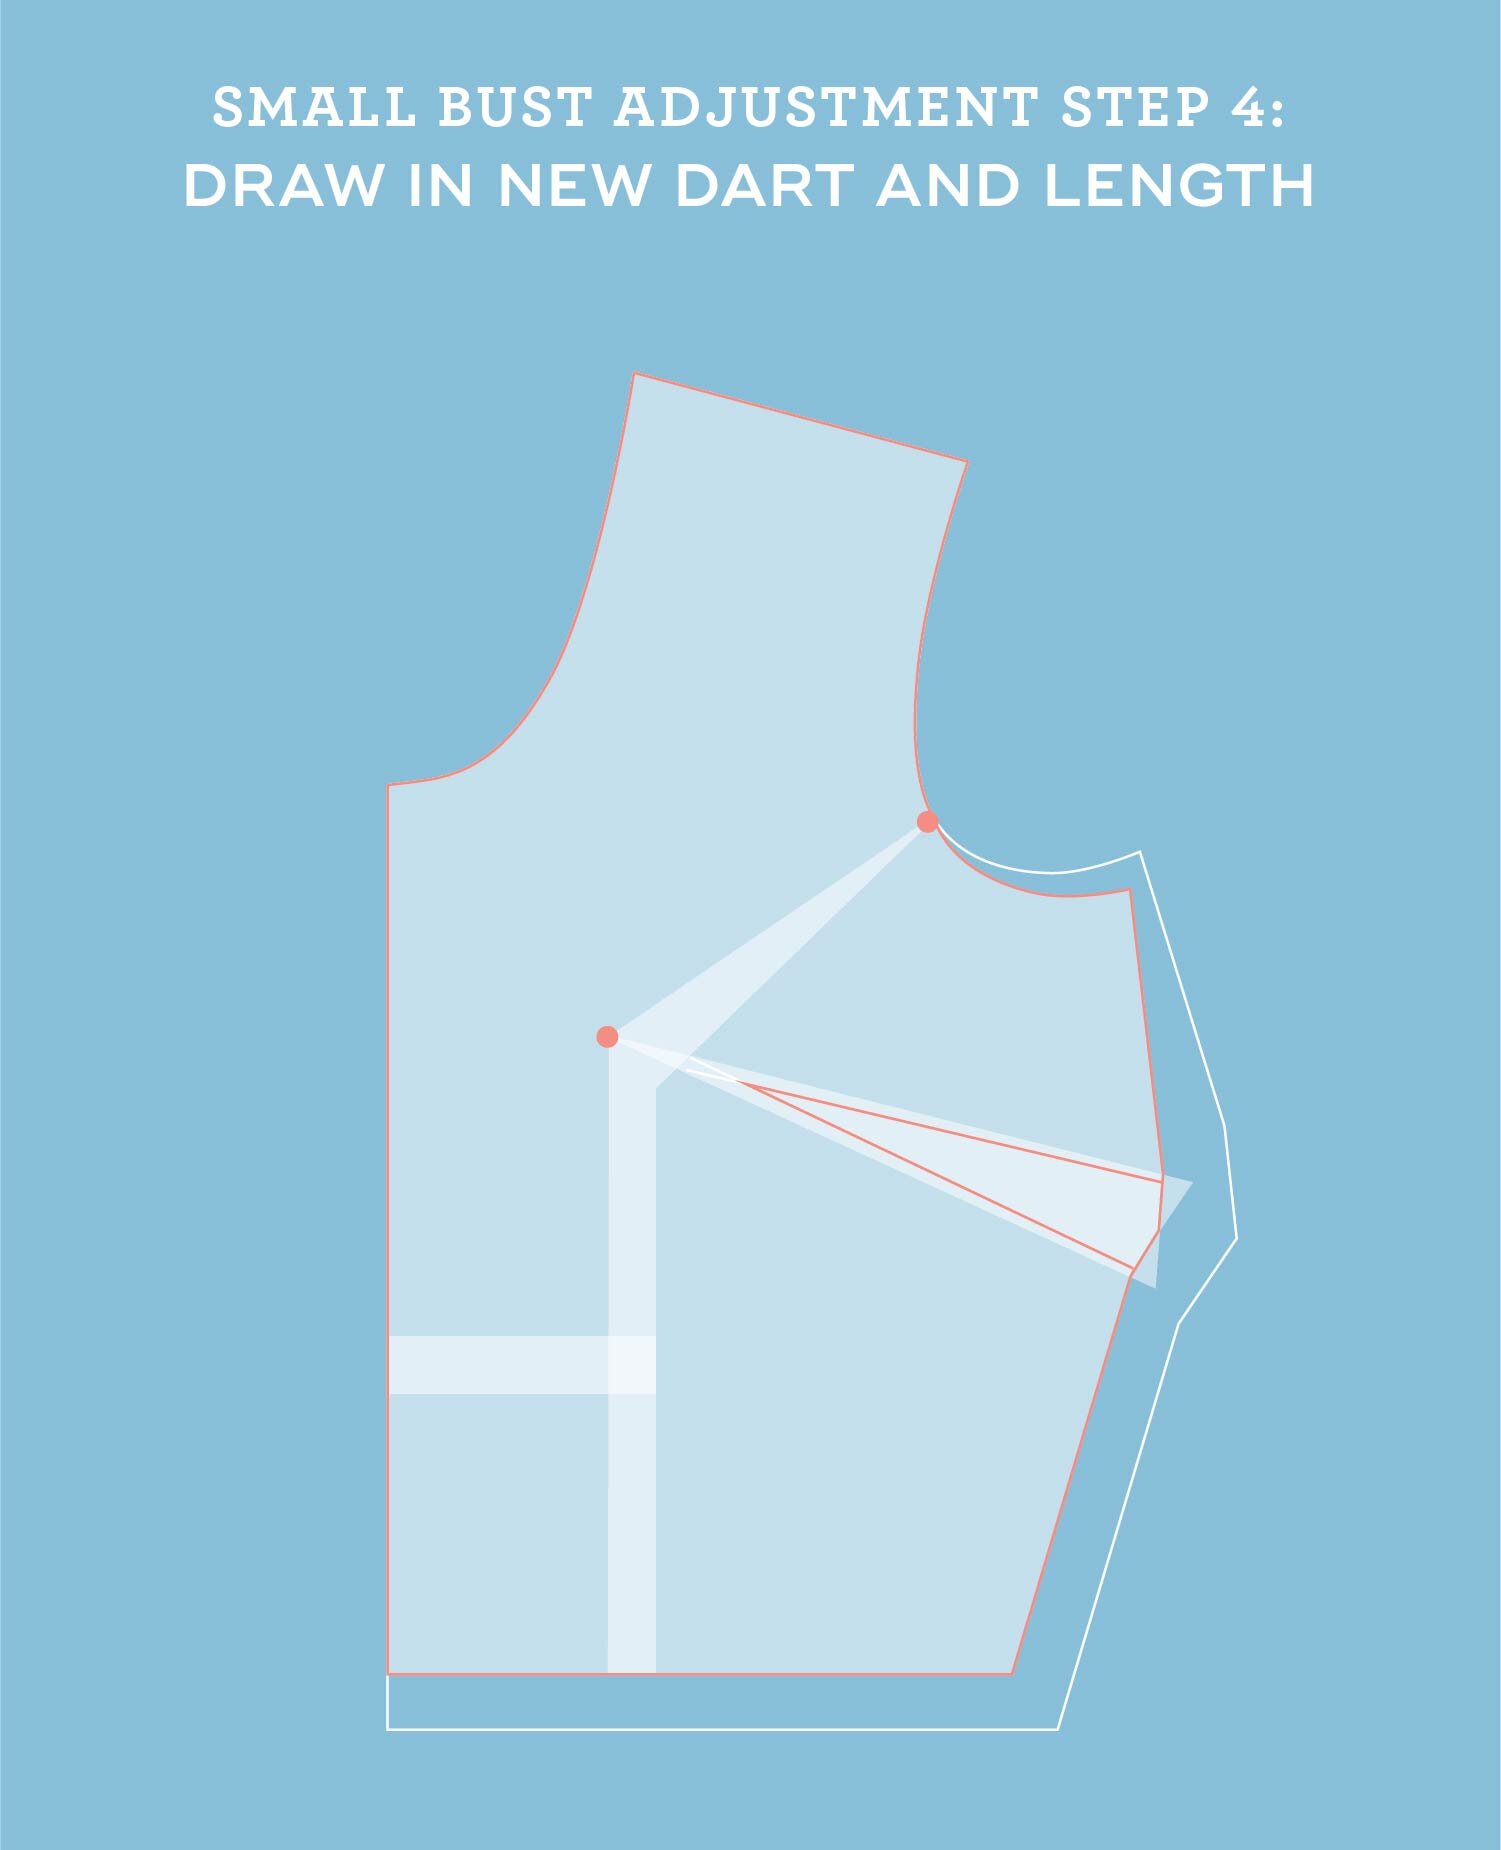
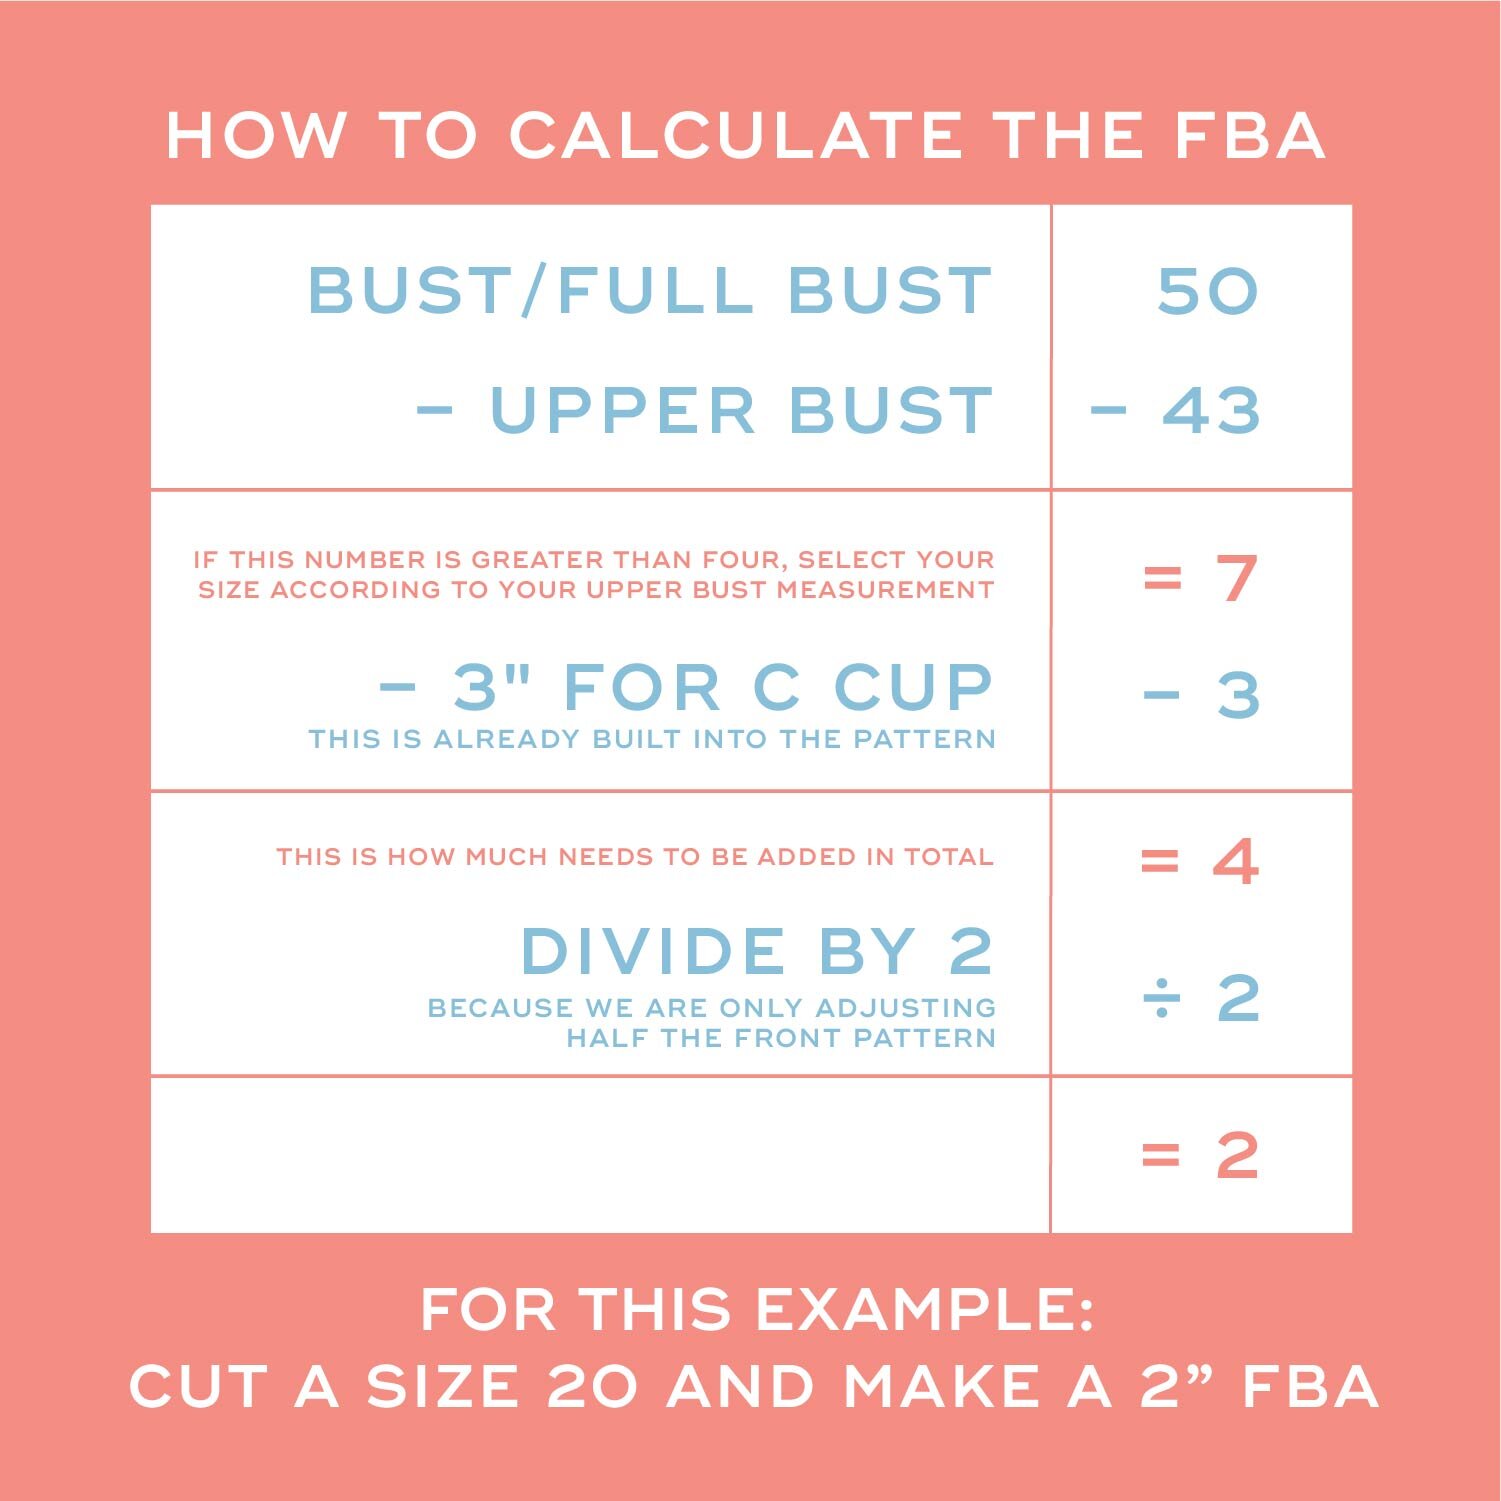
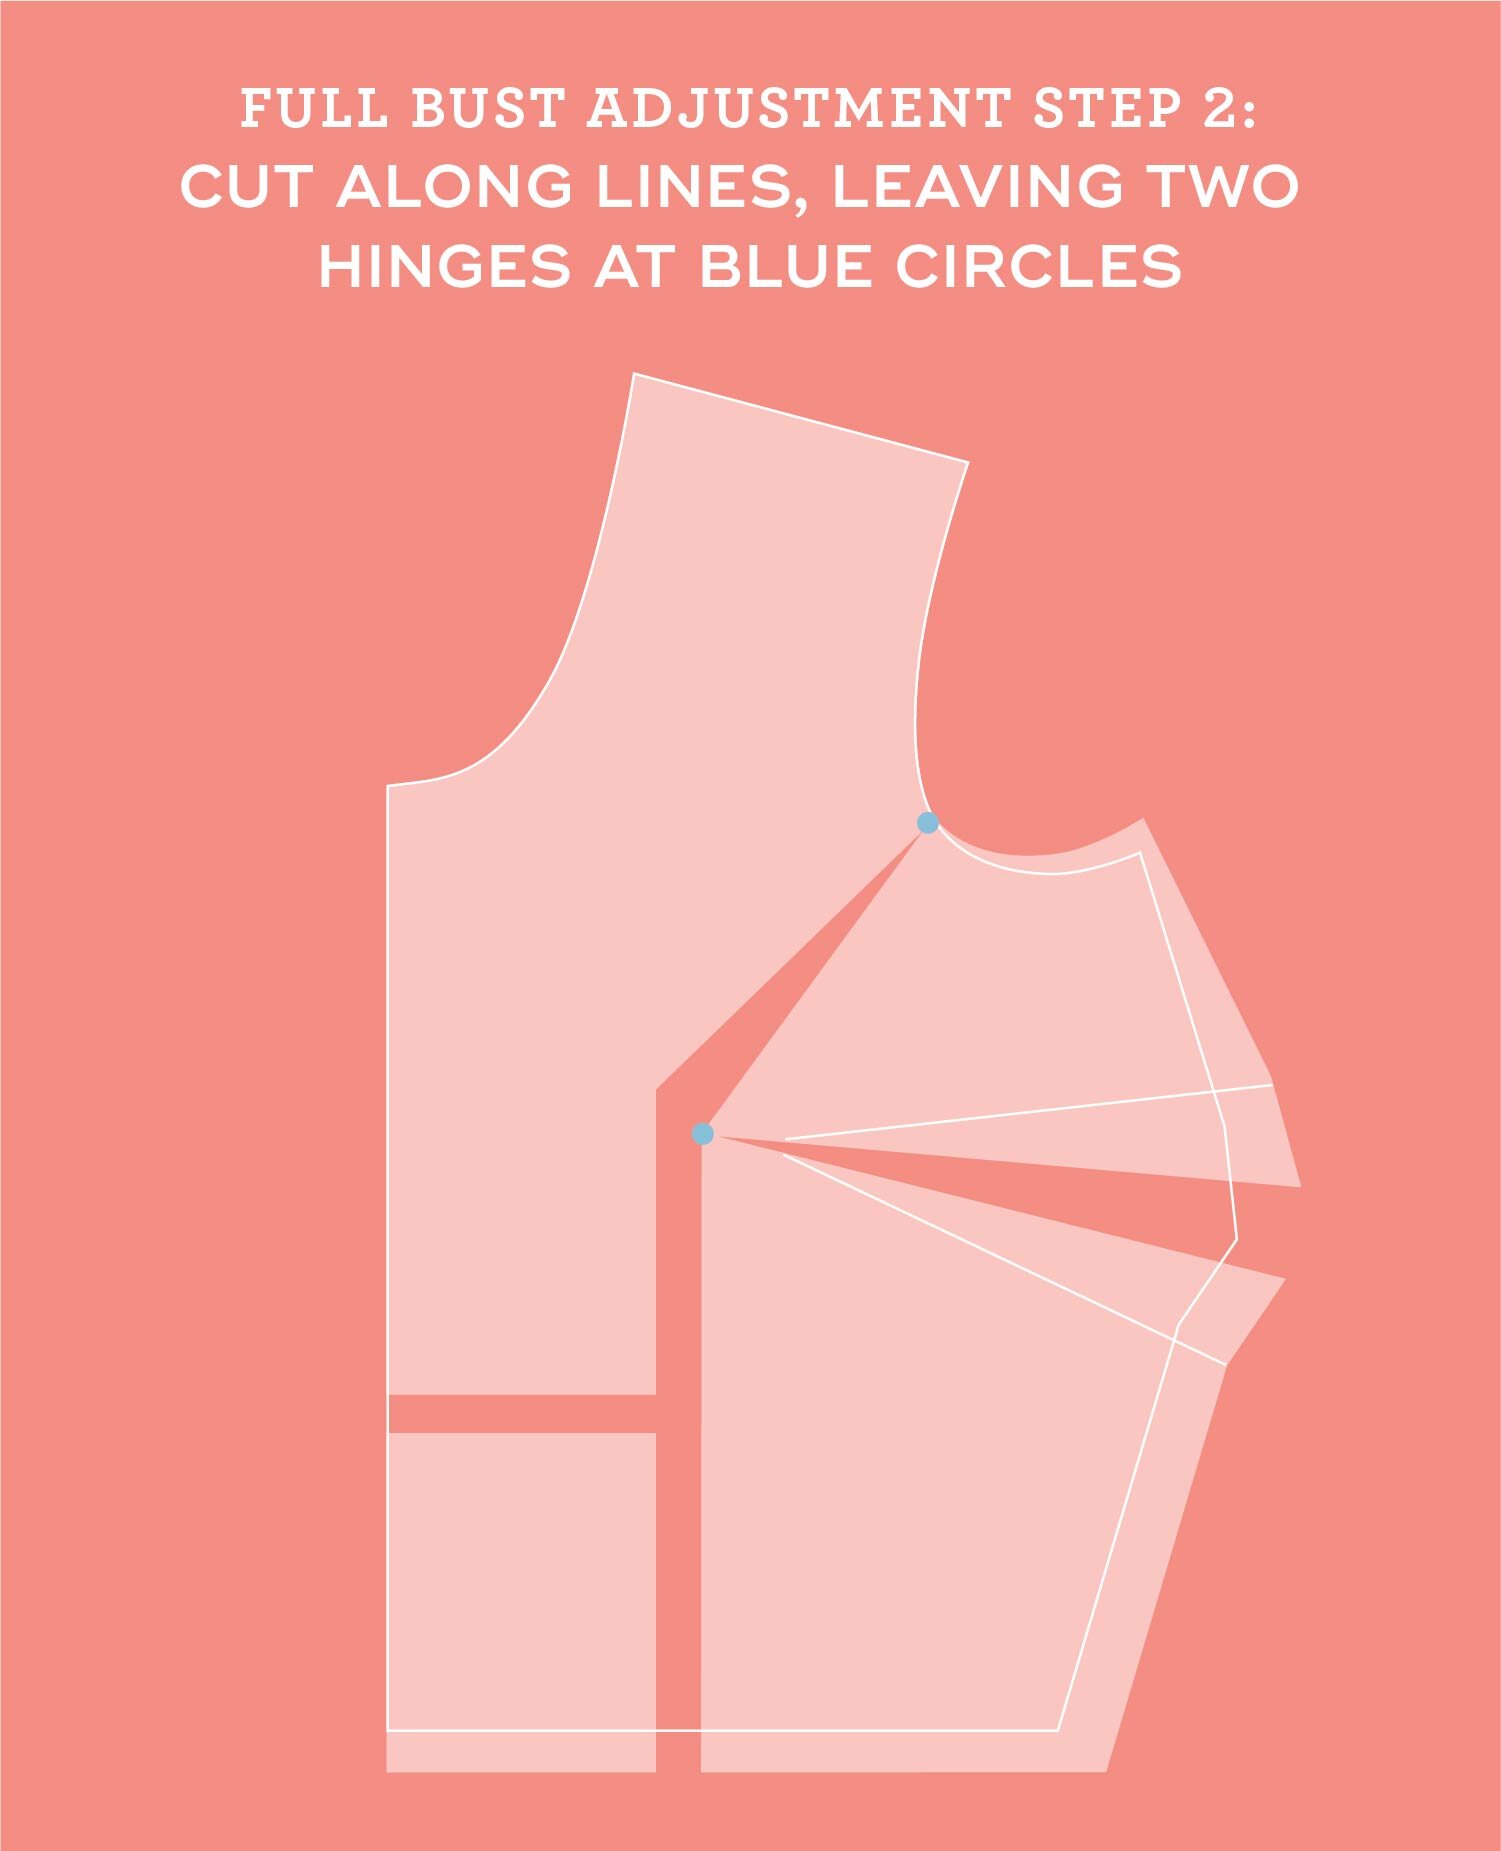
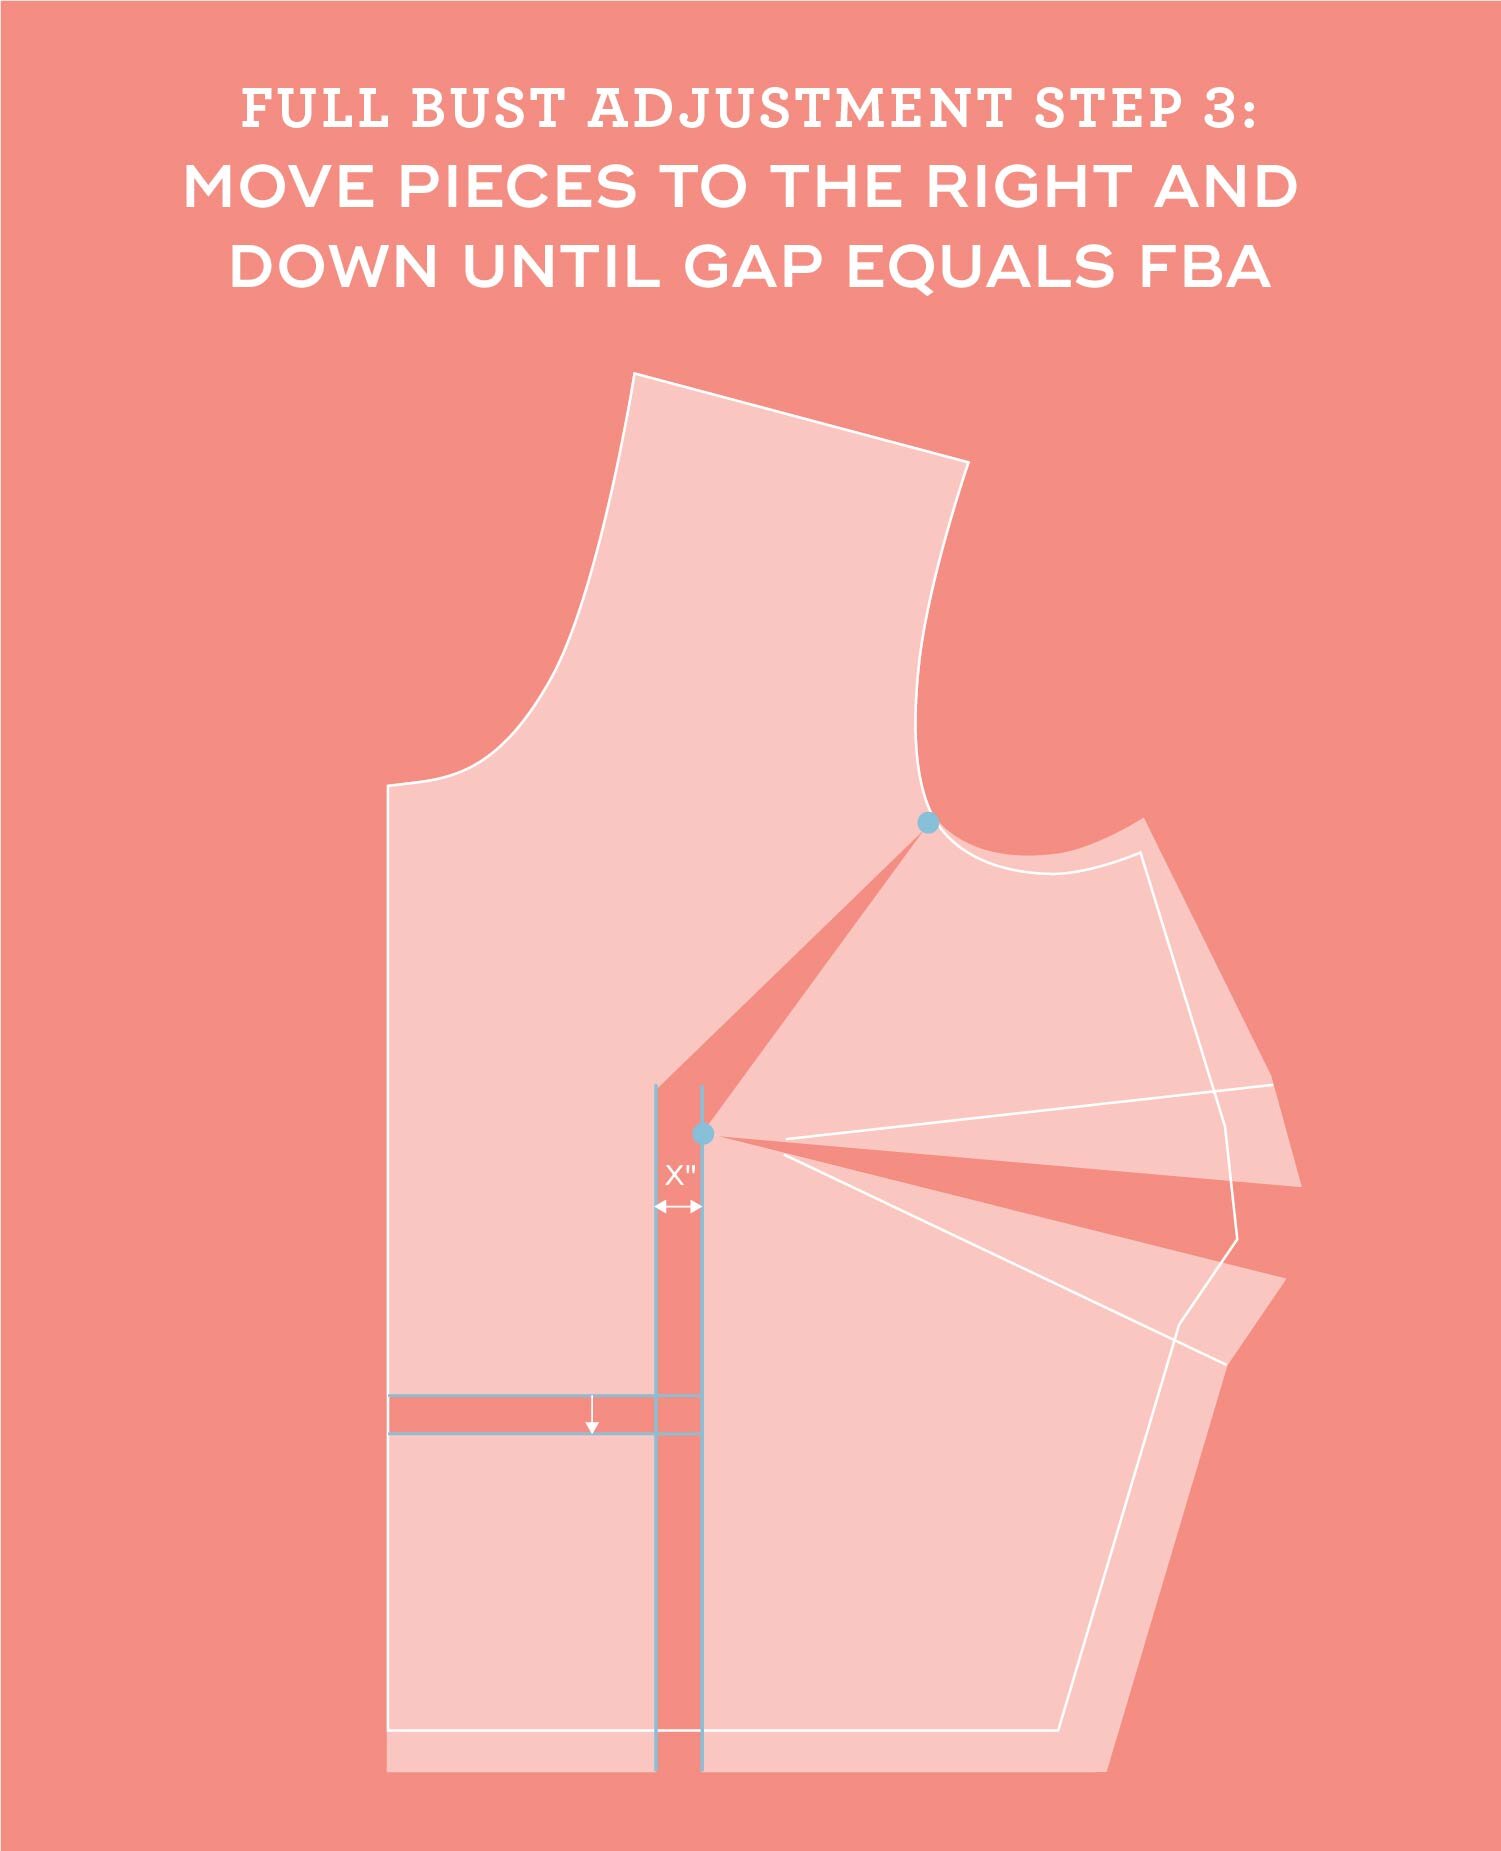
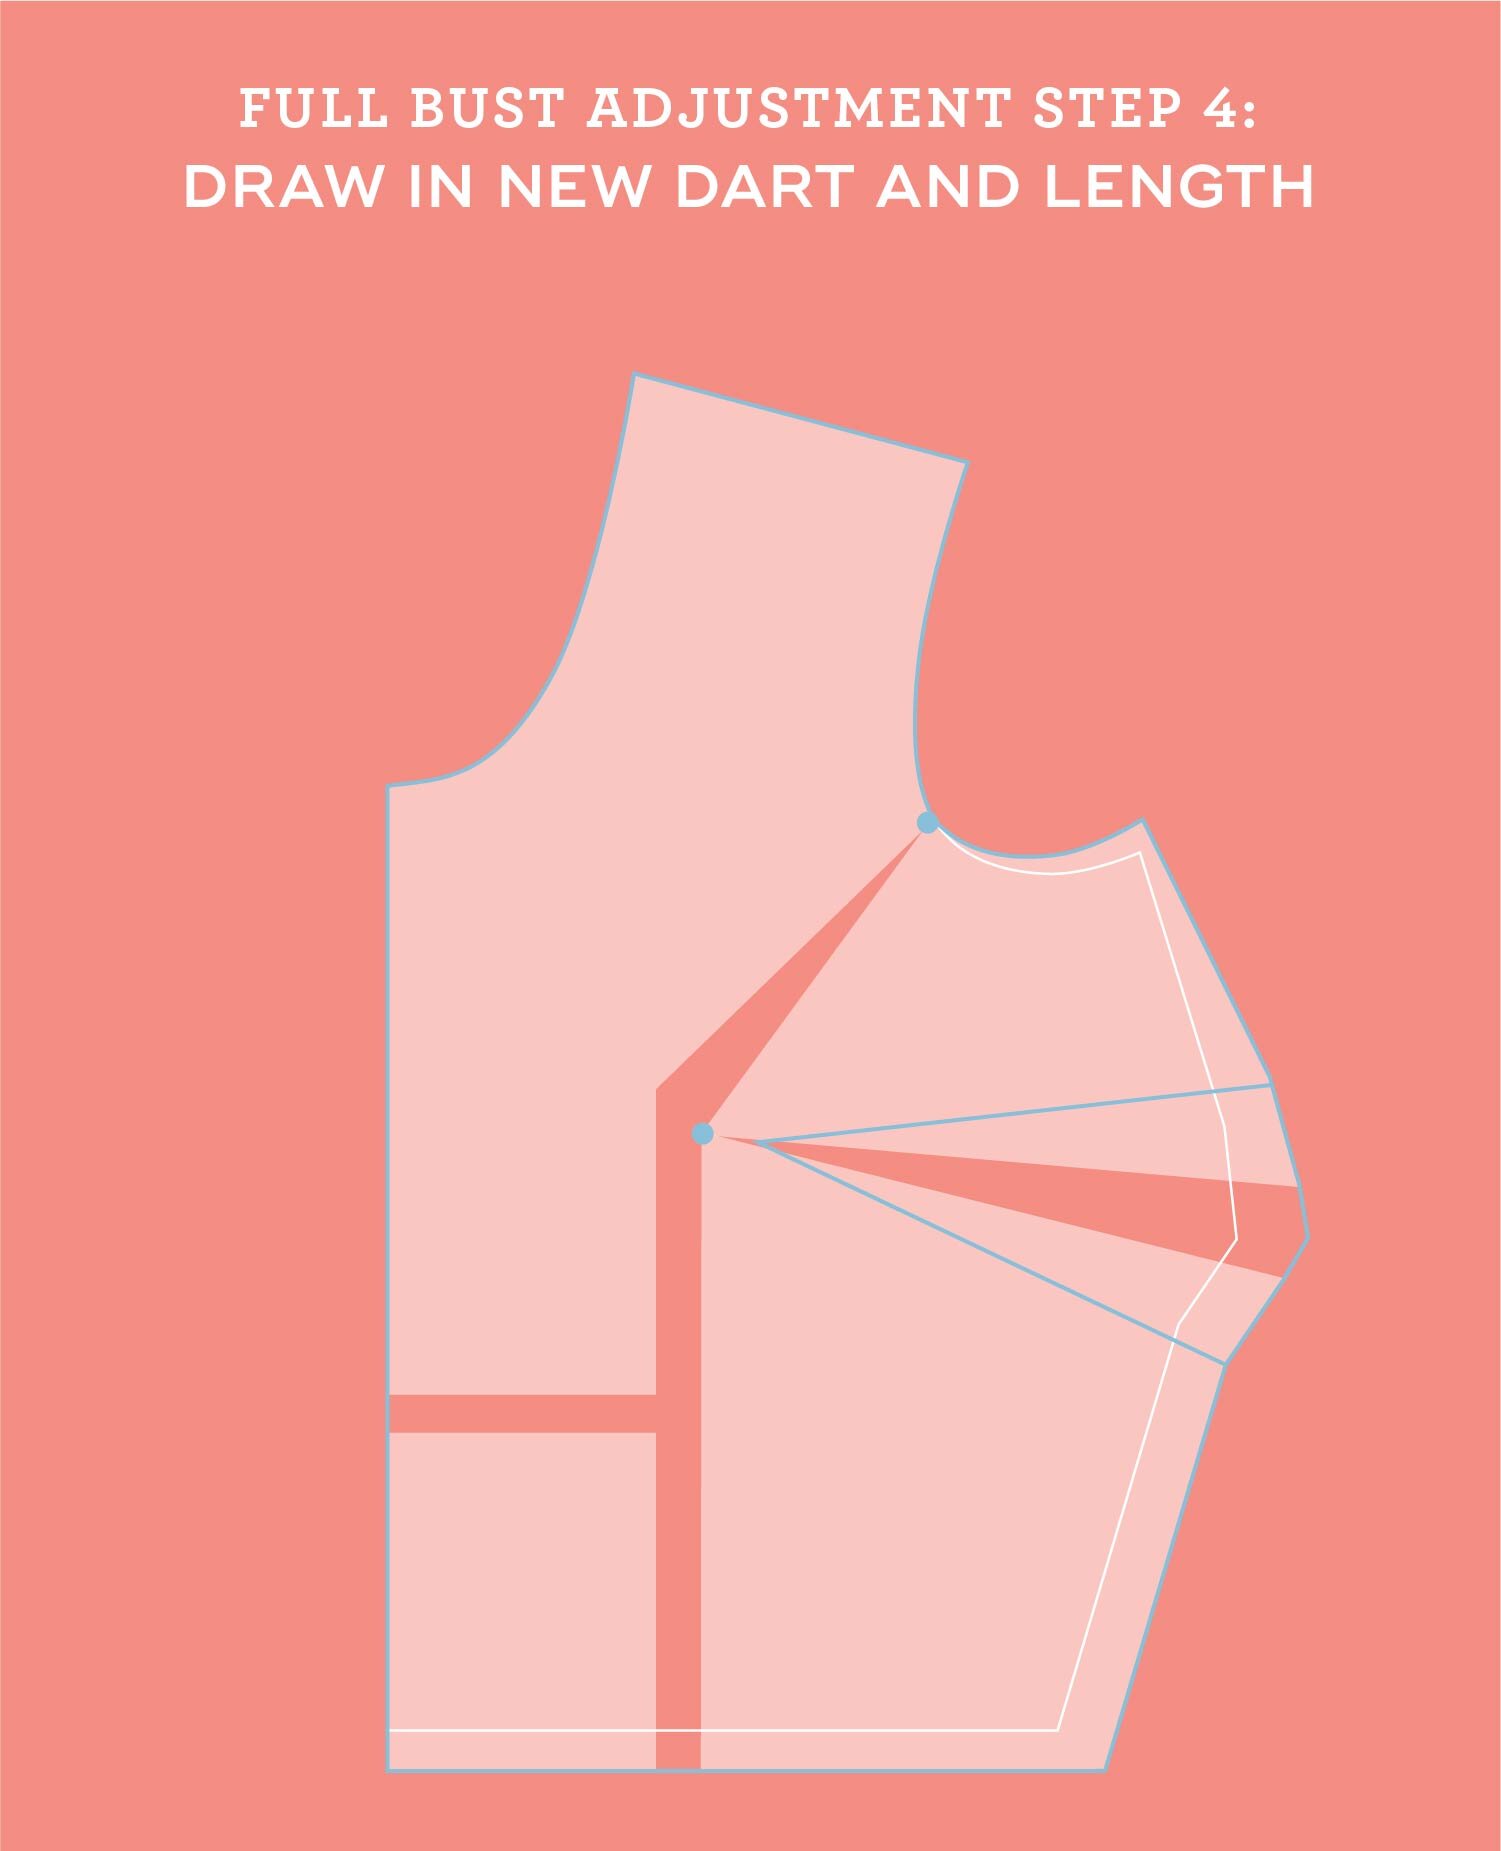
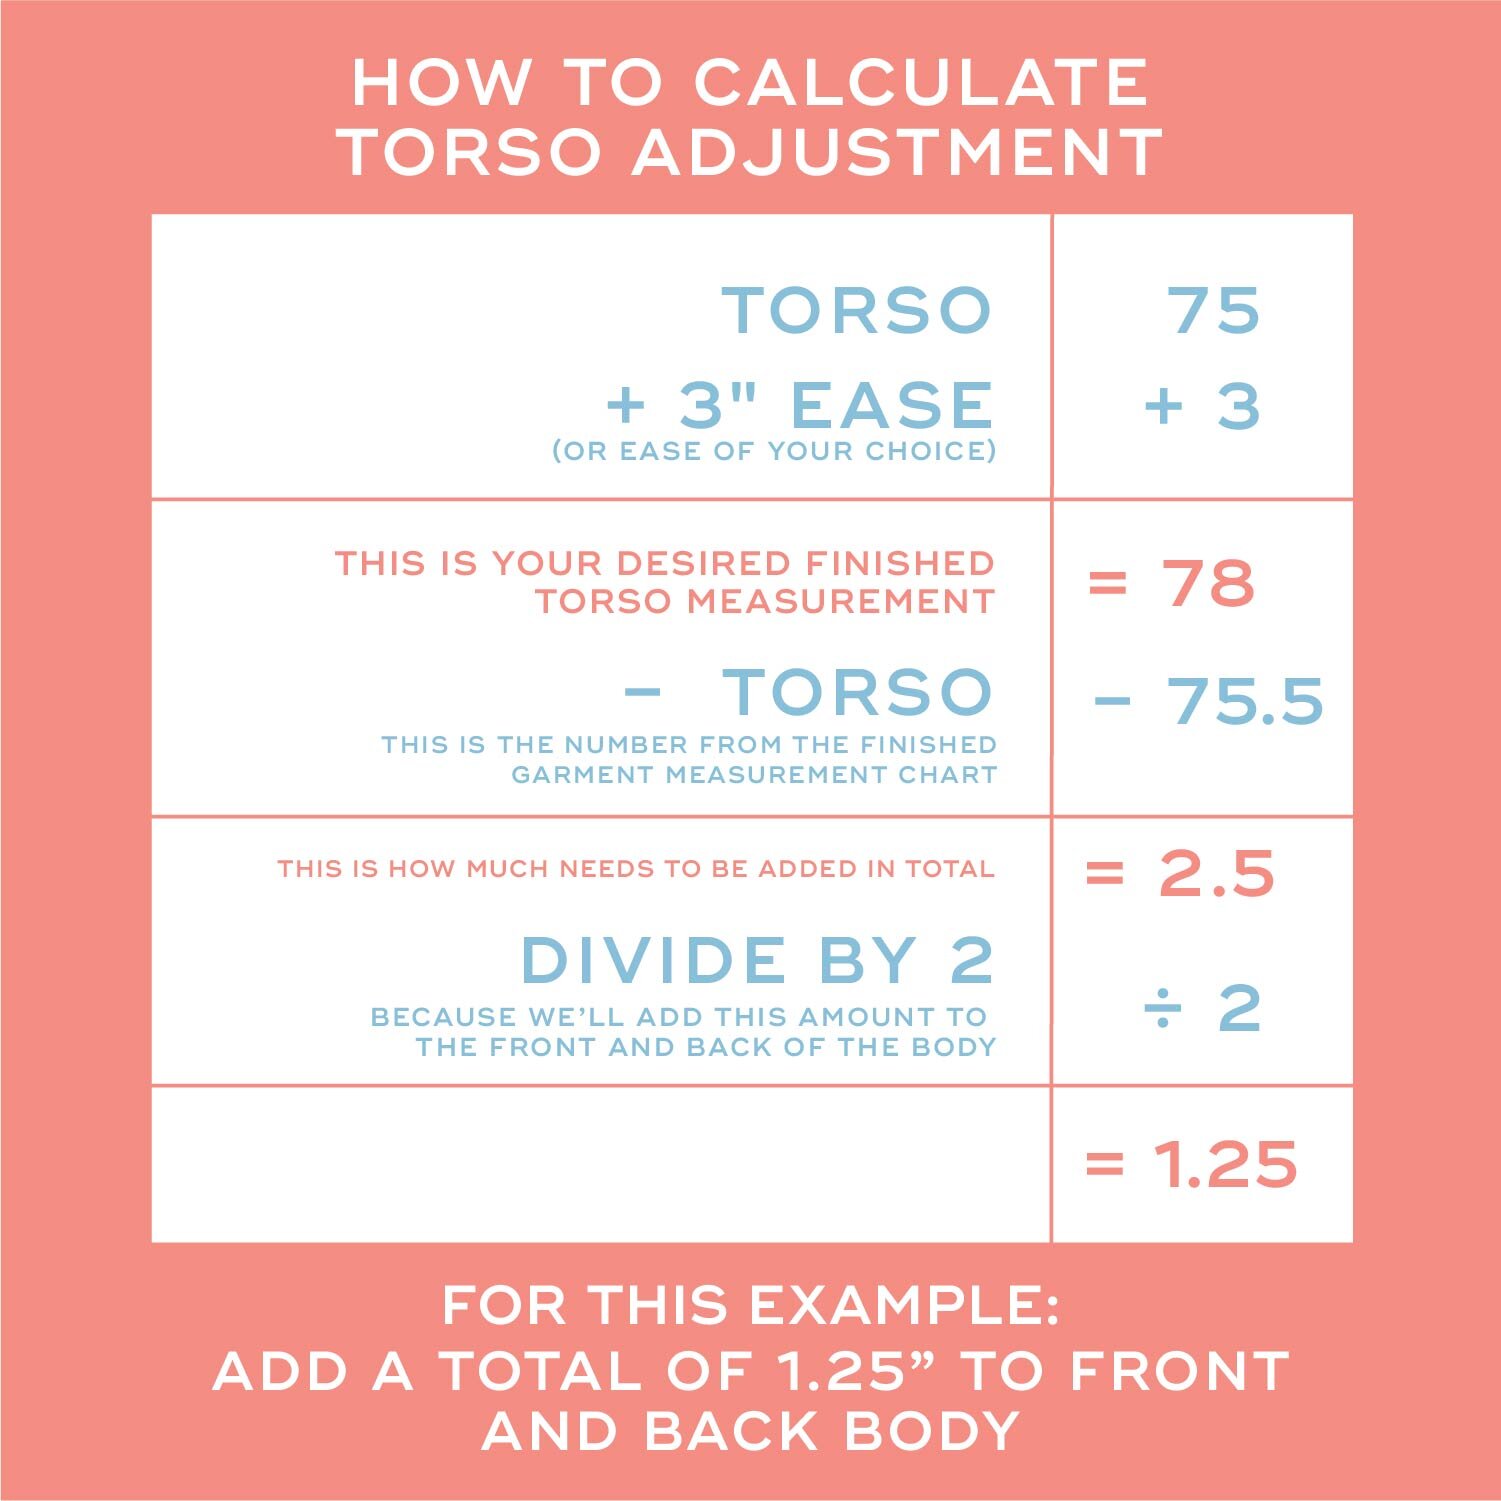
5. Make a muslin + common pattern adjustments

6. How to adhere interfacing & assemble facings

7. How to sew the darts

8. Staystitch and finish seams

9. Stitch bodice front

10. Pockets and jumpsuit front

11. Sew the waist ties

12. Sew jumpsuit back

13. Stitch shoulder seams & attach sleeves

14. Sew the side seams

15. Attach the invisible zipper

16. Sew the neck facing

17. Sew the inseam and hems

How to lengthen or shorten the rise of a pants pattern

How to lengthen or shorten the rise of a pants pattern

One reason people often recommend starting off sewing a skirt rather than pants is that skirts are usually much easier to fit than pants. That crotch curve can create all sorts of fitting dilemmas and one of the easiest to solve is the rise, also called the crotch depth or crotch length. In today’s video tutorial, I’ll show you how to shorten and lengthen the crotch depth evenly across the front and back. And as a bonus, I’ll show you how to adjust only the back rise. This is a really simple pattern adjustment to make and very useful if you are petite or tall (like me!)