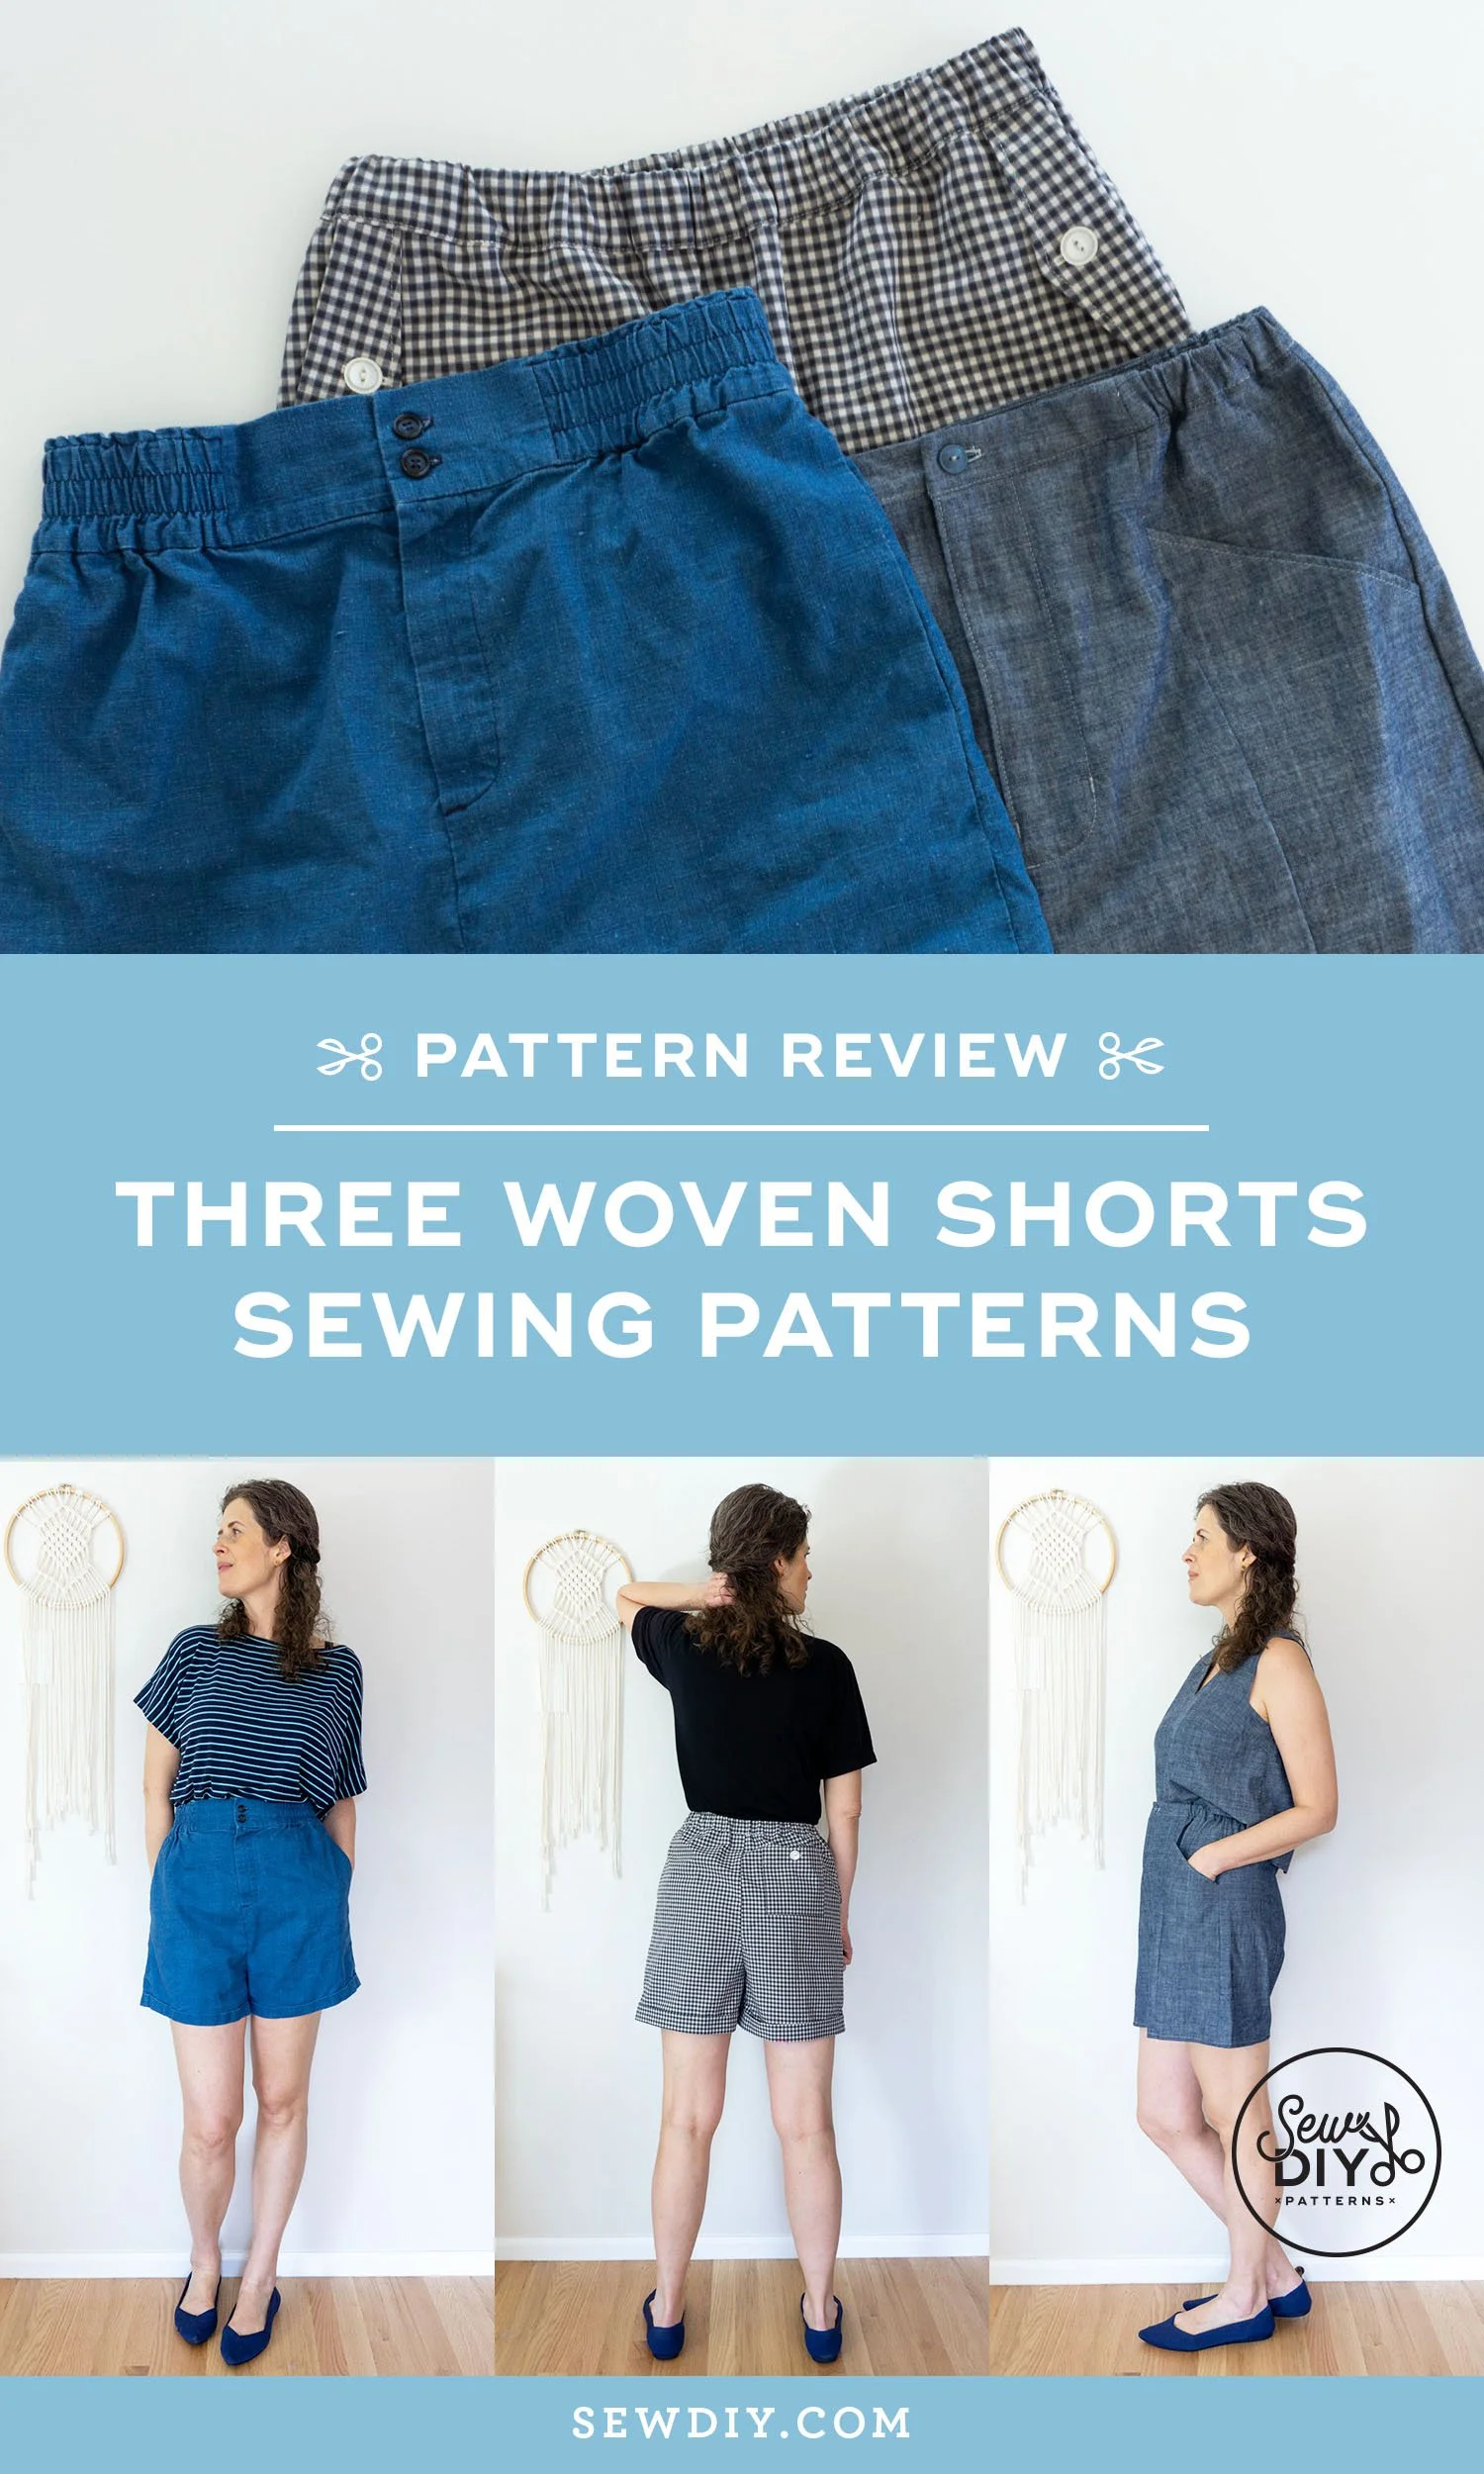
Hello sew-friends! Today, I have THREE finished makes to share with you. This summer, I decided I wanted some new woven shorts. I started by sewing the Dani Shorts by True Bias, then decided I wanted to try two other patterns. I didn't finish the third pair until last week, and while it is already too cold to wear them here in Seattle, I will be prepared for next summer. (Or any warm weather travel!) I'll share all the details on sizing, fabric, construction, what I like and what I'd do differently next time.
For sizing reference, I'm 5'11" with a long torso, hips are 40" and waist is 29.5". For all of these, I made a half muslin (just one front and one back), mostly to test the length of the rise.

Dani Shorts by True Bias
First up is the Dani Shorts by True Bias. I’ve had this pattern for a few years and finally sewed it this July. This pattern features an elastic paper bag style waistband, optional zipper fly front and either tapered full length pants or curved hem shorts. One of my most worn pairs of woven shorts are the Alexandria Shorts by Named Patterns (blogged here). I still wear those shorts (even though there are holes lol) and I feel like the Dani is kind of an elevated version—especially with the zipper fly.
For this pattern, I made a size 10 and added 2.5" to the rise. I also adjusted the balance on the hem, following the advice of this post from Handmade PhD. (Some of that post is now behind a paywall, but there's enough to understand.) I've made one other pants pattern from True Bias, the Lander Pants (blogged here). For those, I also made a size 10 and added 2.75" to the rise.

I used a medium weight blue linen for these shorts. I believe I bought the linen in the LA Fashion about 6 years ago. It was a good fabric for this pattern and easy to sew with. I really like how these shorts turned out and I was able to wear them quite a bit before the weather turned cold. I'm able to pull them on and off without undoing the buttons and zipper. I really like the curved hem and tall waistband.
I really like the fit of these shorts, the ease feels just right for me. Plus the elastic is super comfy. Btw, here I’m wearing a knit top of my own design, the Lou Box Top with short cuff sleeves added. I’ve been wearing it for so many years now, I think it’s starting to get stretched out.

If I were to make this pattern again, I would make a few changes. First, I think I would adjust the width of the center front flat part of the waistband. I don't know if it's the drafting or just how I constructed it but the right side (as worn) looks longer than the left. I think extending the length of the Left Front Waistband would make it look more symmetrical. I should also note that unlike button down shirts, the button and fly on pants are off center by design. I’m probably overthinking the symmetry!
Second, the inseam pockets feel too small. I think they’re deep enough but I’d like them to be wider. Every time I put my hand in it jams against the seam.
I also didn't love the fly construction. Following the instructions, first the zipper is sewn to the fly extension, then the fly topstitching is done and the fly shield is attached at the end. While I don't sew a lot of fly fronts, this felt fiddly to me and I know I've had a smoother time with other methods. This inspired me to look into different construction methods and try the next pattern I'm sharing.

Dorian Shorts by Seamwork
The Dorian Shorts are similar to the Dani in that they have a partial elastic waist and a fly zipper front. The Dorian feature princess seams, deep inset front pockets and a straight hem. I made a size 10 with 1.5" added to the length of the rise/crotch. I used a chambray from my stash and as expected, it was easy to sew with.
I've used a lot of Seamwork patterns and generally like their instructions a lot. For their fly zip, you start by sewing the zipper to the fly shield, then attach the fly shield to the shorts, sew it to the fly extension and finally topstitch. This method worked very well for me. The only problem I had was that I should have positioned the zipper on the fly shield differently and my Right Waistband piece was too short. By the time I figured that out, it was too late to redo the zip, so I recut the Right Waistband to fit. It's only visible on the inside so not a huge deal. Just something to look out for.

The instructions have two methods for attaching the waistband and elastic to the body of the shorts. I used Method 1 but I wish I had used Method 2. I thought the Method 1 looked simpler. But it was really hard to topstitch the waistband with the elastic already inside. My waistband is not as perfect as I would like, but it's ok.
This pattern is a little more complicated to sew than most shorts because of the style of the pockets and the extra seam lines. The waistband has four different pattern pieces. I wouldn't recommend it for beginners. But, if you're looking for something a little more complicated, it's fun to sew. Just take it one step at a time.

Overall, I think the fit is good on these shorts. I do need to use the button and zip to take them on and off because the elastic is only on the sides and doesn’t stretch enough to go over my hips. I’m also wearing a “me made” top with these shorts. The fabric is a cotton chambray (my fave!) that I’ve had in my stash for years. I first used it to make my Miri Tank Top pattern in view B. The matching set was unintentional but I think it’s really cute!


Kirby Shorts by Seamwork
The third pair of shorts that I made are the Kirby Shorts by Seamwork. These are also an elastic waist short but they don't have a zip fly. Honestly, I think they'd be a lot cuter with a zip fly, just to have an extra design detail at the center front. Like the Dani Shorts, these have cuffs at the hem however the construction is different. The Kirby Shorts have a straight hem with a separate pattern piece for the cuffs. The Dani are curved and don't have a separate pattern piece.

The construction of the Kirby is really fairly easy. The most complicated part is the button flap for the pockets. The fabric can get a little bulky there with all of the layers. (Btw, the flap is decorative, not functional.)
My biggest problem was that I chose the wrong size. I made a size 8 for these shorts but I really should have made a size 10. I made the Seamwork Miller Shorts (blogged here) in a size 8 a few years ago and I thought that would work again. But, I failed to check the ease in the size chart. The Miller has a lot more ease built in. I was also trying to use as little fabric as possible and in retrospect, I didn't need to skimp by one size. (I also made a matching shirt from this fabric and I'm using some in a quilt.)
Btw, in these photos, I’m wearing a “me made” t-shirt. I used the Stellan Tee pattern from French Navy Patterns and used a very light drapey fabric. I really like this pattern in a lightweight fabric. The pattern is free to download.

After I was most of the way done, I tried on the shorts and just didn't like the fit (because of the poor size selection). I really prefer at least 4" of ease in my shorts. I should have looked more carefully at the size chart because there's only 3-3.25" of ease at the hips. I also thought that there was too much ease at the thigh. So, I did a bit of deconstruction to refit these. At the side seams, I reduced the seam allowance to 1/4". I also had to extend the seam line at the bottom of the pockets to make a finished edge. So, overall, I added 3/8" x 4 = 1.5" to the circumference of the hips.
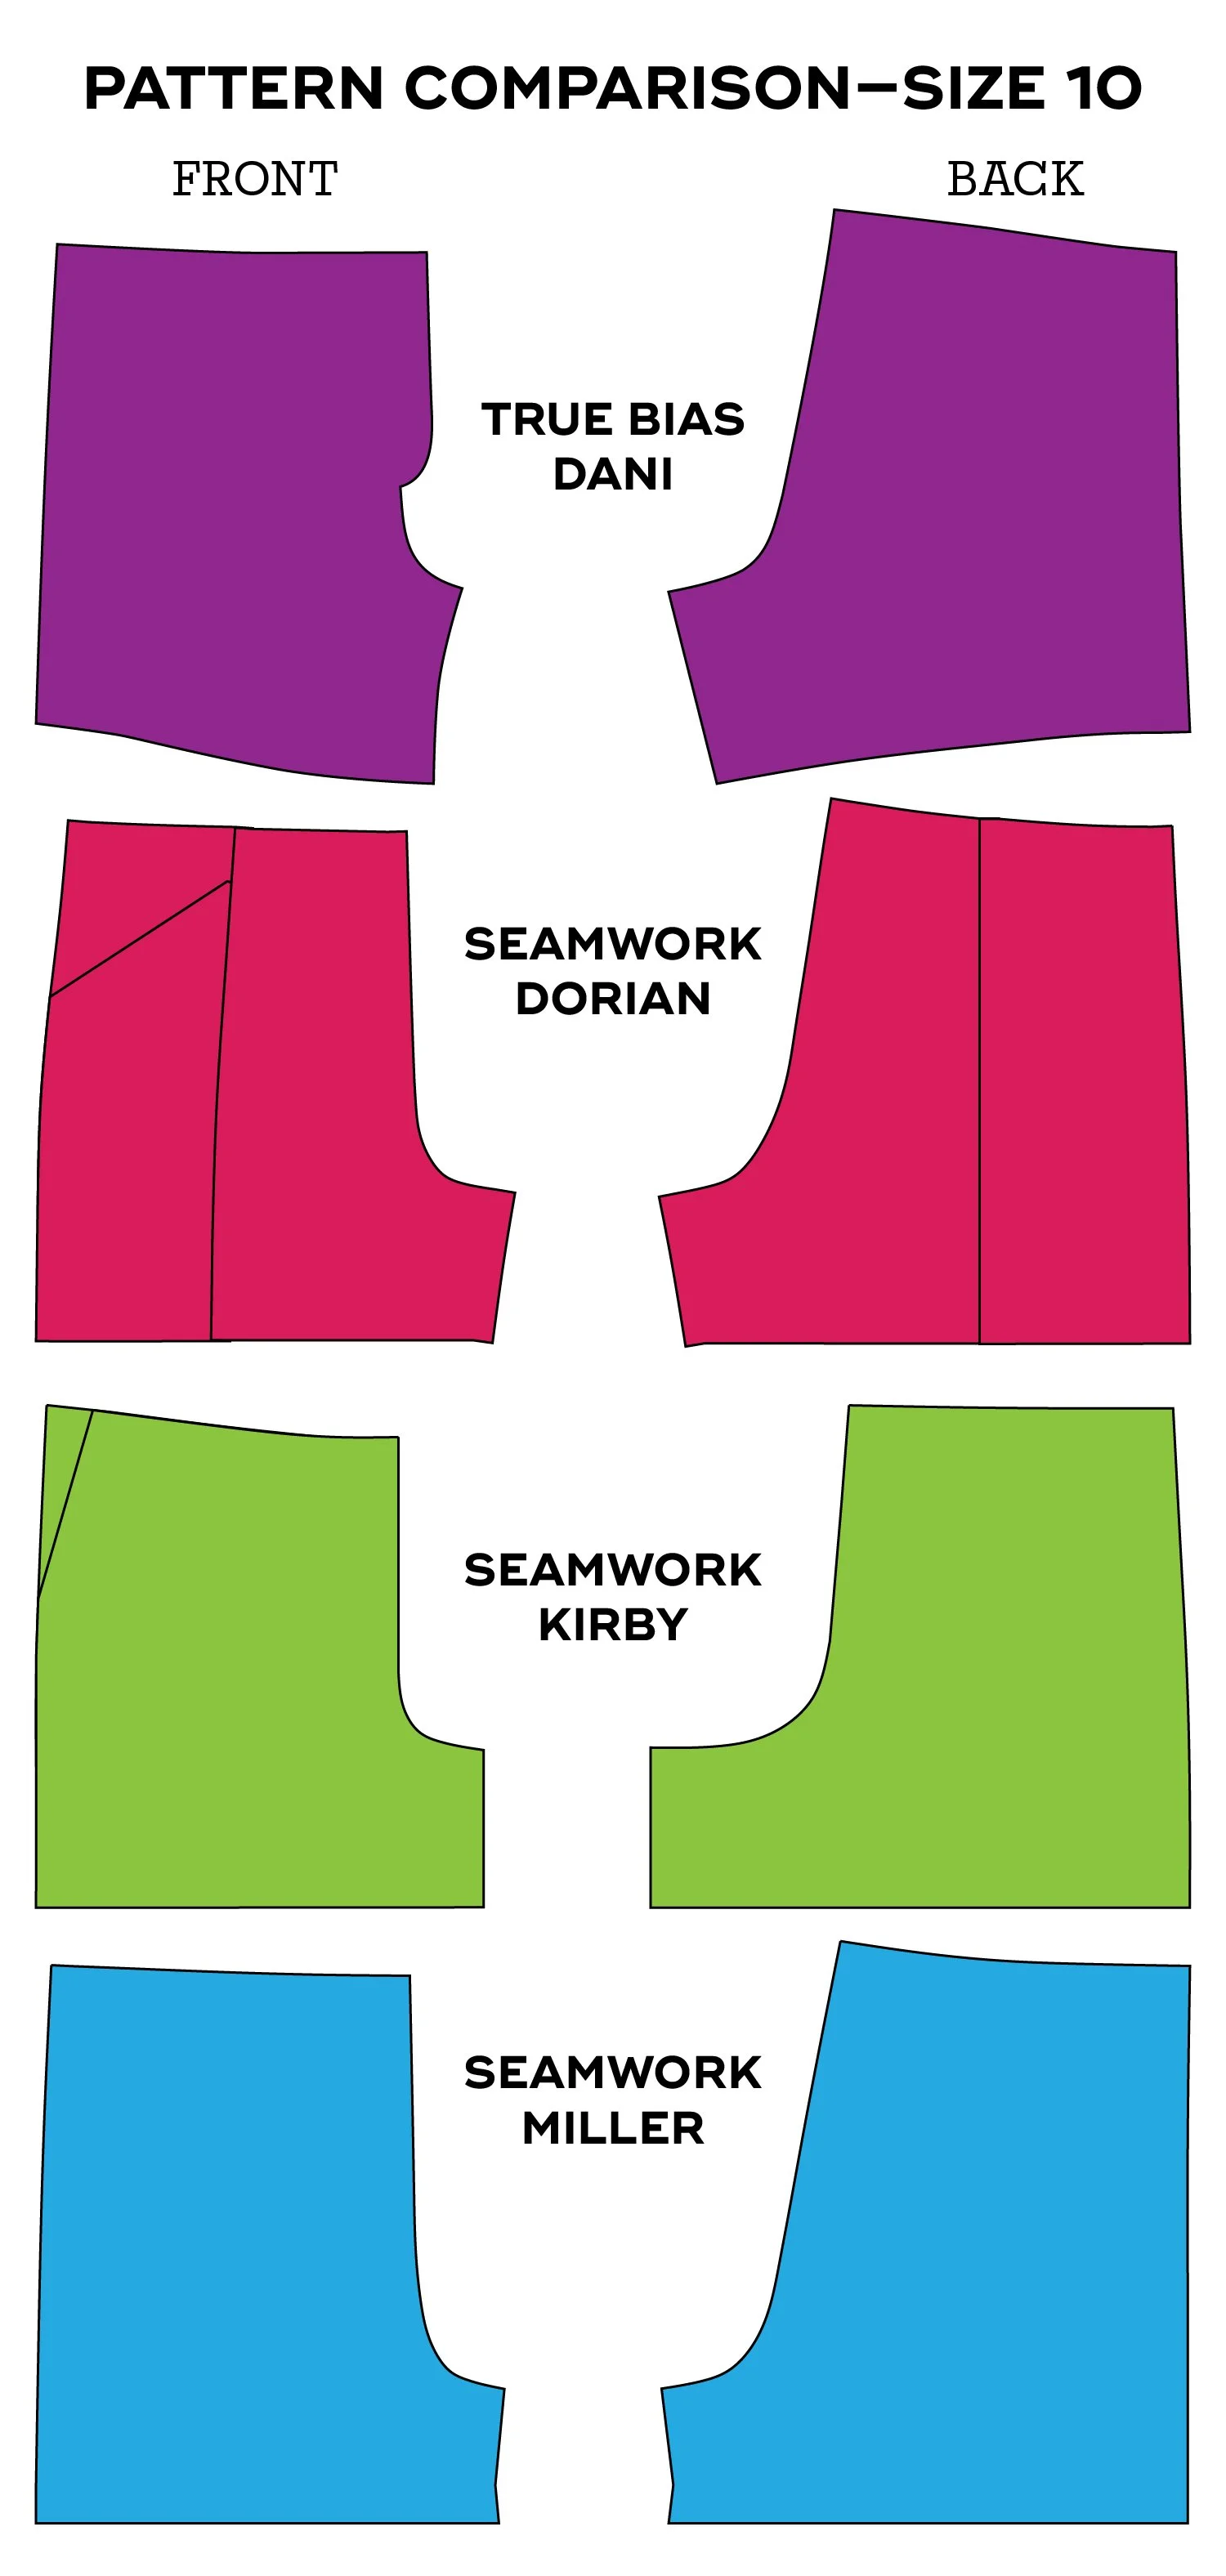
I also removed a total of 2" from the inseam. I removed it evenly from the front and back because that was easiest but if I was starting from scratch, I'd remove more from the back pattern piece. There is a lot of ease in the inner thigh on these shorts and I don’t know why. It’s a lot more than most patterns. See the graphic below for a comparison.

I'm not sure yet if I like these shorts. But time will tell. I do think I was able to fix the sizing pretty well. However, I think there’s still too much fabric at the inseam. And the cuffs make it feel little extra bulky. In the photo above, I’m wearing them with my matching button down shirt! It’s giving some pajama vibes but I think it’s still kind of cute. I’ve not blogged this shirt but I did blog about using this pattern here.
Conclusion
Above is a graphic showing the different patterns. These are all a size 10 with the front on the left and back on the right. It’s interesting to see how similar they all are and the nuances of how they’re different. You can see how the Kirby really have an extended back crotch, almost twice as long as the others. It also doesn’t have a curve at the back waistband.
These were fun patterns to work with because they all have different details and construction methods. So far, the Dani shorts have been my favorite to wear, but I ran out of warm weather to test the others. Trying out different patterns is such a great way to learn new techniques and find out what styles and construction methods you prefer. Plus you get to practice your sewing skills!
You might also be interested in this post from 2019 about other shorts patterns I've sewn. And if you want to save this post for later, you can pin the image below. Happy sewing!