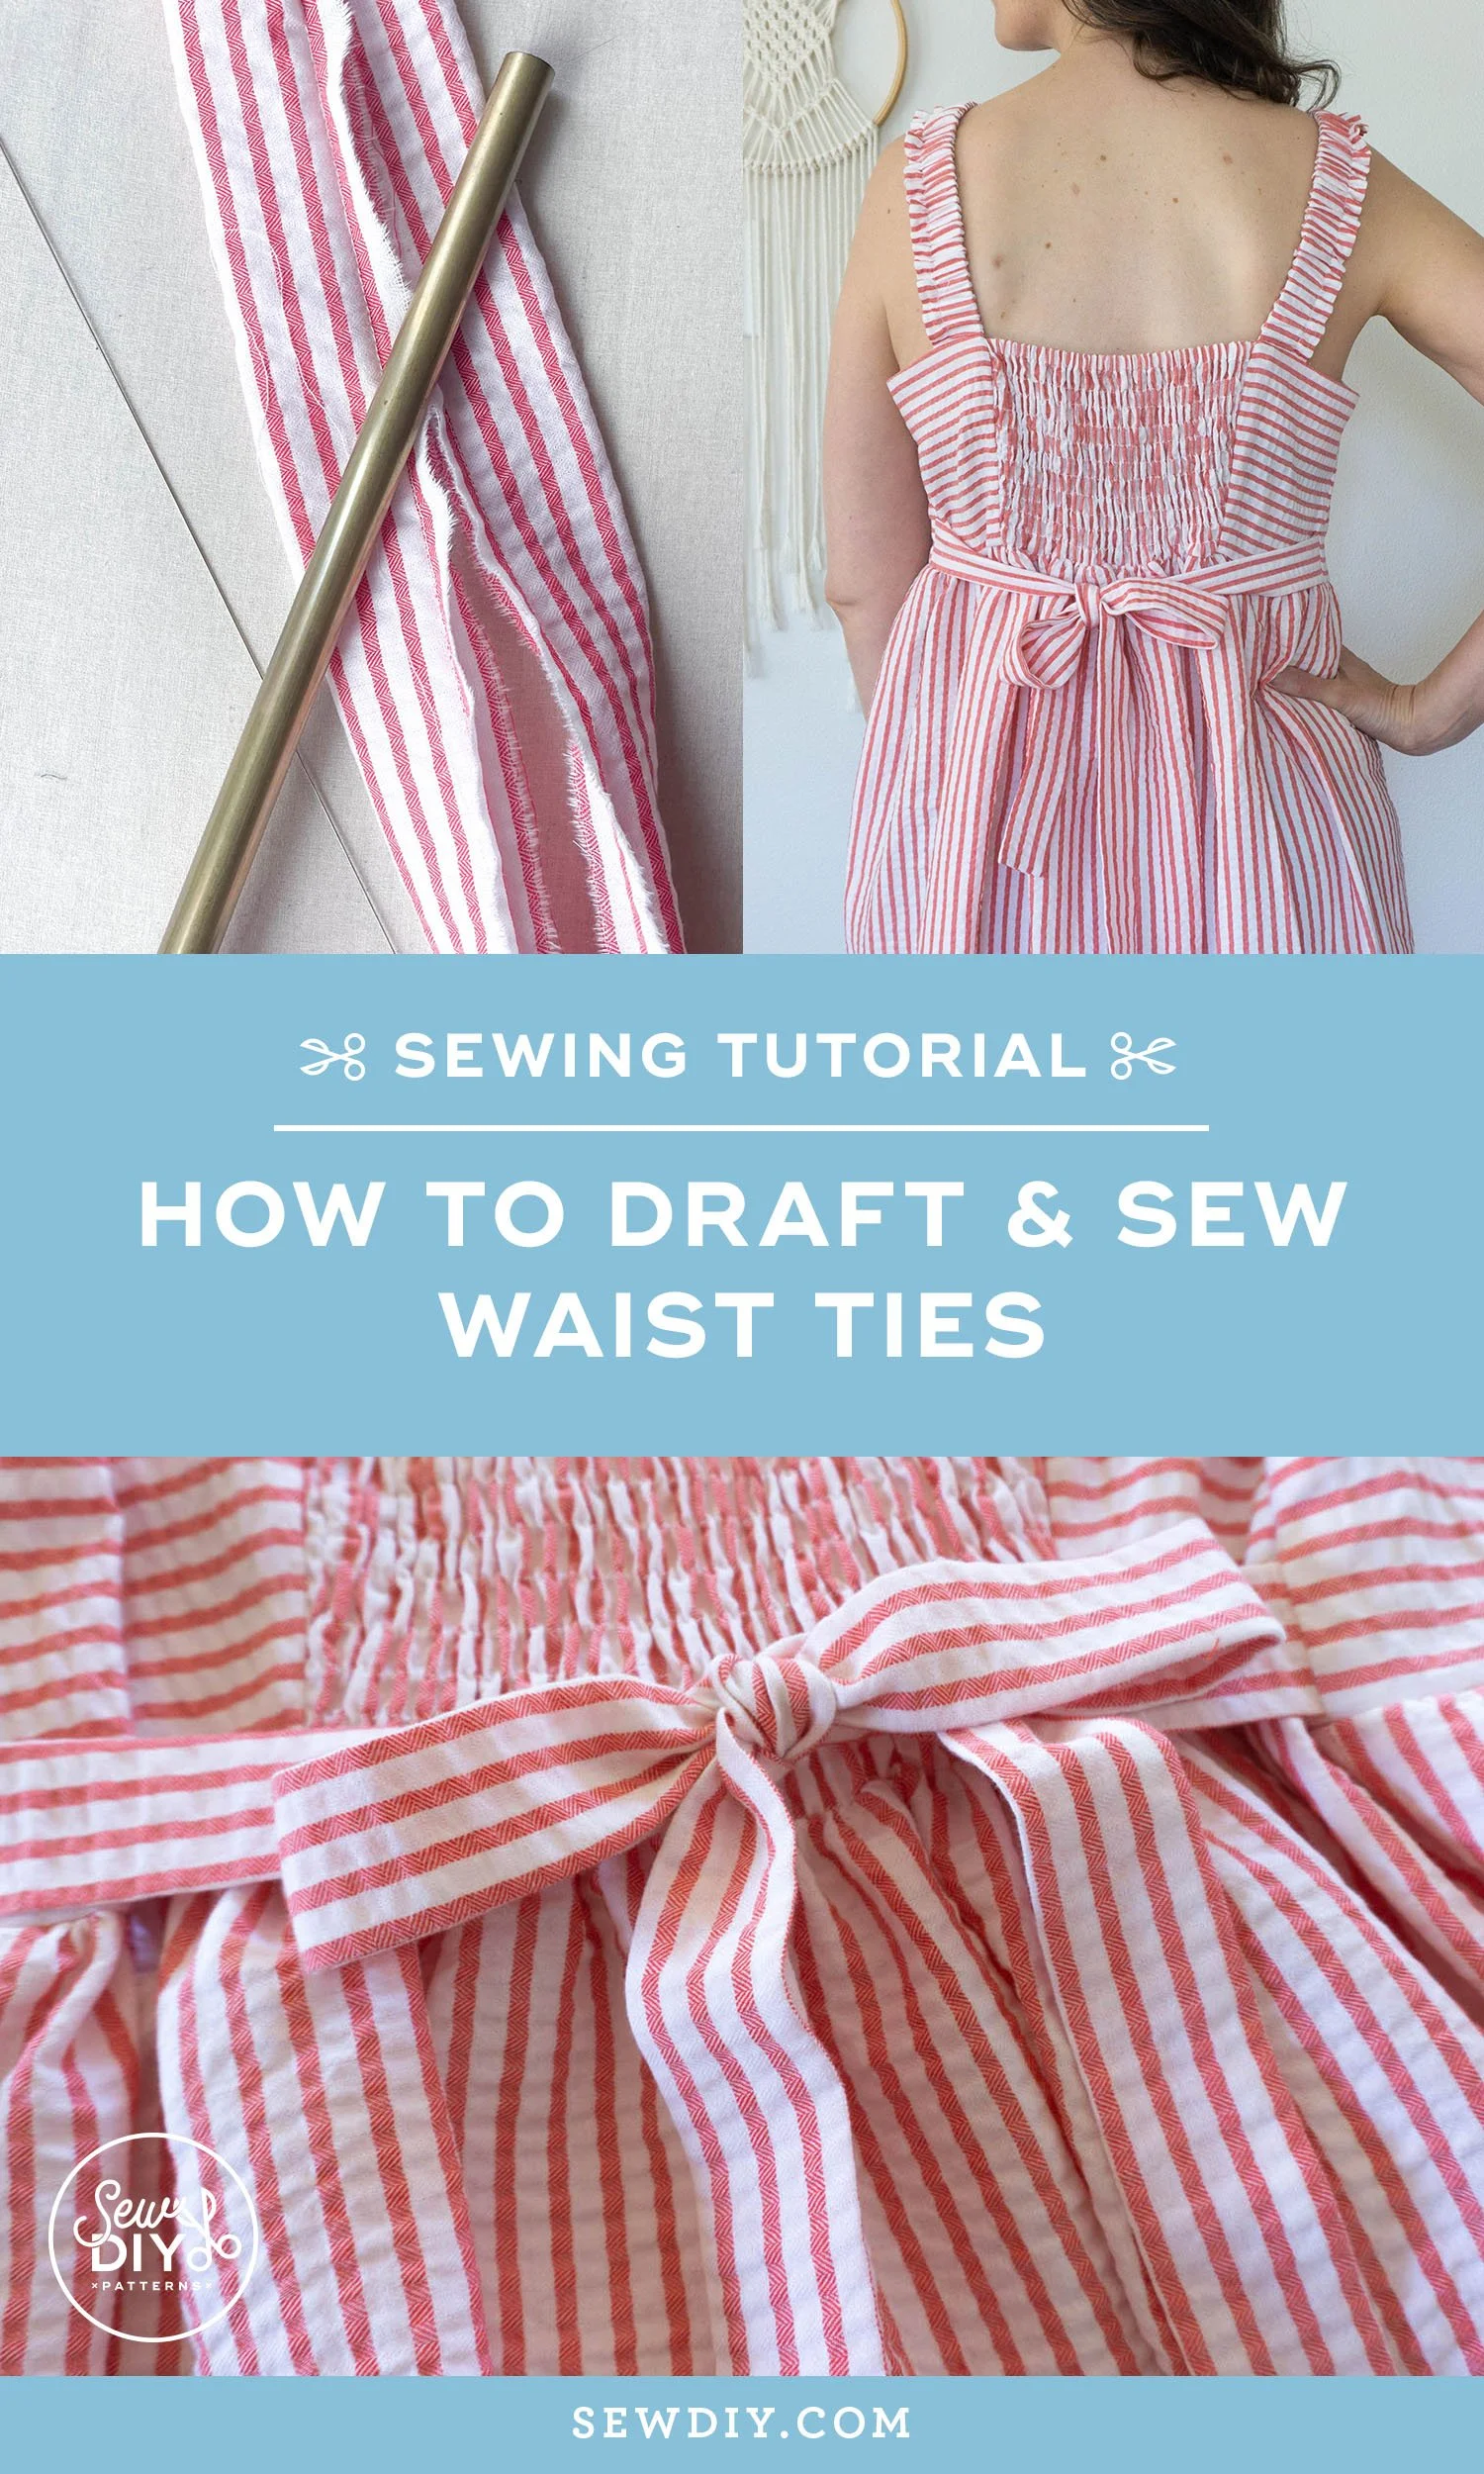
Have you ever wanted a dress or top to be a little more fitted at the waist, but you don't want to add darts or change the seam lines? A simple solution is to add ties at the waist. Waist ties are quick to sew and can be added to the side seam of any dress or top. Plus, they’re adjustable! When I was younger, I remember so many of my dresses and tops had ties that were pulled to the back and tied in a bow. It’s such a great style—both cute and useful! You can also make longer ties that wrap all the way around the body or even tie in the front.
In this tutorial, I’ll show you how to draft and sew waist ties that you can add to the side seam of any top or dress. You'll want to start with a pattern that has side seams. (Alternately, you can probably add ties to other seams or darts in the back bodice. Or, topstitch the end of the tie in place.) I'm using my Eva Tops and Sundress pattern. This pattern has a bodice that ends at the natural waist so I'm placing the ties in the side seam, just above the seam with the skirt.

HOW TO DRAFT WAIST TIES
To draft your own waist ties, you'll need to decide a couple of things about how you want the waist ties to look when they are finished. First, how long to make the waist tie. The tie will need to cover half of your back waist plus enough for a bow and the tail of the bow and possibly additional ease. Second, decide how wide you want the finished tie to be. Finally, make a note of the seam allowance you're using for the pattern.
Below are formulas and a diagram for drafting the waist ties so that you can easily plug in your desired measurements and get a custom pattern piece. If you like this style of drafting tutorial, I have another blog on Substack called Sewing With Numbers where I share lots of pattern drafting tutorials, just like this.
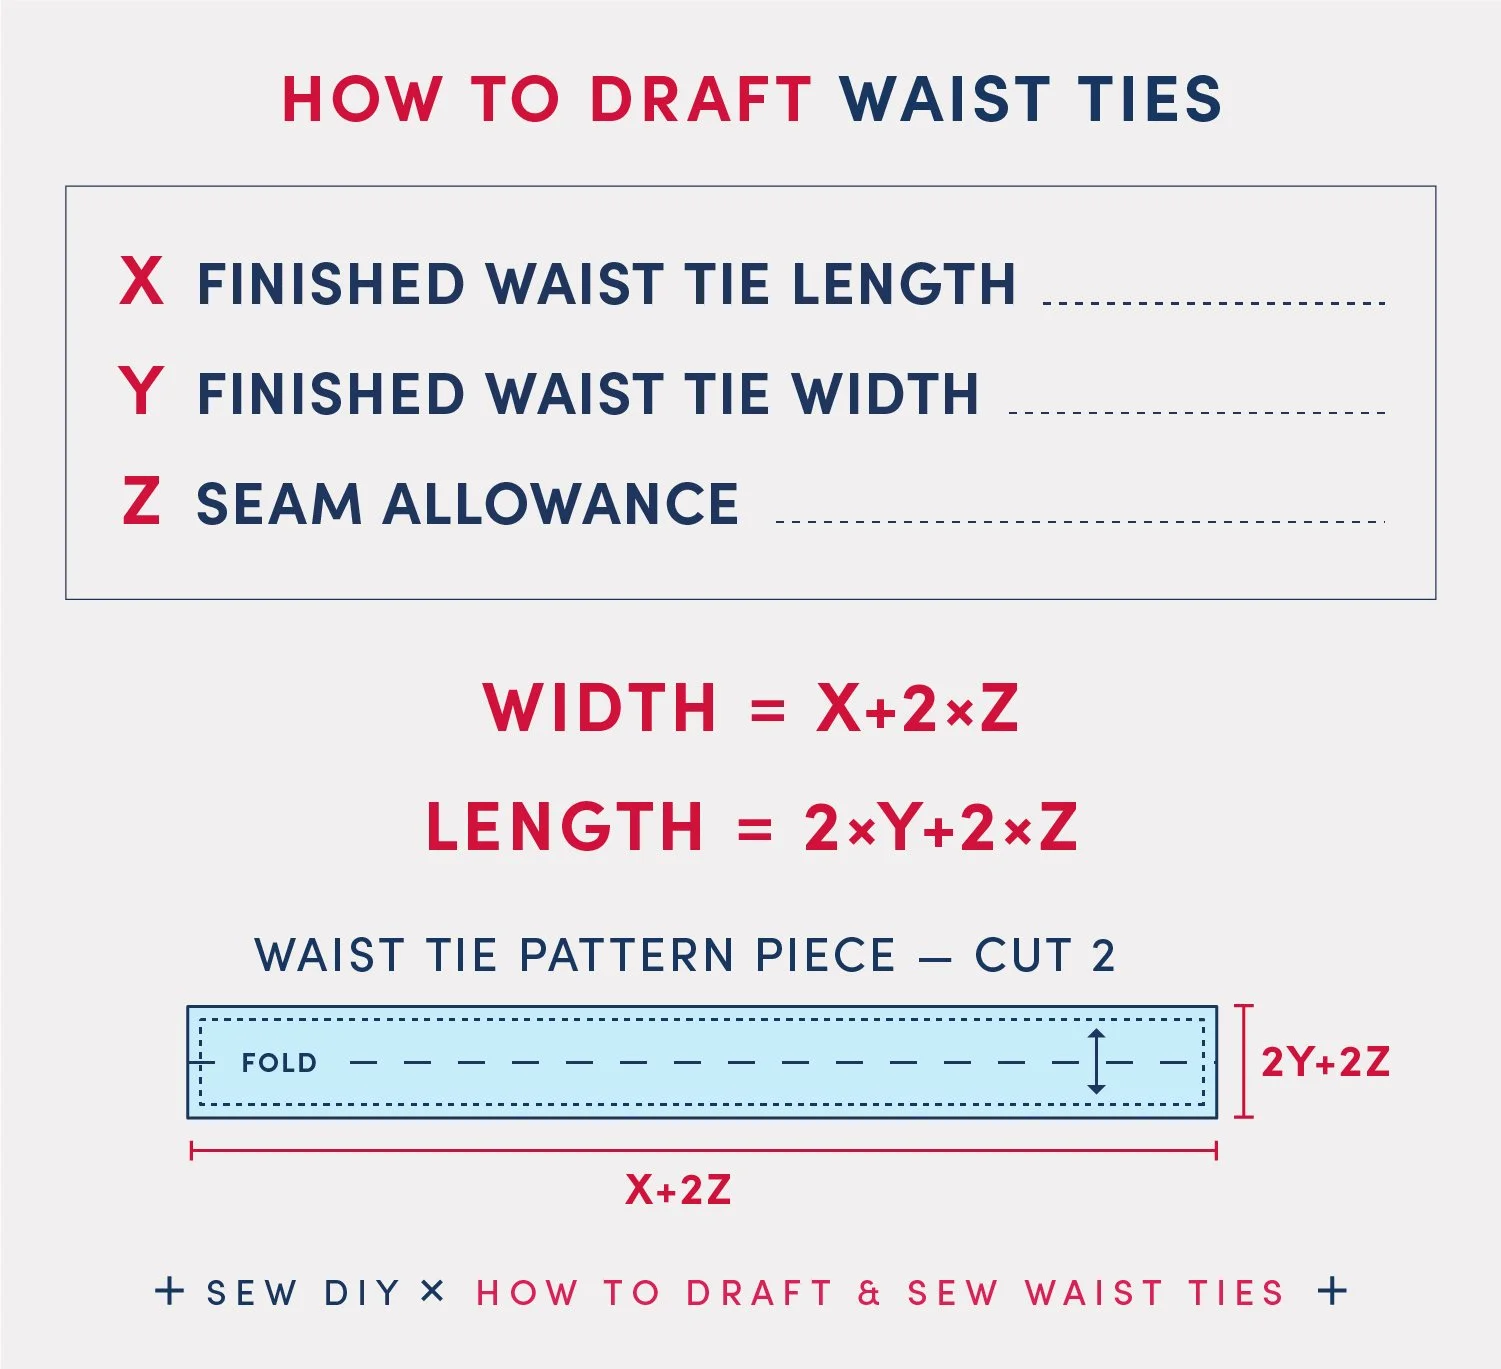
X = Finished Waist Tie Length Each tie needs to be as long as half your back waist, plus length for a bow and for the tail of the bow. I recommend using ribbon to estimate this length.
Y = Finished Waist Tie Width This is designer’s choice! Remember that the thinner the tie, the harder it can be to turn right side out. A tube turner tool can be very helpful.
Z = Seam Allowance I recommend using the same seam allowance that you’re using for the rest of the pattern, to reduce confusion.
The waist tie pattern piece is just a long thin rectangle. When sewn, the waist tie will be folded in half lengthwise so that the wrong side of the fabric is not visible and the raw edges are enclosed. The width of the pattern piece is X Finished Waist Tie Length plus two times Z Seam Allowance. The length of the tie will be two times Y Finished Waist Tie Width plus two times Z Seam Allowance.
WIDTH = X + 2Z
LENGTH = 2Y + 2Z
Use the pattern piece or ruler to cut two pieces of fabric.
For my dress, I wanted ties that were 25” long and 1.5” wide. I used the following dimensions: X=25'“, Y=1.25” and Z=.5”.
Width = 25+.5x2=26 and Length = 2*1.25 + 2x.5 = 2.5 + 1 = 3.5.
So I cut two pieces of fabric 26” by 3.5”. I could probably make the ties a little bit longer but there’s always the risk that if they’re too long they’ll end up falling in the toilet. iykyk. :P


HOW TO SEW WAIST TIES
Sewing the waist ties is fairly simple. You just need to fold in half and stitch. The hardest part of sewing the waist ties is actually turning them right side out. Watch the video below for a quick overview, or read on for a step-by-step instruction and illustrations.

Step 1: To sew the waist ties, fold the fabric in half lengthwise with right sides together. Stitch along one short end and the long edge. Repeat for second tie.
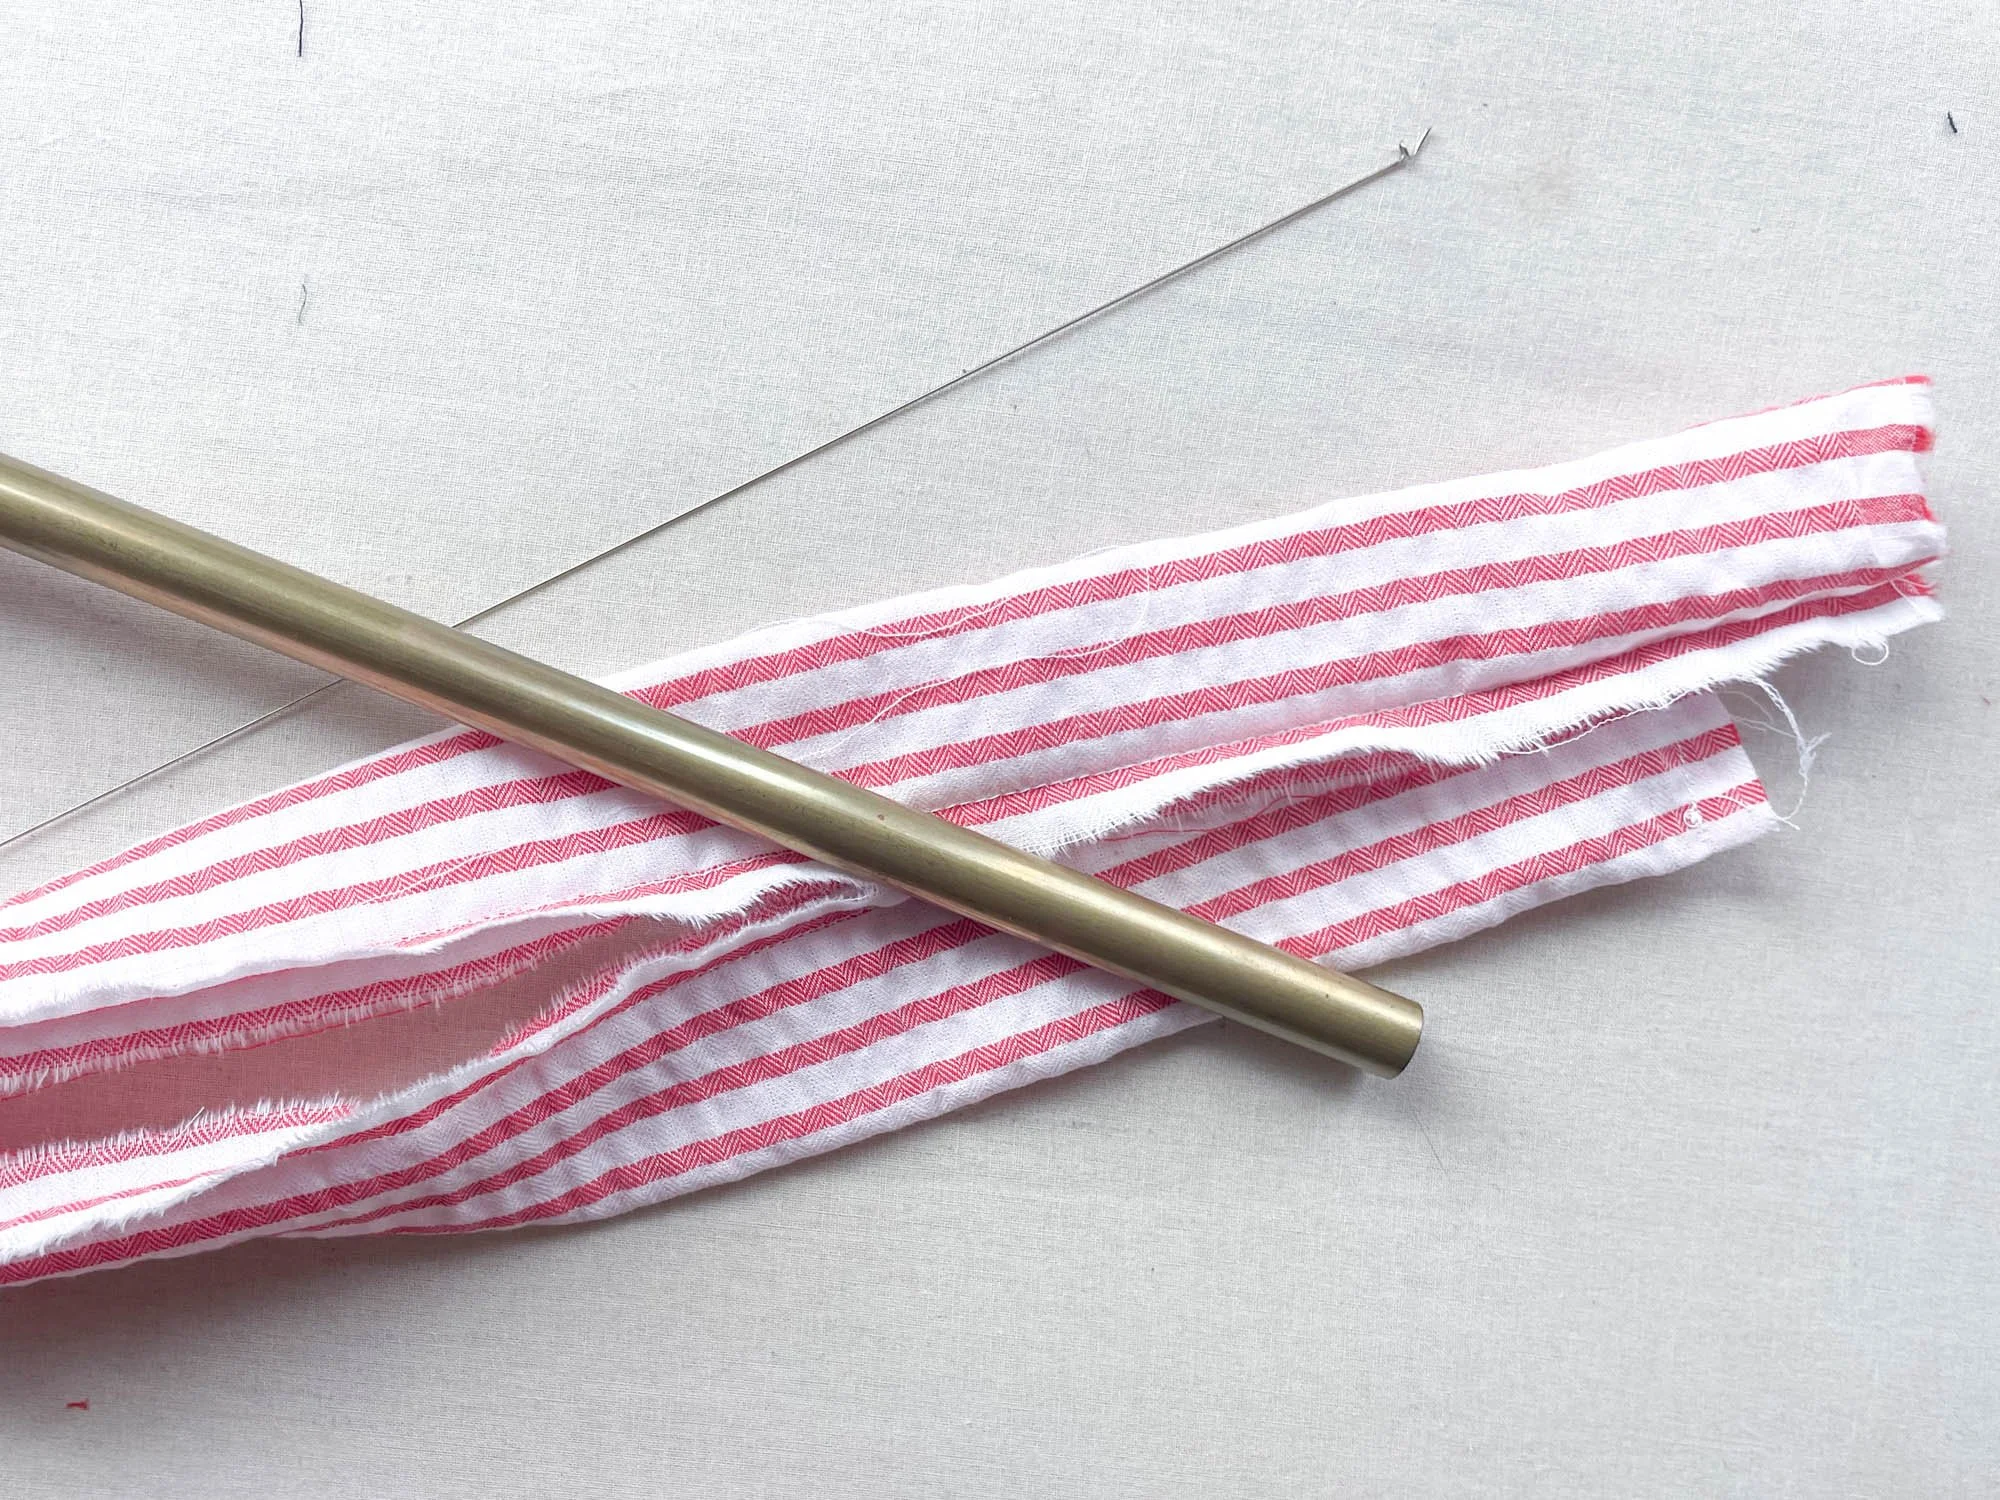
TIP: Before turning right side out, I like to press the seam open. To do this, I insert a wooden dowel inside the waist tie and center the seam on top. This will help you press the tie extra flat along the seam.
Step 2: Turn the ties right side out and press with the seam on one edge. If the seam is not at the edge of the tie, use your fingers to gently push and roll the fabric so that the edge is flat and not buried inside the tube.
TIP: For ties where one end is sewn closed, I like to use a tube turner. There are devices you can buy like the one shown above. Or a tube and chopstick also work well.
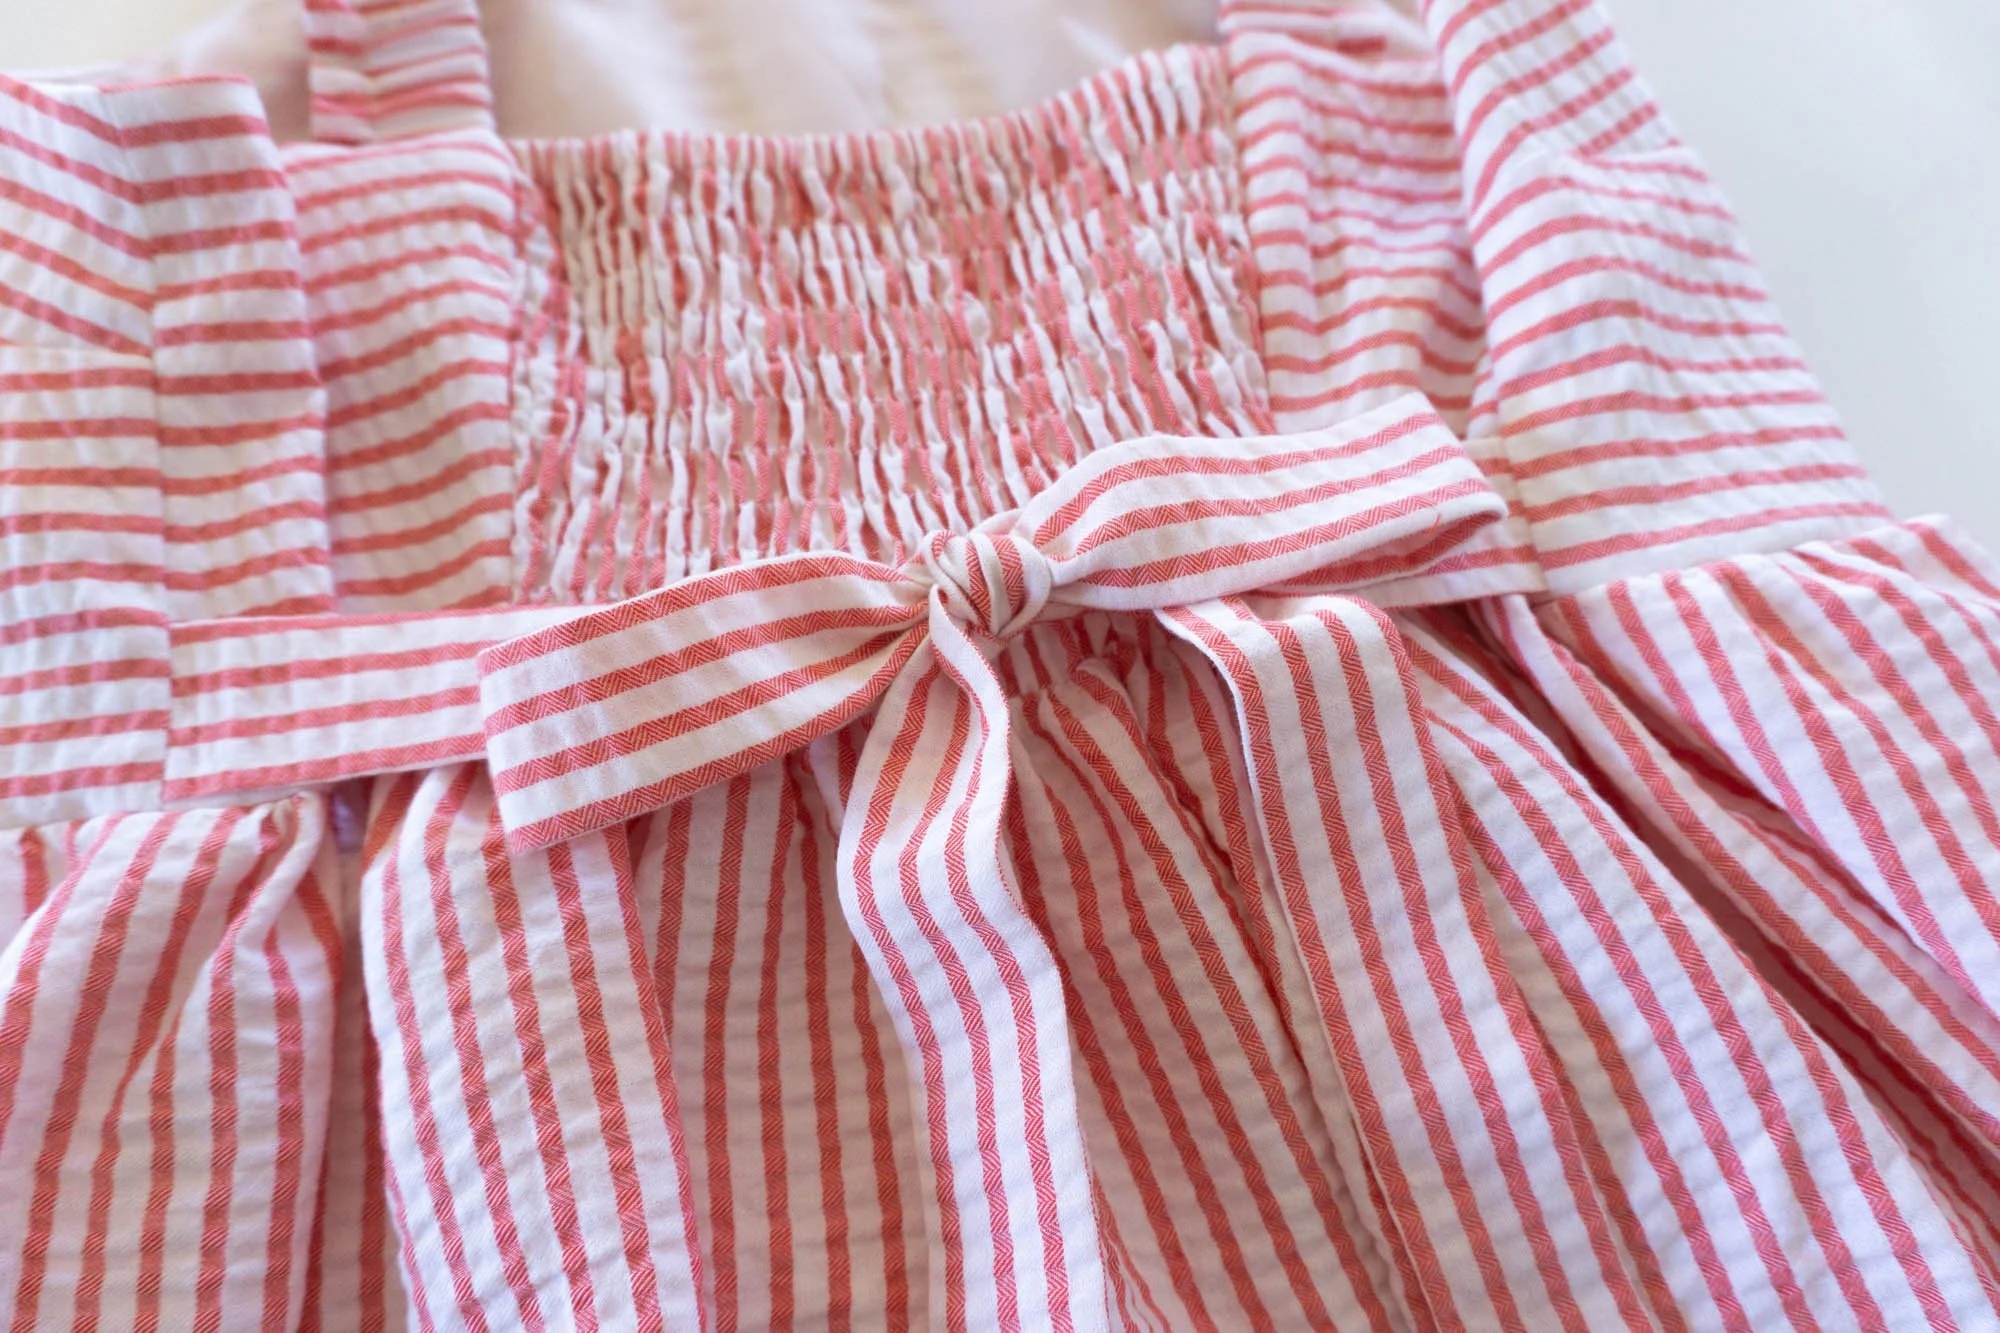
Step 3: Baste the ties to the side seam. Before stitching the front and back side seams, baste the raw end of each tie to the side seam at the waist point. On my Eva pattern, I positioned the tie 1/2" (1.2cm) above the raw edge so that the tie sits right above the seam with the skirt. Sew the side seams as normal.
If you learn best from videos, check out the video below for a quick overview of sewing the waist ties.
Now that you know the basics of sewing a waist tie, you can explore some variations! Here are a few ideas:
Make an extra wide tie for a dramatic bow.
Add carrier loops for the waist tie.
Make an extra thin tie.
Make an long tie that wraps around and ties in the front.
Add a trim to the seam, such as rick rack or piping.
Make the tie a triangle shape that is wider at the side seam and narrows at the ends.
I hope that you found this tutorial helpful. A waist tie is the easiest way to add a little (adjustable) fitting to the waist of a dress or top is with a waist tie. Plus, you get a cute bow at the back. Pin the image below to save this tutorial for later. Happy sewing!