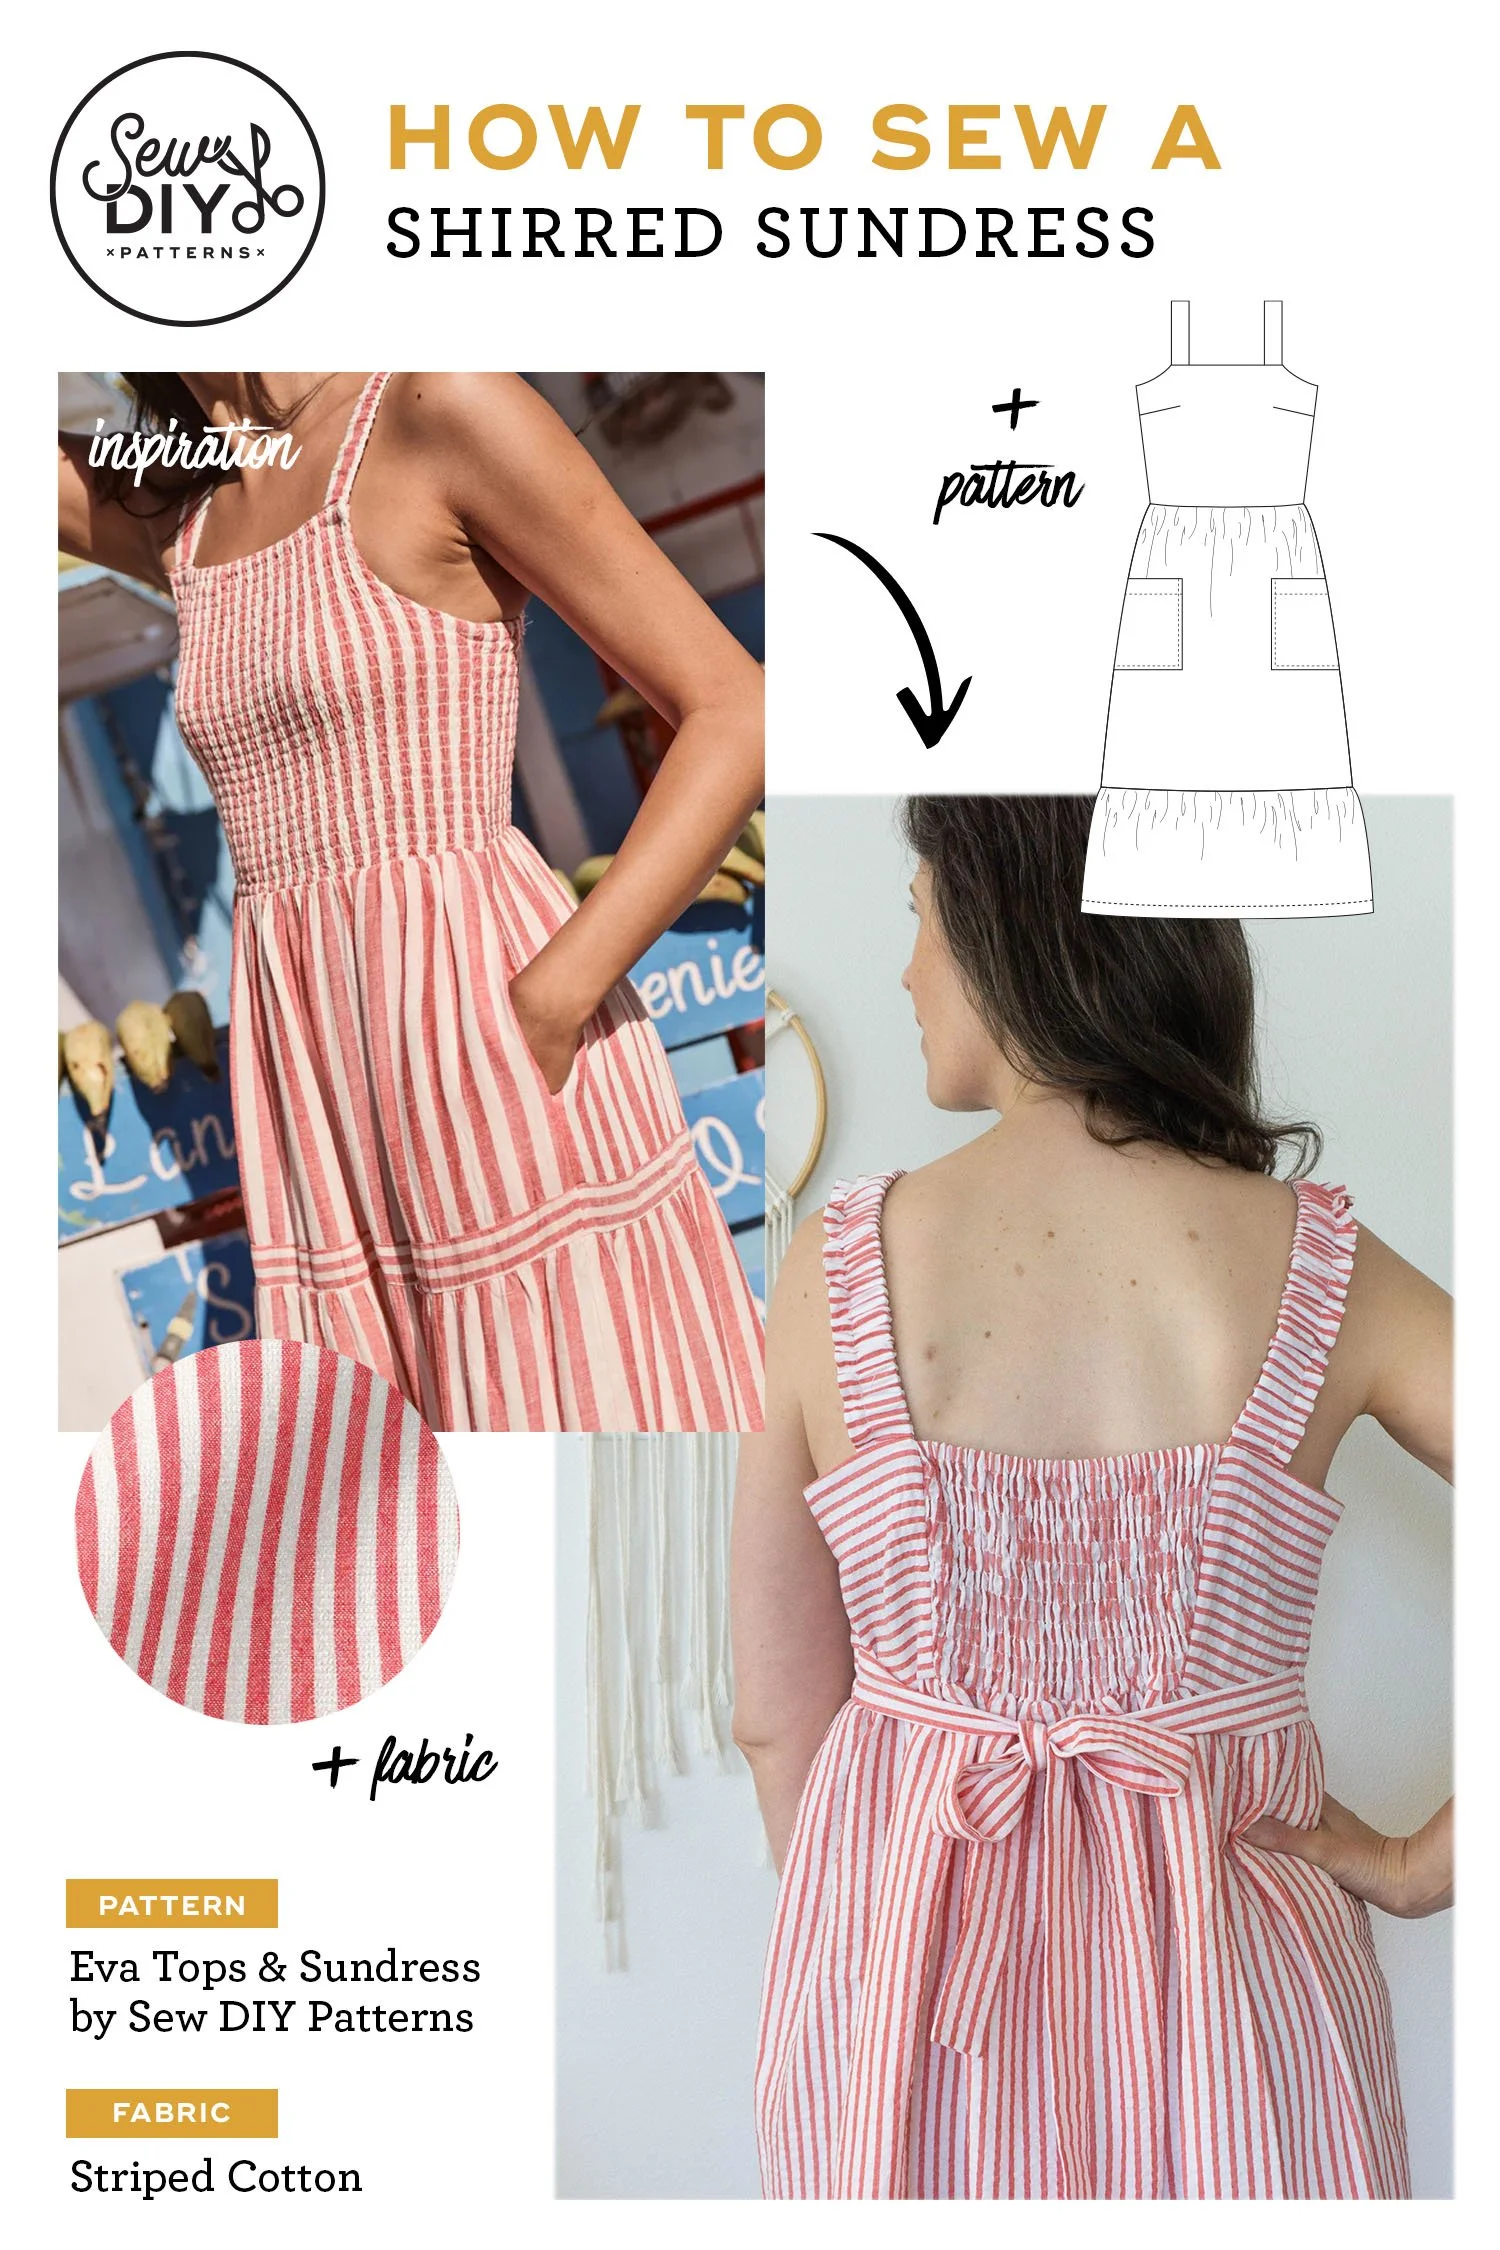
Hello sew-friends! Today, I have a new hack of my Eva Dress to share with you. If you're not familiar, the Eva Tops and Sundress, they are semi-fitted with a square neckline, side bust darts and are fitted at the back with a combination of narrow elastic and criss-crossed lacing. This pattern is size 0 to 32 with three cup size options for EVERY size. The cup sizes are A/B, C/D AND E/F.
For this hack, I took the dress version and made three major changes plus a handful of small changes. First, instead of the lacing at the center back, I used elastic shirring. Second, I added ties at the waist. And lastly, I made ruffled elastic straps. I have separate tutorials for how to draft and sew each part of the hacks. Read on for all the links and details.
BUY THE eva tops & Sundress PDF PATTERN HERE.

Let's start with the inspiration for this hack. A couple months ago, I saw this dress in a catalog from a brand called Marine Layer. (Yes, a real catalog that was mailed to my house! I used to LOVE looking through catalogs back in the day.) Anyway, I was immediately drawn to the dress because I've had a very similar red striped fabric in my stash for many years. And the silhouette is very similar to my Eva pattern. You might say it was kismet.

I did a lot of planning and pondering before starting to sew this dress. This pattern is a little unique in that except for the front bodice and facing, most of the pattern pieces are rectangles that you cut out with a ruler. It’s pretty zero-waste friendly and you don’t need to print a ton of pages. The pattern has charts for the different pattern pieces and a printable worksheet for each view. Above is my worksheet for this project with all my notes and sketches.
And while that planning helped, it was not a smooth process. I just cut things out wrong—multiple times!—and the shirring didn't go as expected. I felt a little cursed by Mercury Retrograde. But honestly, it was 80% smooth sailing and just a couple of storms.
FABRIC
The fabric is a red and white striped cotton seersucker that I was gifted by The Fabric Store back when they had a brick and mortar location in Los Angeles. For a long time, I thought I'd sew pants or skirt but I just never got around to it. But when I saw the photo of my inspiration dress in the catalog, I thought it would be really fun to try to recreate it. I also liked the idea of playing with the orientation of the stripes to create contrast and I saw a lot of similar dresses during my Pinterest research.
I found a similar red striped fabric from Matchy Matchy Sewing Club. I’ve never ordered from them before but they seem to be popular and have lots of color options.
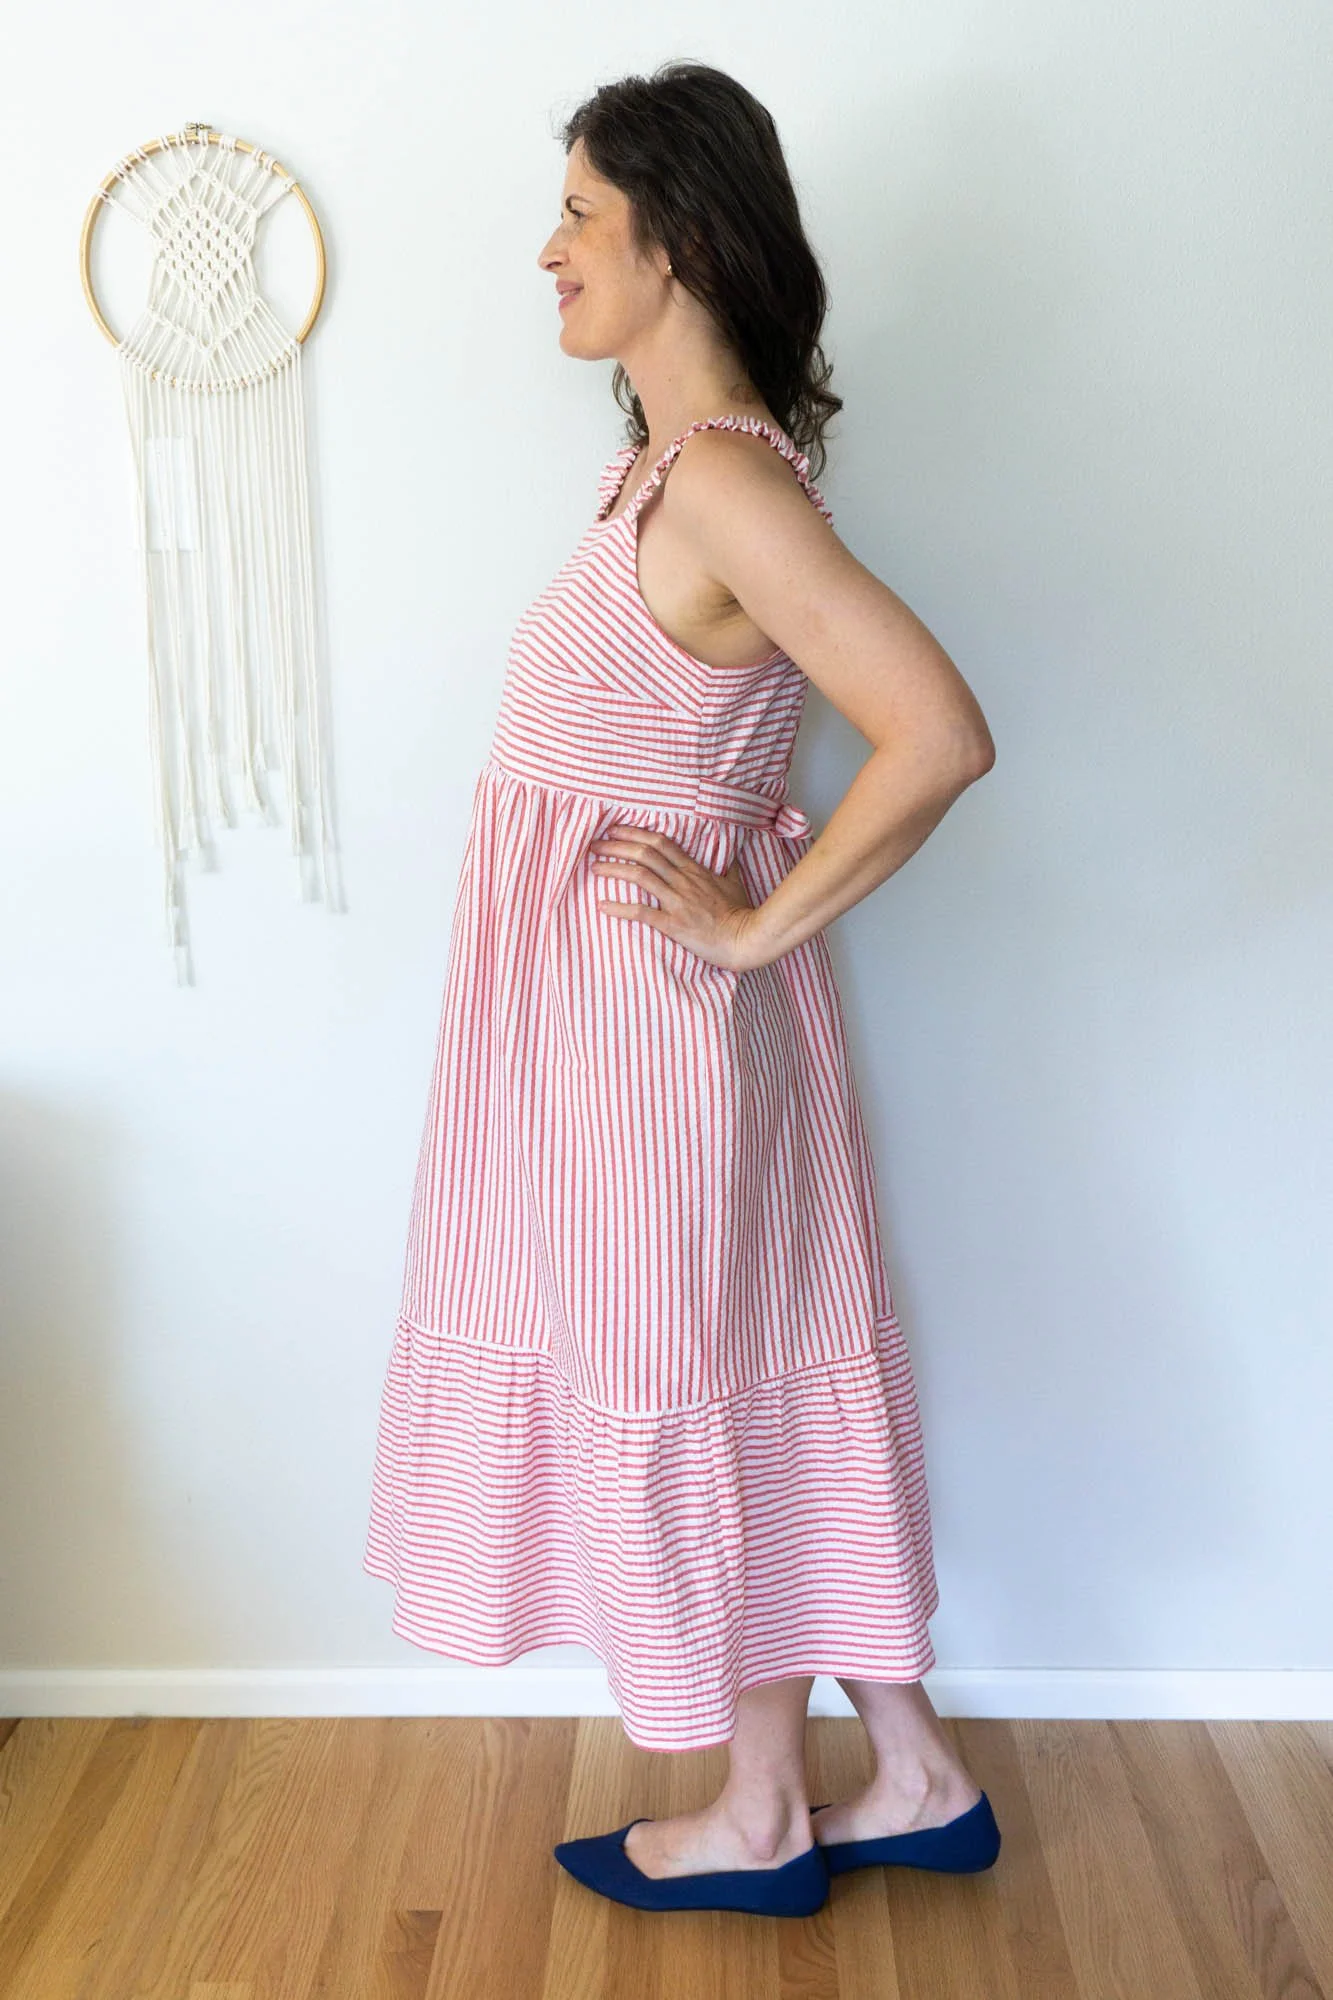
Before we get into the major hacks, I want to mention a couple of small details. First, I decided to make the bodice a little bit shorter and to leave off the pockets. Will I regret not having pockets in this dress? Very likely, yes. I really should have added some side seam pockets! I’m also not 100% convinced this is the right length. It feels a little short on me but maybe I’m just feeling sensitive. As a tall person (just over 5’11”), I’m always worried that things look to short. The last dress I made is extra long and I may be comparing too much.

Inside of front bodice

Inside of back bodice
Another small change I made was to use a lining for the front bodice instead of a facing. Instead of cutting the front facing, I just cut a second front bodice piece from lining fabric. I was a little worried about not having the structure of the interfacing at the neckline but I think it’s fine. Phew!
Above are photos of the inside of the bodice, for all the sewing nerds out there. I will usually hand tack linings and facing but I actually machine stitched this time. Before sewing the bodice to the skirt, I flipped the bodice lining inside out and stitched the side seam seam allowances together. I think it actually worked pretty well.


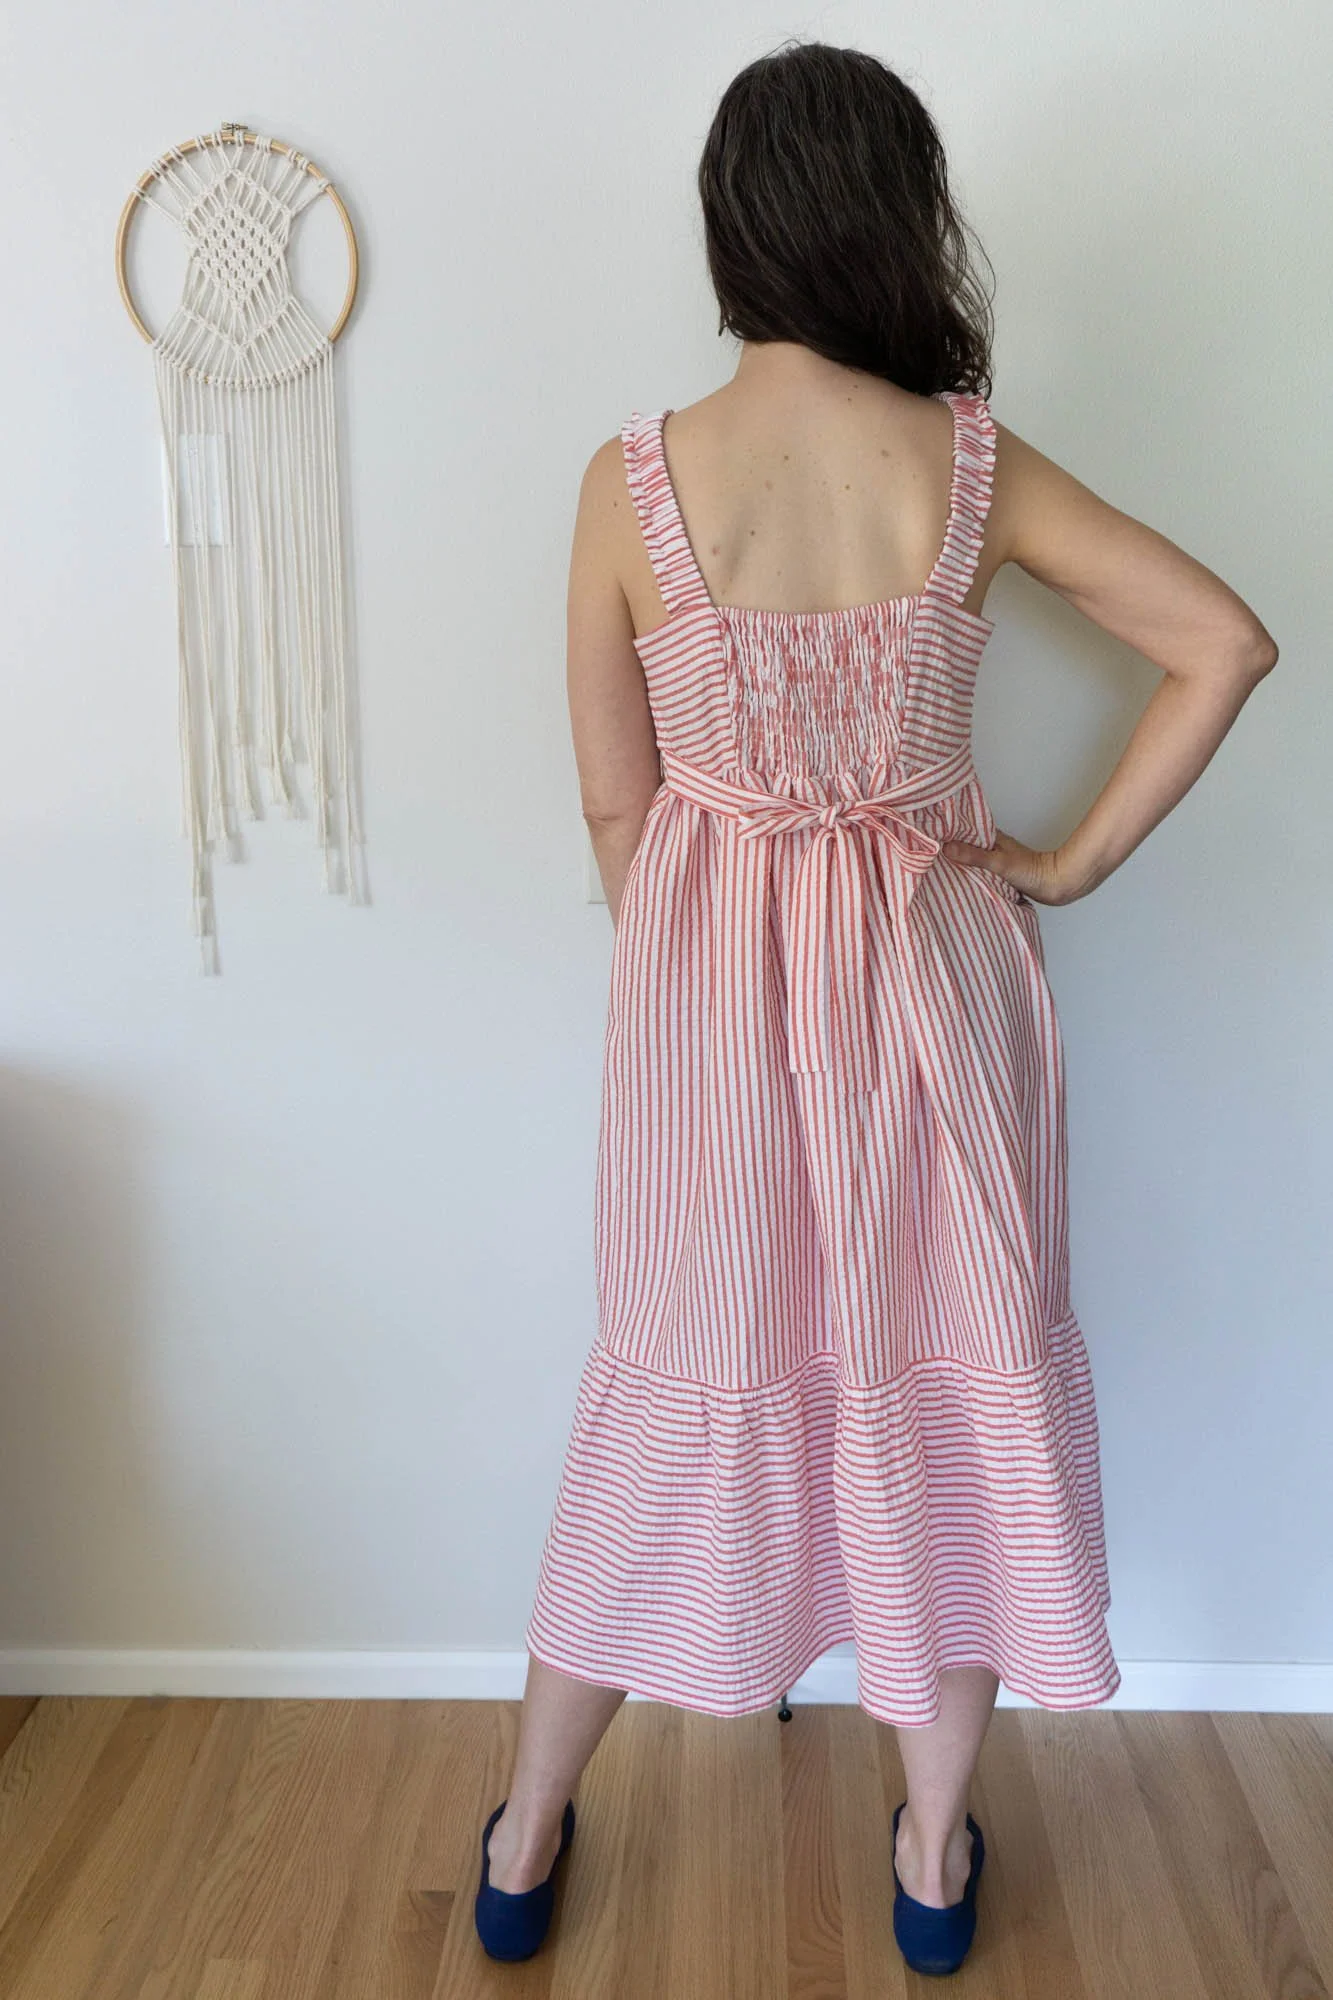
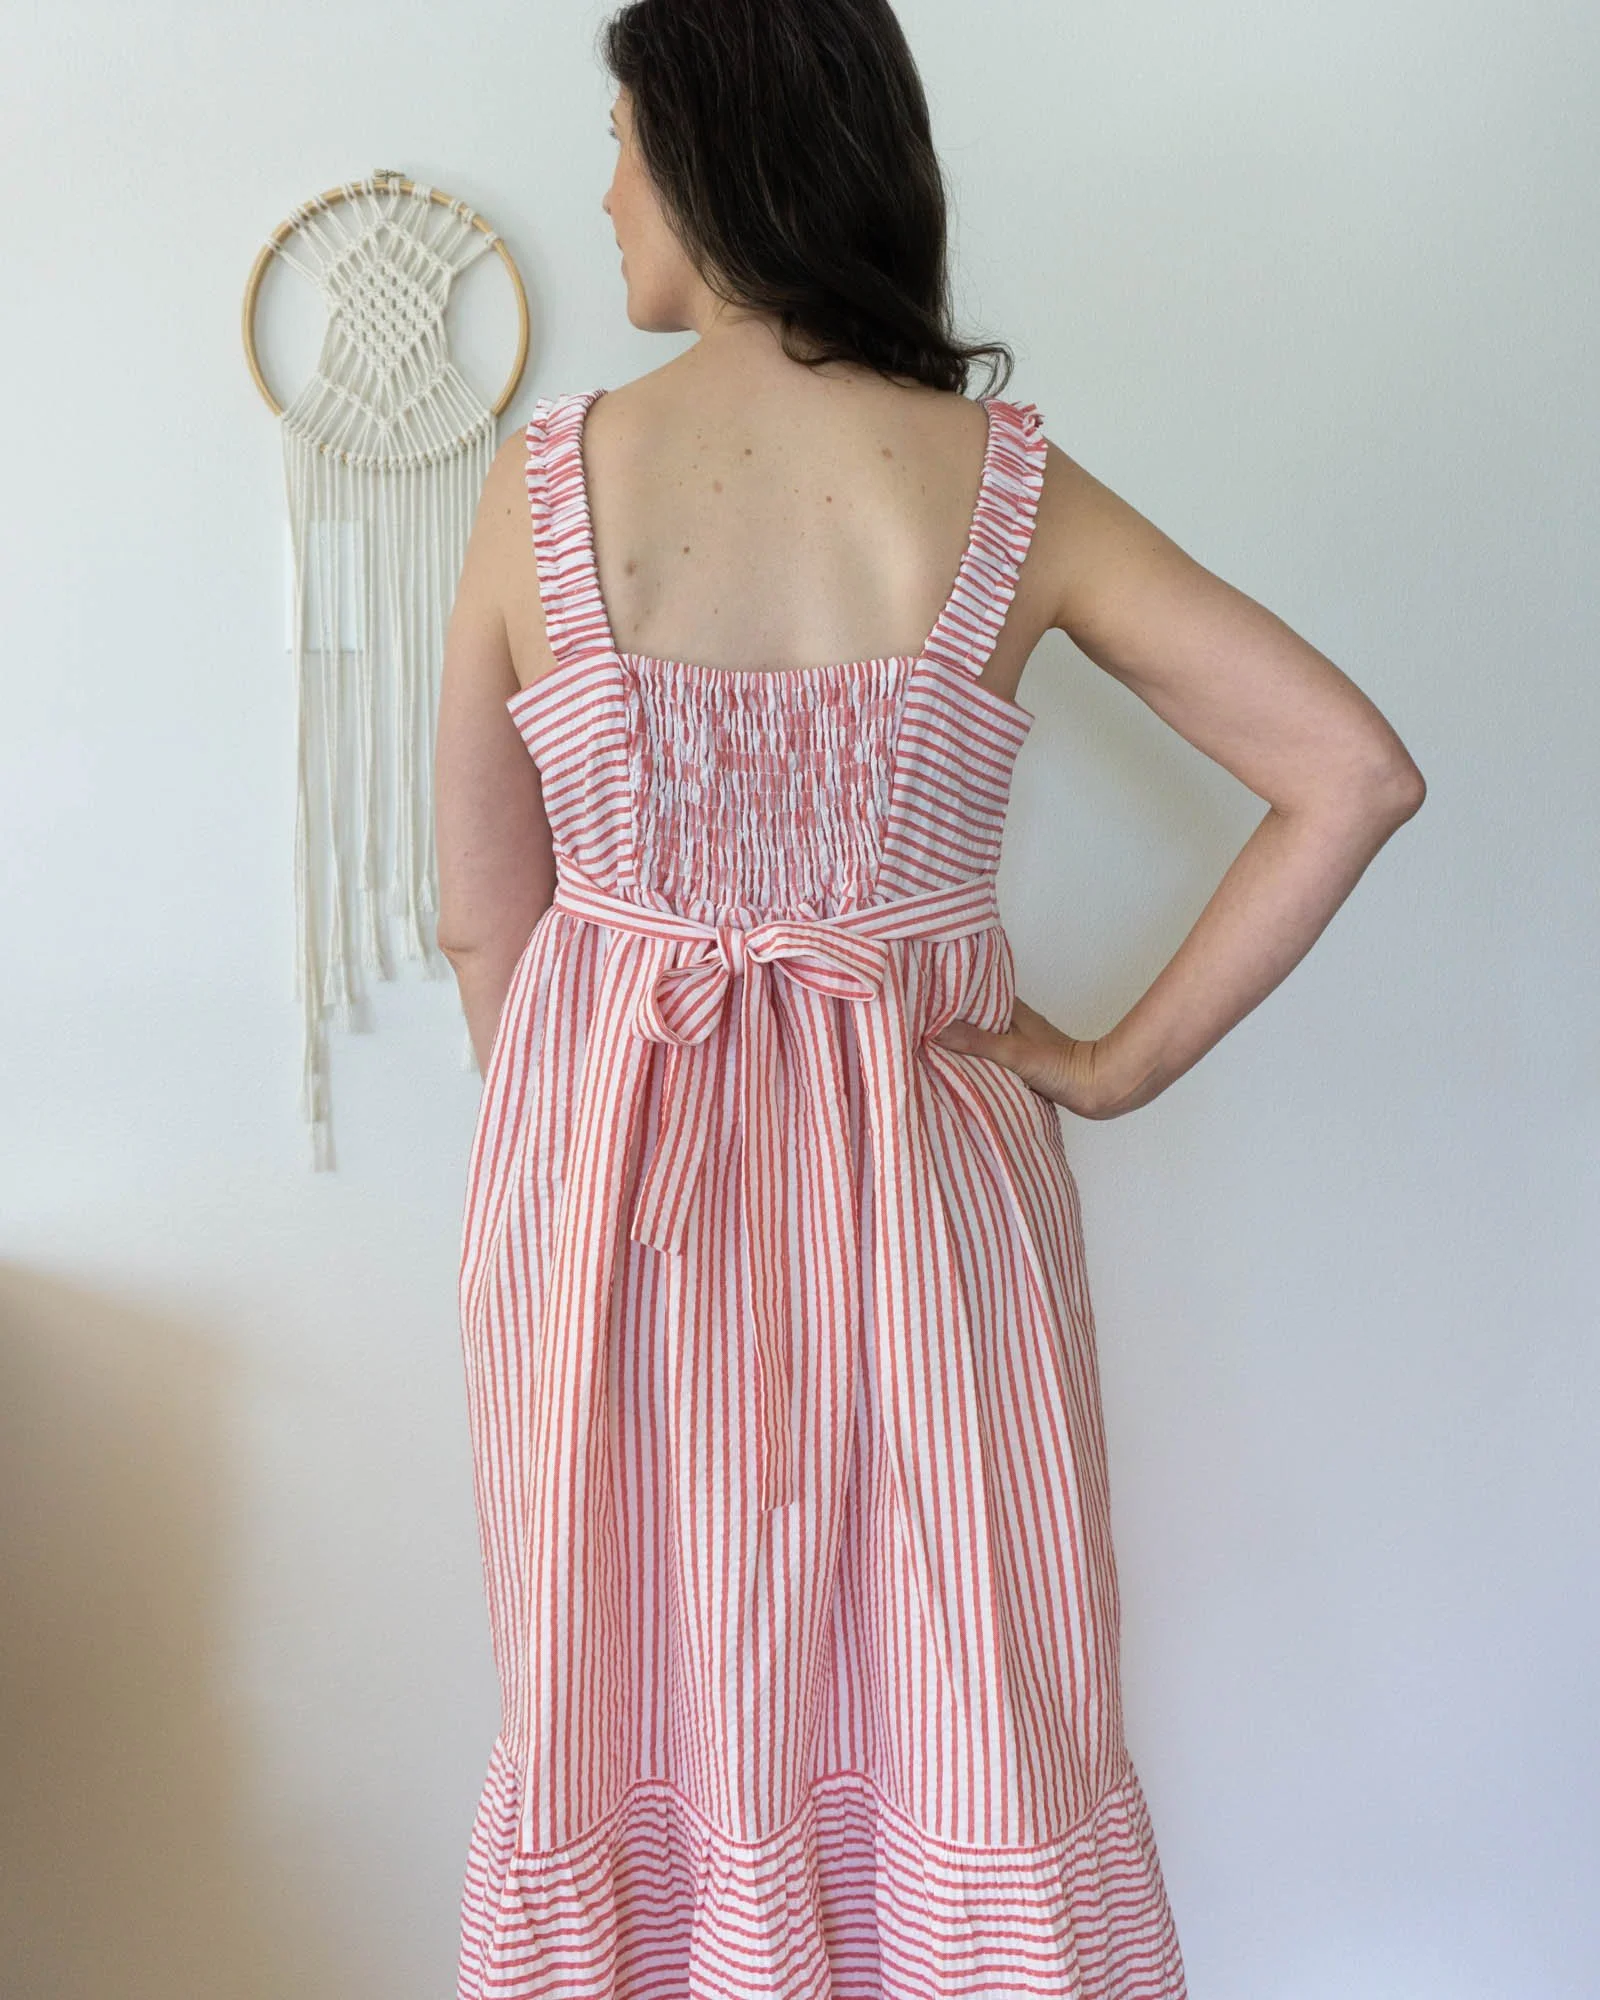
Hack Part 1—The Shirring
If you're not familiar, shirring is made when you sew with elastic thread in the bobbin. It's a fun way to create a stretchy fabric and I've been seeing it everywhere the last few years. I have a blog post with tips here and linked here: TIPS FOR SEWING SHIRRING WITH ELASTIC THREAD
The inspiration photo has shirring over the entire bodice but I wanted to retain the dart in the front bodice and wasn't sure how that would work with shirring. So, at first, I tried making the entire back panel out of shirred fabric. (The Eva has side back pattern pieces and a center back pattern piece.) But, when I tried it on it was so tight that the bodice was actually painful. The elastic back pulled the front as tight as possible and it dug into my armpits. It was horrible and extremely disappointing.
But not all was lost. I have made another Eva Hack using shirring where I only added shirring to the center back panel and that top is not too tight. So, I cut the shirring panel smaller and cut side back panels according to the pattern. I spent quite a bit of time fitting the bodice and decided to remove a wedge between the center and side back seams, kind of like a waist dart. All in all, I'm happy with the shirring and sewing the shirring panel was not hard. But I was surprised at how tight the first version was. I imagine if the entire bodice was shirred, it would not have been as much of an issue.
If you want to add shirring to your Eva, check out this post. For the crop top, I also added an elastic casing at the center back hem.

HACK PART 2—WAIST TIES
Next, I added ties at the waist. These were (thankfully) very simple to sew. The only problem was when I forgot to sew them on. My seam ripper got a lot of use with this project! I wrote up a separate tutorial for how to draft and sew waist ties. This tutorial can be used for any top or dress that has side seams.
For reference, I cut the waist ties 26” x 3.5” and used a 1/2" (1.2 cm) seam allowance.
HOW TO DRAFT AND SEW WAIST TIES

HACK PART 3—ELASTIC RUFFLE STRAPS
The inspiration dress features elastic straps so I thought it would be fun to add them here. I sewed a self-drafted nightgown last year that has elastic straps with a baby ruffle and I really like the look. So, I did the same technique for these straps. Instead of the flat fabric strap that the pattern uses, I cut the fabric longer and made it into a casing for elastic. I also topstitched a little ruffle for added charm. For reference, I cut the elastic straps 28” x 4” and used a 1/2" (1.2 cm) seam allowance.
I wrote up a separate tutorial for how to draft and sew elastic straps that can be used for any top or dress that has separate strap pattern piece. In the tutorial, I show how to draft elastic straps for any size elastic and ruffle. Plus, I show how to sew them with illustrations, text and video.
HOW TO DRAFT AND SEW ELASTIC STRAPS
These semi-fitted tops and sundress feature a square neckline, side bust darts and are fitted at the back with a combination of narrow elastic and criss-crossed lacing. View A is a crop top that ends at the waistline. View B has a ruffled peplum and ends at the high hip. View C is a dress with a calf-length skirt and ruffle at the hem.
The pattern is a hybrid of a traditional pattern that you need to print and a zero-waste style pattern. You will need to print (or project) the front bodice and front facing pattern pieces. The remaining pattern pieces are rectangles that you can draw directly on your fabric (or paper) and then cut out, saving you paper and fabric.
This digital pattern includes an illustrated, step-by-step instruction booklet, a print-at-home layered pattern for letter or A4 size paper, a US copy shop pattern, an A0 size pattern and a projector pattern. All pattern files have layers. Pattern files are separated by cup size so that you can easily print only the pattern pieces that you need.
Visit the sewalong for more information, tips and tutorials.
Model is 5’11” and is wearing a size 12 C/D cup.
THIS IS NOT A PHYSICAL PRODUCT. After checkout, you will receive a link to the pattern that will be active for 24 hours after you click it. Prices are in USD.
CONCLUSION
I really like this dress and I hope that I can get some good wear out of it this summer. It's very satisfying to be able to use fabric that's been in my stash for so long. That said, it was not the smoothest sewing project for me. Perhaps it was the THREE different variations that I added? Plus the directional stripes! It was involved for sure.
If you haven’t gotten your copy yet, you can get the Eva Tops and Sundress pattern in the shop. And make sure to check out the Eva Sewalong for more tips and tutorials posts. Happy sewing!
ABOUT THE EVA TOPS & SUNDRESS PATTERN
The Eva Pattern includes two semi-fitted tops and a sundress all of which feature a square neckline, side bust darts and are fitted at the back with a combination of narrow elastic and criss-crossed lacing. View A is a crop top that ends at the waistline. View B has a ruffled peplum and ends at the high hip. View C is a dress with a calf-length skirt and ruffle at the hem.This pattern is size 0 to 32 with three cup size options for EVERY size. The cup sizes are A/B, C/D AND E/F.