Today’s post is a deep dive into how to make bust adjustment to a pattern with a side dart. The objective of the bust adjustment is to make the dart bigger or smaller so that the shaping fits your body better. I share details on what a full or small bust adjustment is, what you might want to make one and how to do it. I show how to calculate a bust adjustment and how to make the adjustment to your pattern. I’ve included illustrations, written instructions and videos for how to do a full bust adjustment and a small bust adjustment.
A full bust adjustment is one of the most common pattern adjustments that sewists need to make is a. Most sewing patterns are designed for a B-cup and most drafting books do not even address different bust sizes. (The only one that I’ve found to include different sized darts is How to Make Sewing Patterns by Don McCunn Bookshop link.) Since most people are not a B-cup (imo anyway), then lots of sewists are going to need to make this adjustment.
Garment patterns need to fit a lot of different components and while they generally do a pretty good job of fitting the back, shoulders and waist circumference, they do not do a great job of fitting the curves of the bust, especially a larger bust. If you have a full bust, it’s very common to pick a pattern size based on the full bust measurement. The circumference will fit the body but often the shoulders and back are too big because that circumference measurement is not distributed for a fuller bust. With an FBA, you can get a pattern that fits the shoulders and back but also has extra room for the bust in the front.
You may want to make a bust adjustment with every pattern (especially if you have a very large bust) or you may only make adjustments to very fitted patterns. Personally, I have a sewing D-cup and I usually only do an FBA for more fitted patterns. If something is very oversized or a knit fabric, it doesn’t make a huge difference to the fit.
This post is specifically for patterns WITH a side bust dart. If you want to add a dart to a pattern that doesn’t have one, check out this post.
Here are a few FAQs before we get started.
What is a Full or Small Bust Adjustment?
This adjustment is made to the dart that creates shape at the bust (usually a side seam dart in a bodice). It will make the dart larger for a full bust and smaller for small bust. The objective is to get a better fit for the bust while maintaining a good fit in the shoulders and back.
How do I know if I need a Bust Adjustment?
If your muslin has extra room or is hanging loosely in the bust area but fits well elsewhere, then you might benefit from a small bust adjustment.
If the fabric is straining over the breasts and there are drag lines coming from the bust apex, you may need a full bust adjustment. Alternately, you may have a pattern that fits your circumference but is too big in the back and shoulders. In that case, you need to size down and do an FBA.
Can I use my bra size to find my sewing cup size?
No. Your bra size can be helpful in predicting if you’ll need an adjustment but it shouldn’t be used to find the adjustment numbers. Bra cup sizes are different depending on the band size, so a 32C is actually a bigger cup than a 36C. It’s kind of complicated! I’ll take you through the calculations below to find your sewing cup size.
What bust cup size do sew diy patterns use?
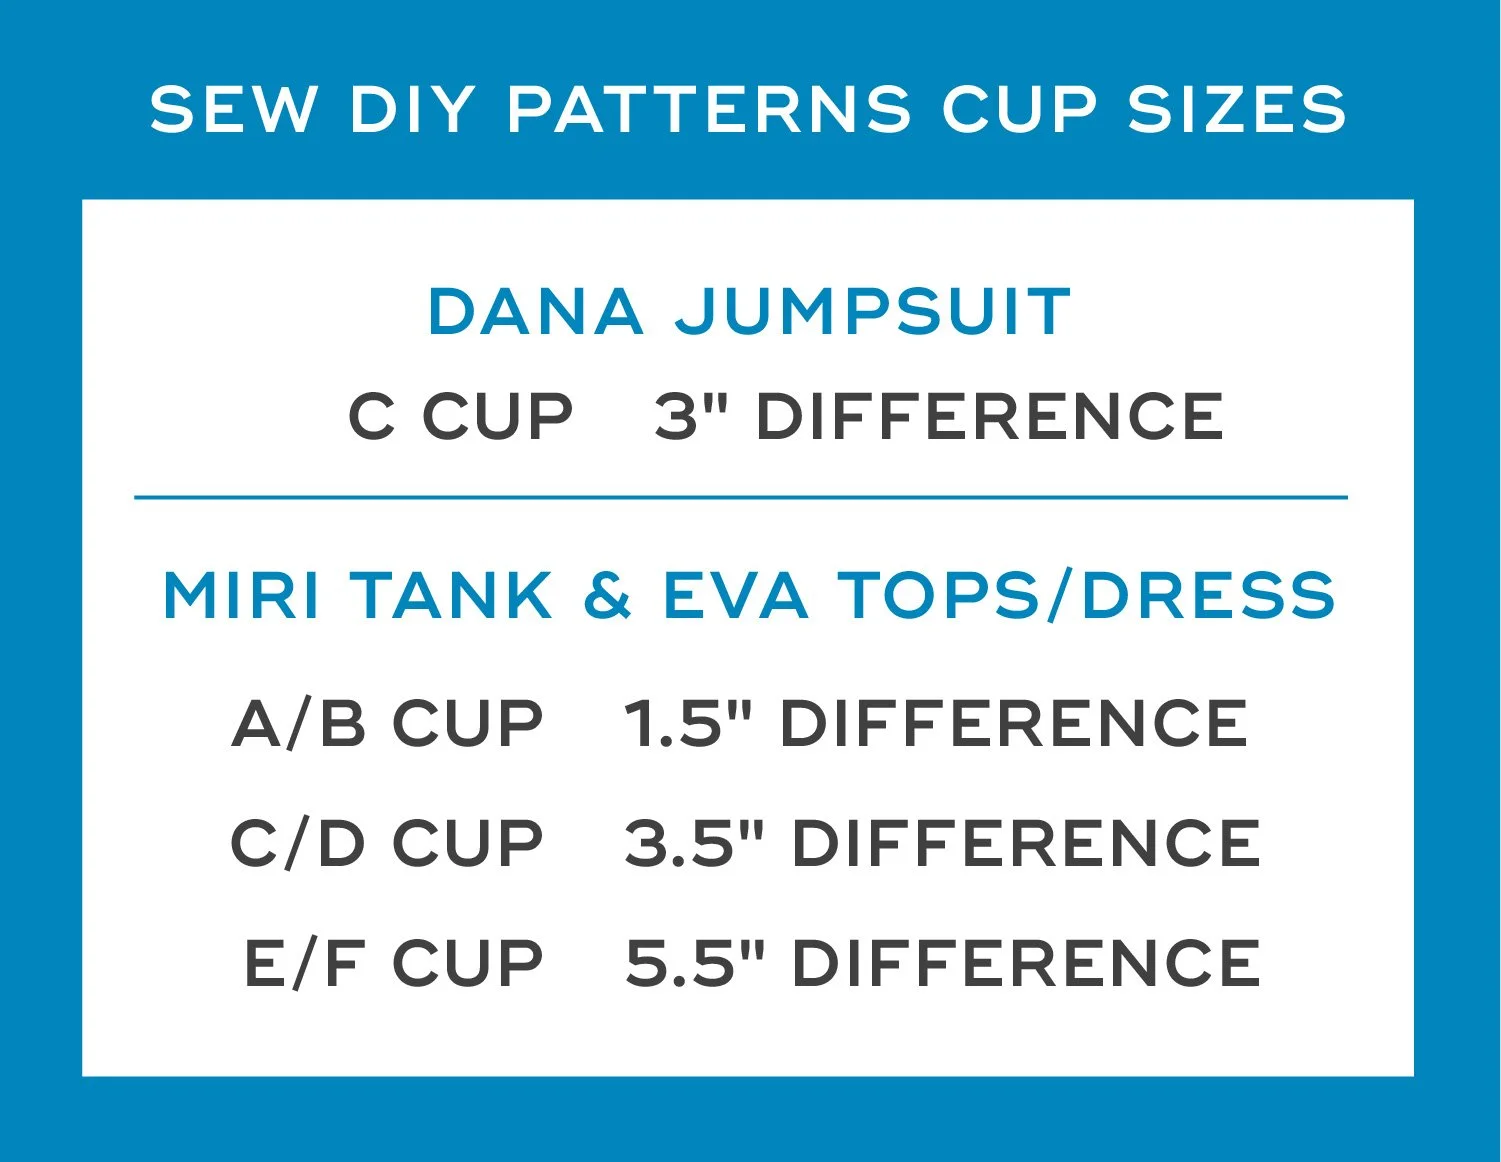
I have 3 patterns with bust darts. The Dana Jumpsuit has a sewing C-cup.
The Miri Tank and the Eva Tops and Sundress have three cup sizes, for all sizes: A/B, C/D and E/F. If you are sewing the Miri or the Eva, I recommend selecting the Upper Bust measurement that most closely matches yours (round up or down), then select the Full Bust Cup Size that most closely matches. You can learn more about selecting your size in this post.
The A/B cup is drafted to be right in between a sewing A-cup and a sewing B-cup–a 1.5" difference between the high bust and full bust. Likewise the C/D cup is drafted for a 3.5” difference and the E/F cup is for a 5.5” inch difference.
You can learn more about the sizes used in my patterns here.

The Miri Tank is a wardrobe building basic that will quickly become the shirt you reach for most often. This simple-to-sew top can be worn with skirts, pants or shorts for a variety of everyday outfits, throughout the year.
This A-line shaped tank top is fitted with a bust dart and cropped to end at the high hip. View A features a classic rounded neckline and armholes, while View B sports a V-neck in the front and gently angled armholes and back neck shaping. Both views are finished with an all-in-one facing. When made in a linen or cotton, the tank will maintain its A-line shape while worn. When made in a drapey rayon or Tencel, the shape will hang closer to the body.
This beginner-friendly pattern is drafted for sizes 0-32 and includes three cup size options for all sizes. Choose from A/B cup, C/D cup or E/F cup for a customized fit through the bust.
This digital pattern includes an illustrated, step-by-step instruction booklet, a print-at-home layered pattern for letter or A4 size paper, a US copy shop pattern and an A0 size pattern. Pattern files are separated by cup size and view to reduce so that you can easily print only the pattern pieces that you need.
Model is 5’11” and is wearing a size 12 C/D cup.
THIS IS NOT A PHYSICAL PRODUCT. After checkout, you will receive a link to the pattern that will be active for 24 hours after you click it. Prices are in USD.

These semi-fitted tops and sundress feature a square neckline, side bust darts and are fitted at the back with a combination of narrow elastic and criss-crossed lacing. View A is a crop top that ends at the waistline. View B has a ruffled peplum and ends at the high hip. View C is a dress with a calf-length skirt and ruffle at the hem.
The pattern is a hybrid of a traditional pattern that you need to print and a zero-waste style pattern. You will need to print (or project) the front bodice and front facing pattern pieces. The remaining pattern pieces are rectangles that you can draw directly on your fabric (or paper) and then cut out, saving you paper and fabric.
This digital pattern includes an illustrated, step-by-step instruction booklet, a print-at-home layered pattern for letter or A4 size paper, a US copy shop pattern, an A0 size pattern and a projector pattern. All pattern files have layers. Pattern files are separated by cup size so that you can easily print only the pattern pieces that you need.
Visit the sewalong for more information, tips and tutorials.
Model is 5’11” and is wearing a size 12 C/D cup.
THIS IS NOT A PHYSICAL PRODUCT. After checkout, you will receive a link to the pattern that will be active for 24 hours after you click it. Prices are in USD.

The Dana Jumpsuit is the perfect mix of sophistication and sport. Make the pants version in velvet or silk for sophisticated nighttime look or sew up the shorts length in a rayon crepe or cotton chambray for a carefree, summer romper. The front waist tie creates subtle shaping while maintaining total comfort.
This all-season jumpsuit features a dramatic front waist tie, a scoop neck, set-in elbow-length sleeves, an invisible back zipper and optional center front top stitching. Choose between a high curved or a deeper V-shaped back neckline.
This digital pattern includes an illustrated, step-by-step instruction booklet, a print-at-home layered pattern for letter or A4 size paper, a US copy shop pattern and an A0 size pattern.
Model is 5’11” and is wearing a size 12.
THIS IS NOT A PHYSICAL PRODUCT. After checkout, you will receive a link to the pattern that will be active for 24 hours after you click it. Prices are in USD.
One final note before we start. This is not a foolproof system but it should get you closer to a fit that works for you. For example, you may find that your “sewing cup size” doesn’t really match the size of your bust and you may want a bigger adjustment. Sometimes, you have to trust your gut and your experience more than the formula. As with all sewing, there’s a bit of trial and error involved.
How to find your Sewing Cup Size
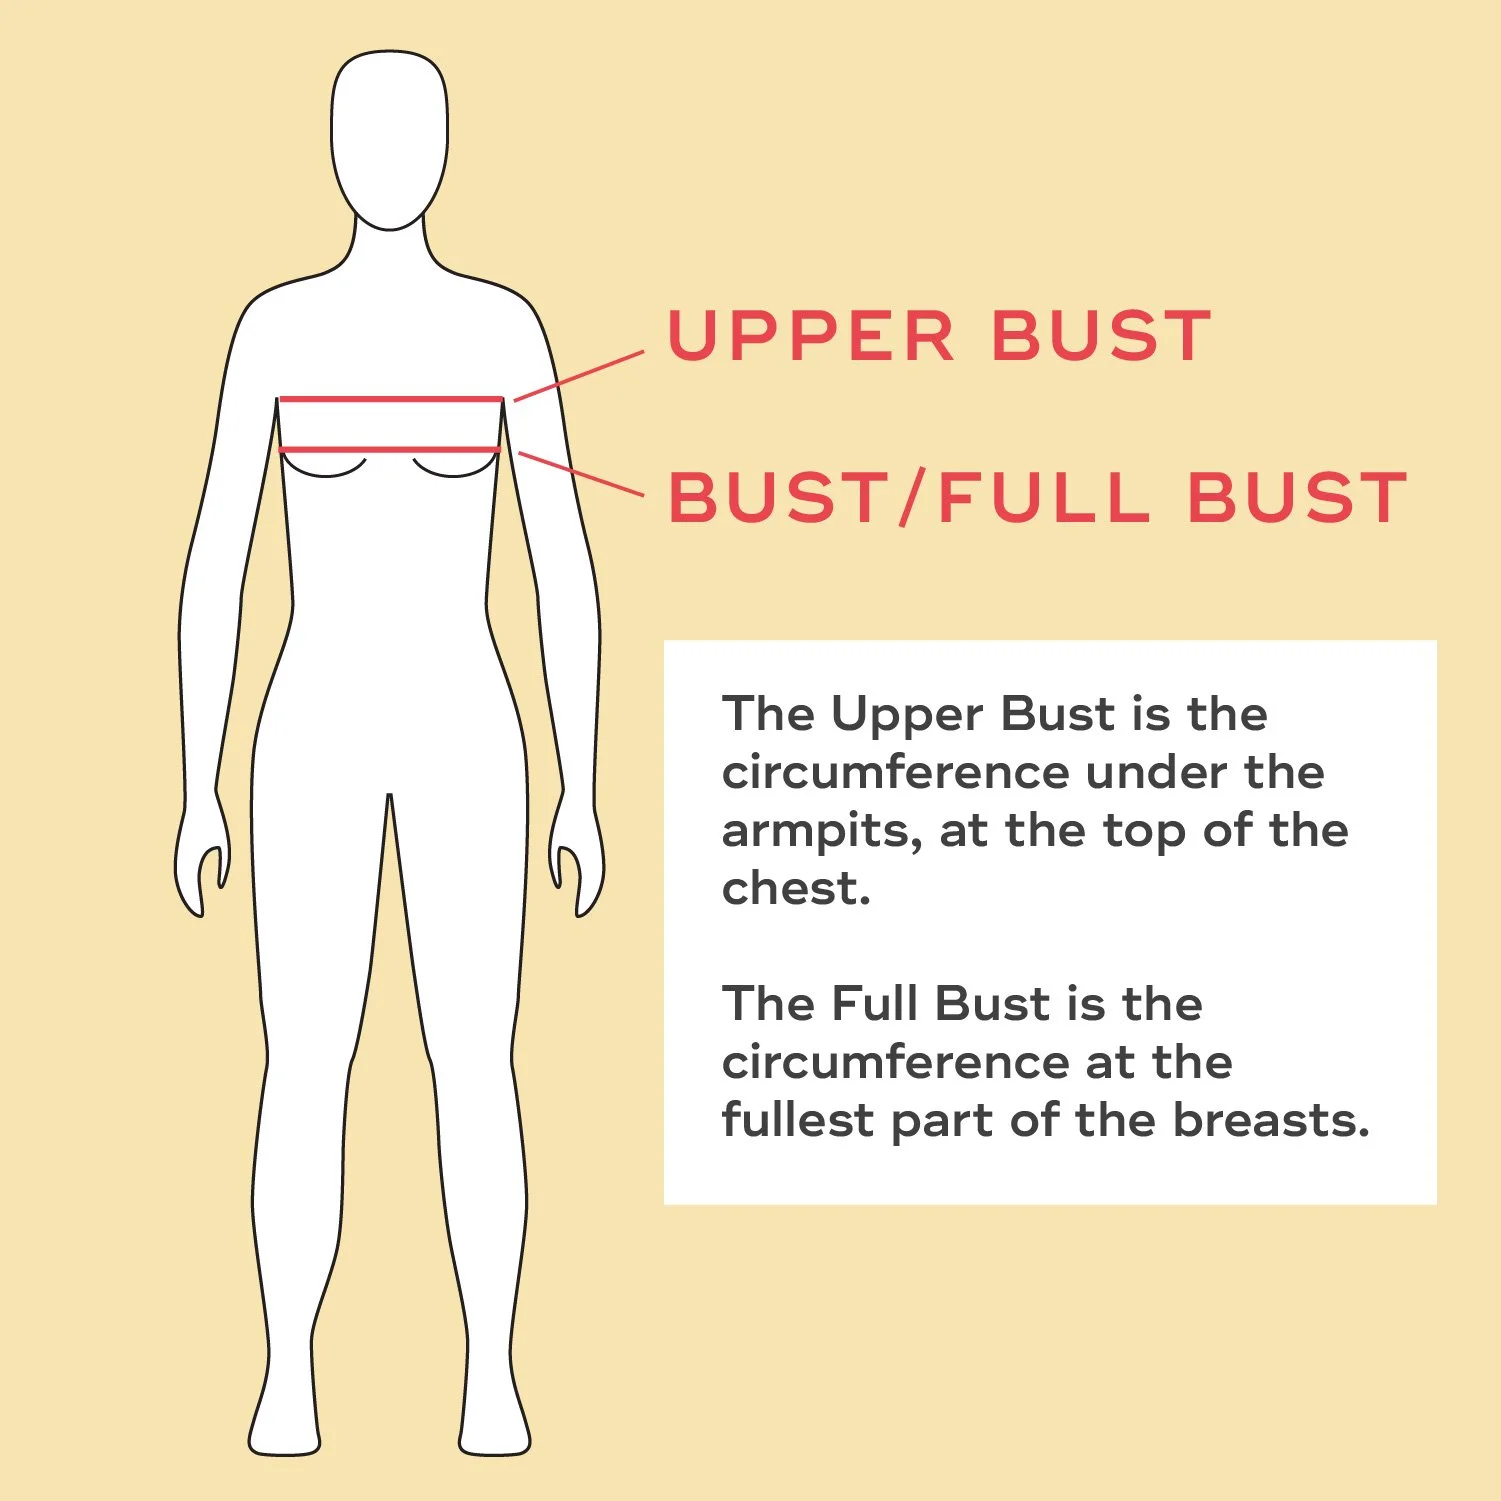
First, you need to measure your upper bust and full bust. To take your measurements, you'll want to use a flexible measuring tape. The upper bust is the circumference of your body under the armpits, at the top of the chest. This measurement helps us find the size that best fits the shoulders and back. (Some people prefer to take this measurement with their bra off, and others with their bra on. If you have larger shoulders, I’d start with the larger measurement. If your shoulders are more narrow, go with the smaller measurement.) You can also compare your back measurement to the pattern to see what fits best. Just remember that you want the fabric to be a little larger than your body for comfort.
The full bust is measured around the fullest part of the breasts and will be used to select the cup size.
TIPS FOR TAKING MEASUREMENTS
Wear the undergarments that you’ll wear with the top.
Try to have kind of a neutral breathing position
Try to have the measuring tape be level to the ground.
Don't pull it too tight or let it fall down. Just have it in a really comfortable position.
For this method, it is important to select your sewing pattern size based on the Upper Bust measurement. This should give you the best fit for your shoulders and back regardless of your bust size. If your pattern does not have this measurement in the size chart, you can subtract the cup size from the full bust to find it. For example, if the sewing pattern is designed for a B-cup (a 2” difference between upper and full) and your upper bust is 36” then you want to select the size that has a full bust of 38” as your starting point because the 38” full bust would correspond with a 36” upper bust.
How to calculate your Sewing cup size
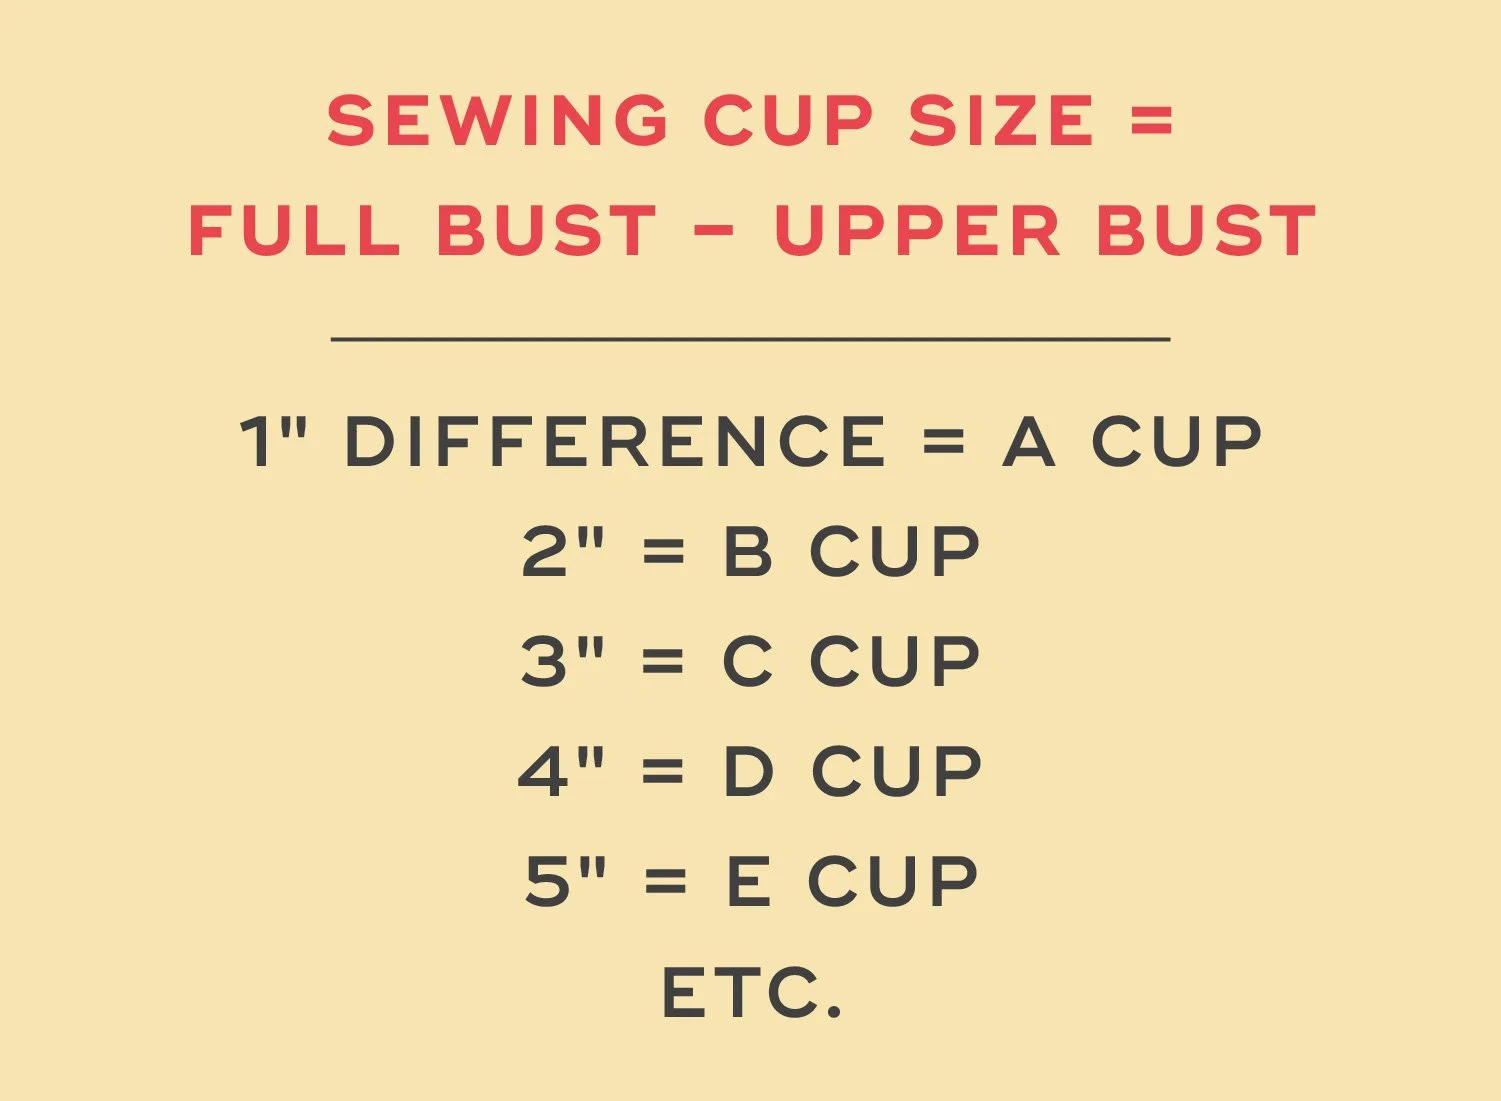
Your "Sewing cup size” is the difference between your upper bust and full bust measurements.
1” difference = A cup
2” = B cup
3” = C cup
4” = D cup
5” = E cup
etc.
For example, if your upper bust is 35” and your full bust is 39”, then your sewing cup size is a D cup.
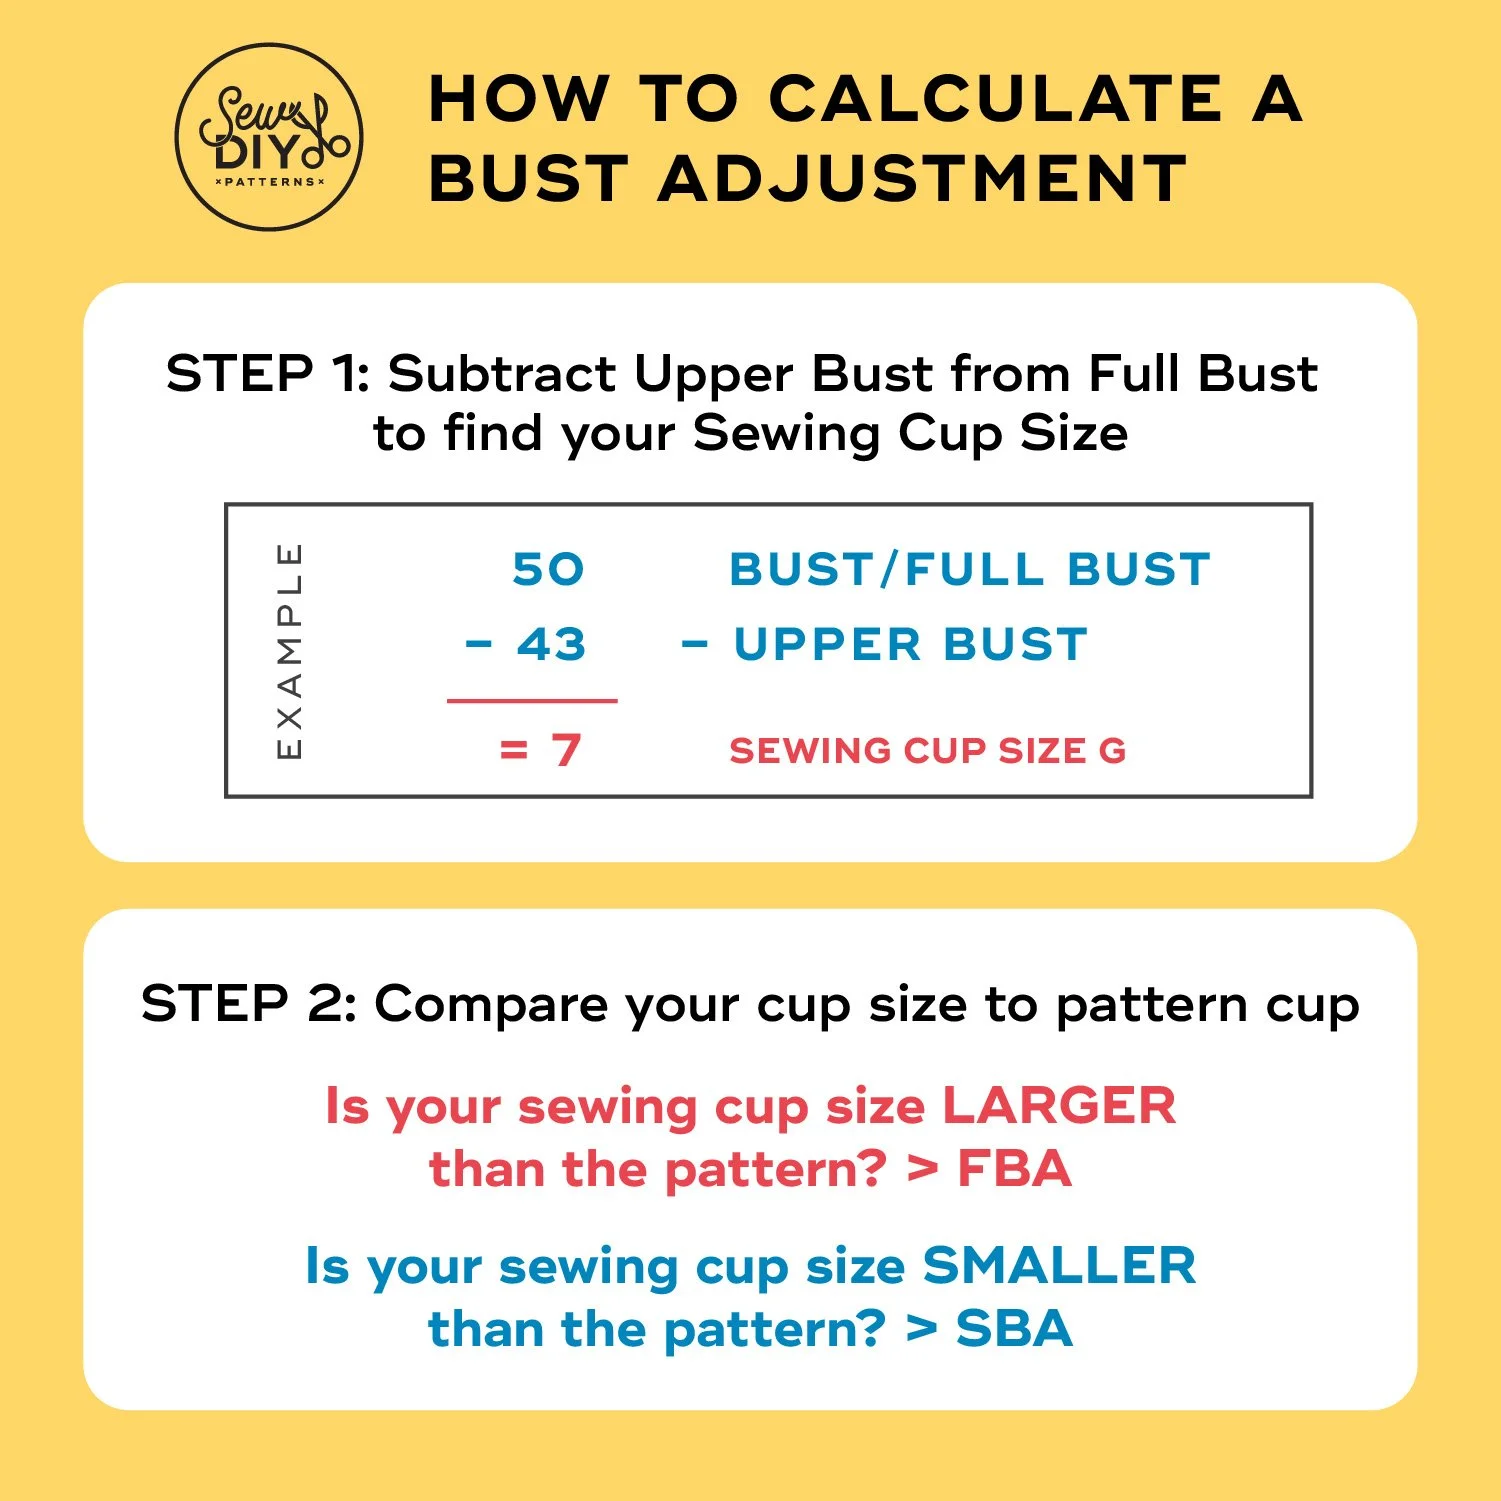
How to calculate a bust adjustment
With your personal measurements and the pattern measurements at hand, we can now calculate the amount of adjustment needed. You need to know your Bust/Full Bust and Upper Bust measurement. You also need to know the Sewing Cup Size for the pattern you are sewing.
I’m going to break down each step and then recap with a single formula at the end.
STEP 1: Subtract your Upper Bust measurement from your Full Bust measurement to find your sewing cup size.
For example, if your Full Bust is 50” and your Upper Bust is 43”, the difference is 50-43=7” which is a Sewing Cup Size of G.
STEP 2: Compare your cup size to the pattern cup size. If your sewing cup size is larger, then you will make a Full Bust Adjustment. If your sewing cup size is smaller, you’ll make a Small Bust Adjustment.
For example, let’s use a sewing pattern with an existing cup size of C, which equals 3”.
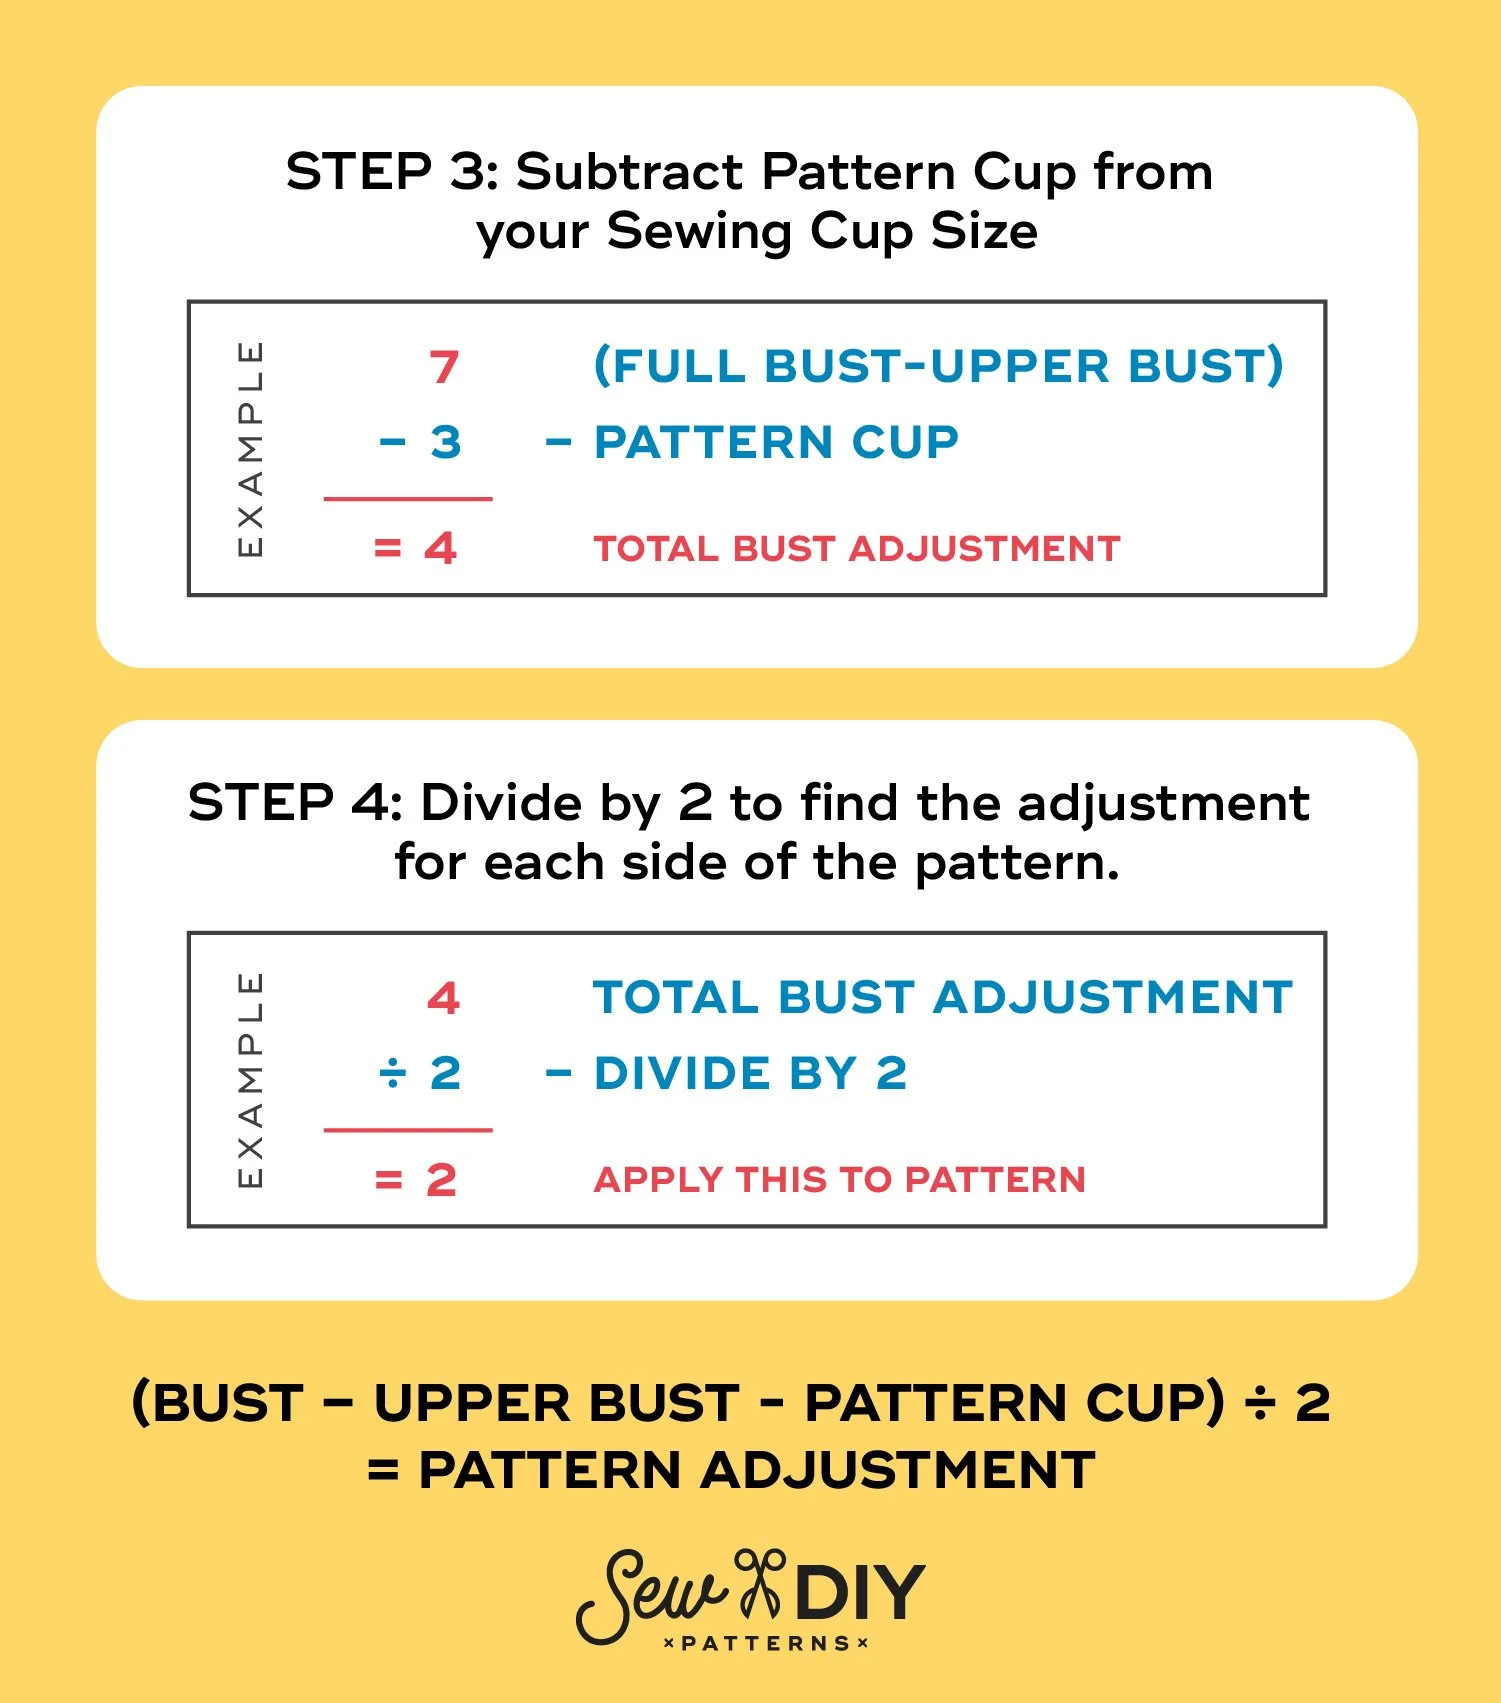
STEP 3: Subtract the numerical values of the Pattern Cup Size from your Sewing Cup Size. For example, if your Sewing Cup size
For example, if your Sewing Cup Size is G=7” and our Pattern Cup Size is C=3” then we subtract 3 from 7 to get 4.
Sewing Cup Size - Pattern Cup Size = Total Pattern Adjustment
STEP 4: Divide by 2 to find the adjustment for each side of the pattern. So far, our calculations have been for the entire circumference of the body so we want to divide it in half to find the amount the will be made to each side.
For example, if our Total Bust Adjustment is 4, we divide that by 2 to get a 2” adjustment to the pattern.
For faster calculations, you can use the formula below:
(Bust – Upper Bust - Pattern Cup) ÷ 2 = Pattern Adjustment
If the final number is positive, you will make a Full Bust Adjustment. If the number is negative, you will make a Small Bust Adjustment.
FULL BUST ADJUSTMENT EXAMPLE:
Bust = 48, Upper Bust = 42, Pattern Cup = 3
(48-42-3)÷ 2= (3)÷ 2 = 1.5
In this example, you’d make an FBA of 1.5”.
SMALL BUST ADJUSTMENT EXAMPLE:
Bust = 44, Upper Bust = 43, Pattern Cup = 3
(44-43-3)÷ 2= (-2)÷ 2 = -1
In this example, you’d make an SBA of 1”.
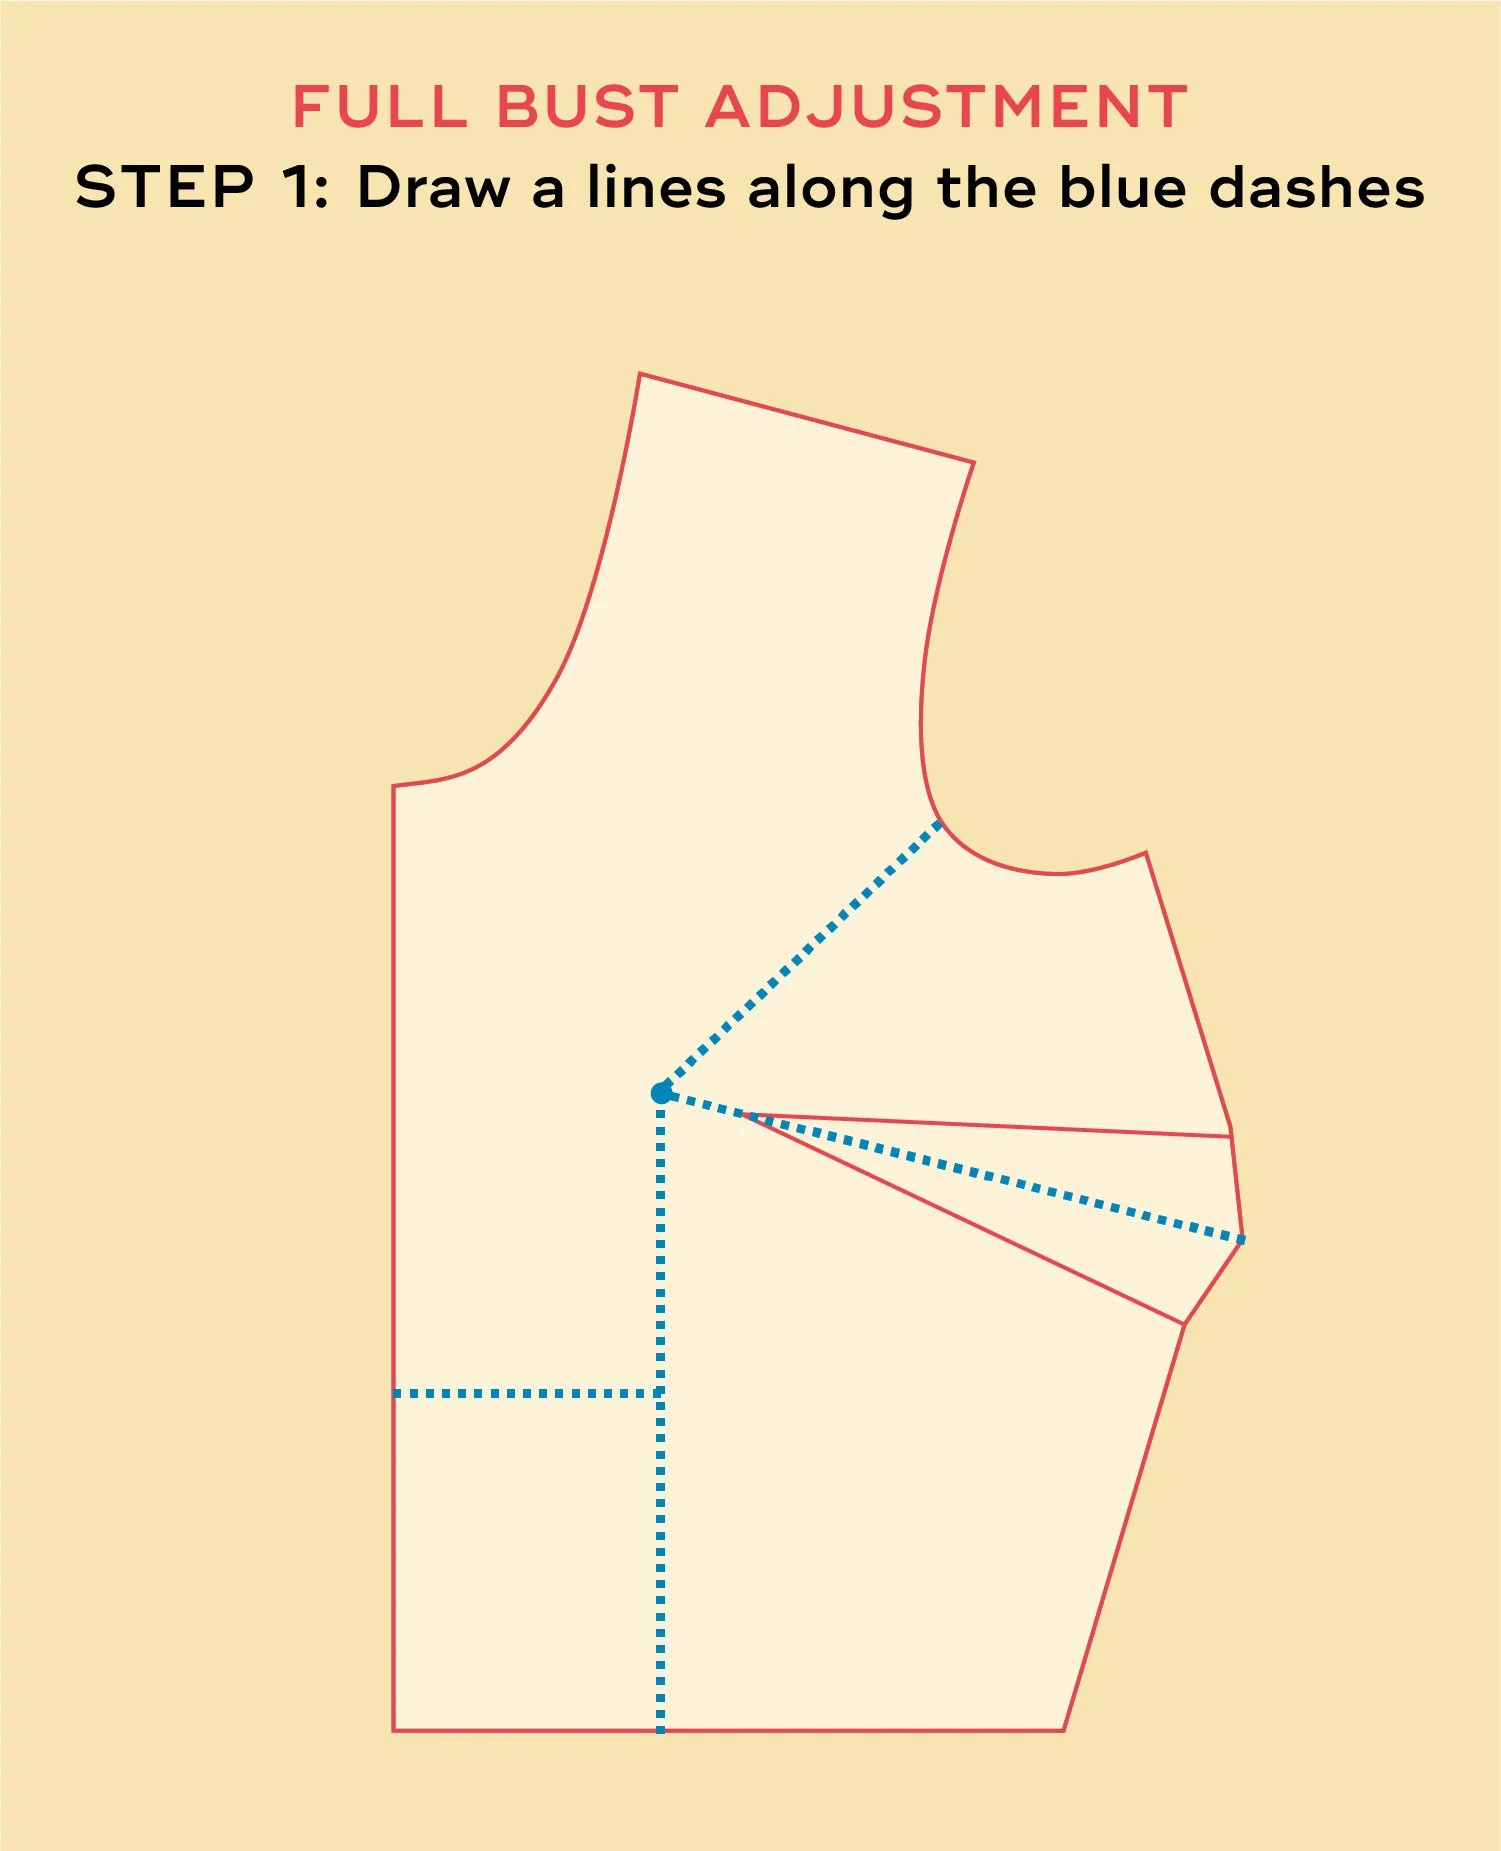
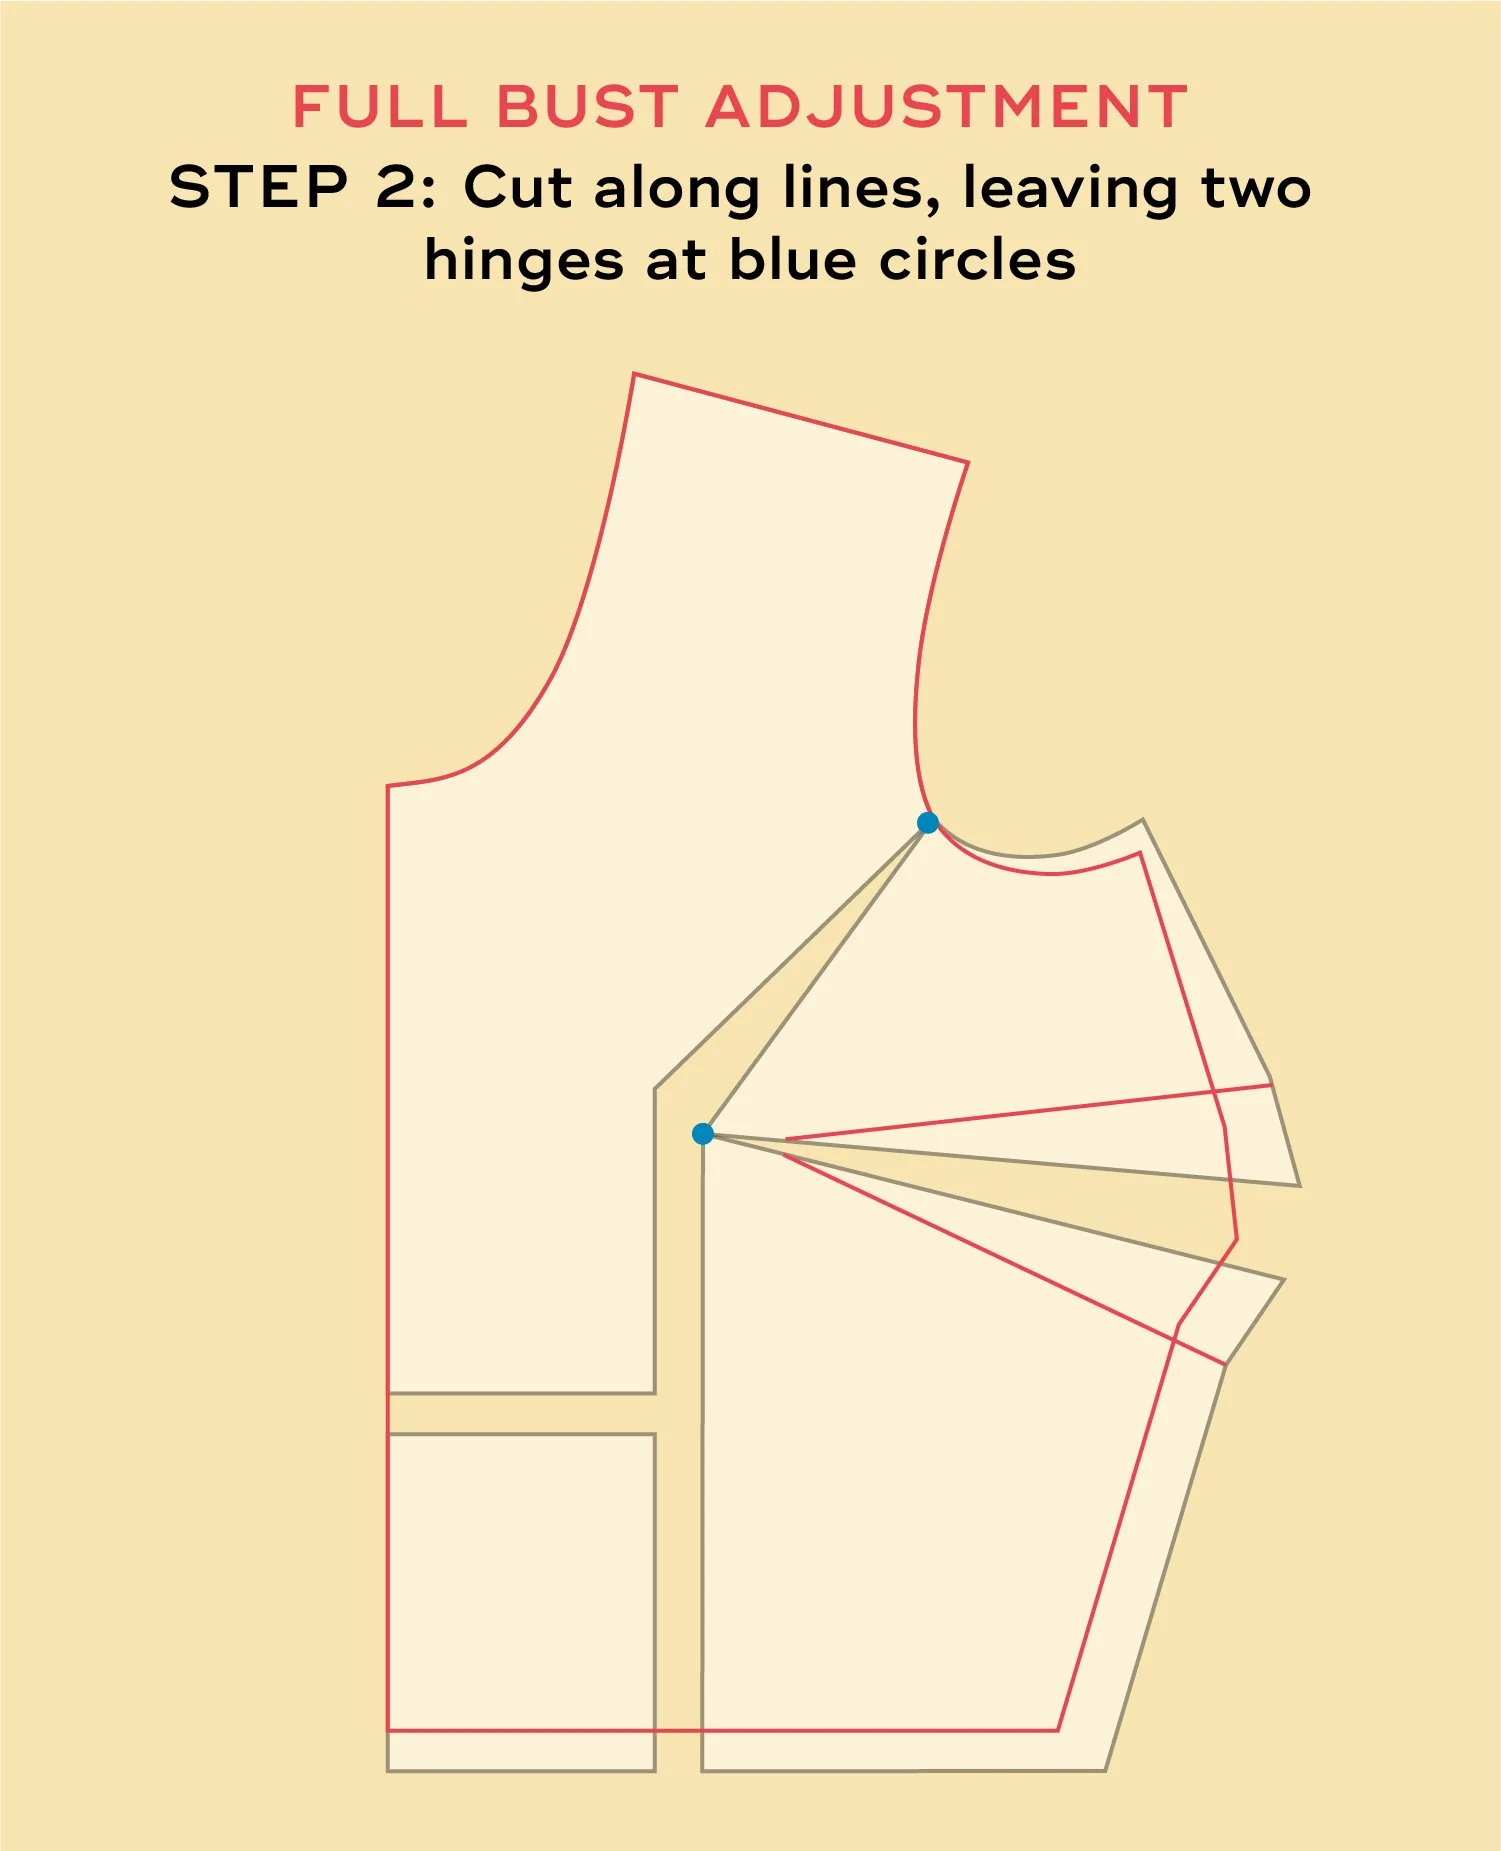
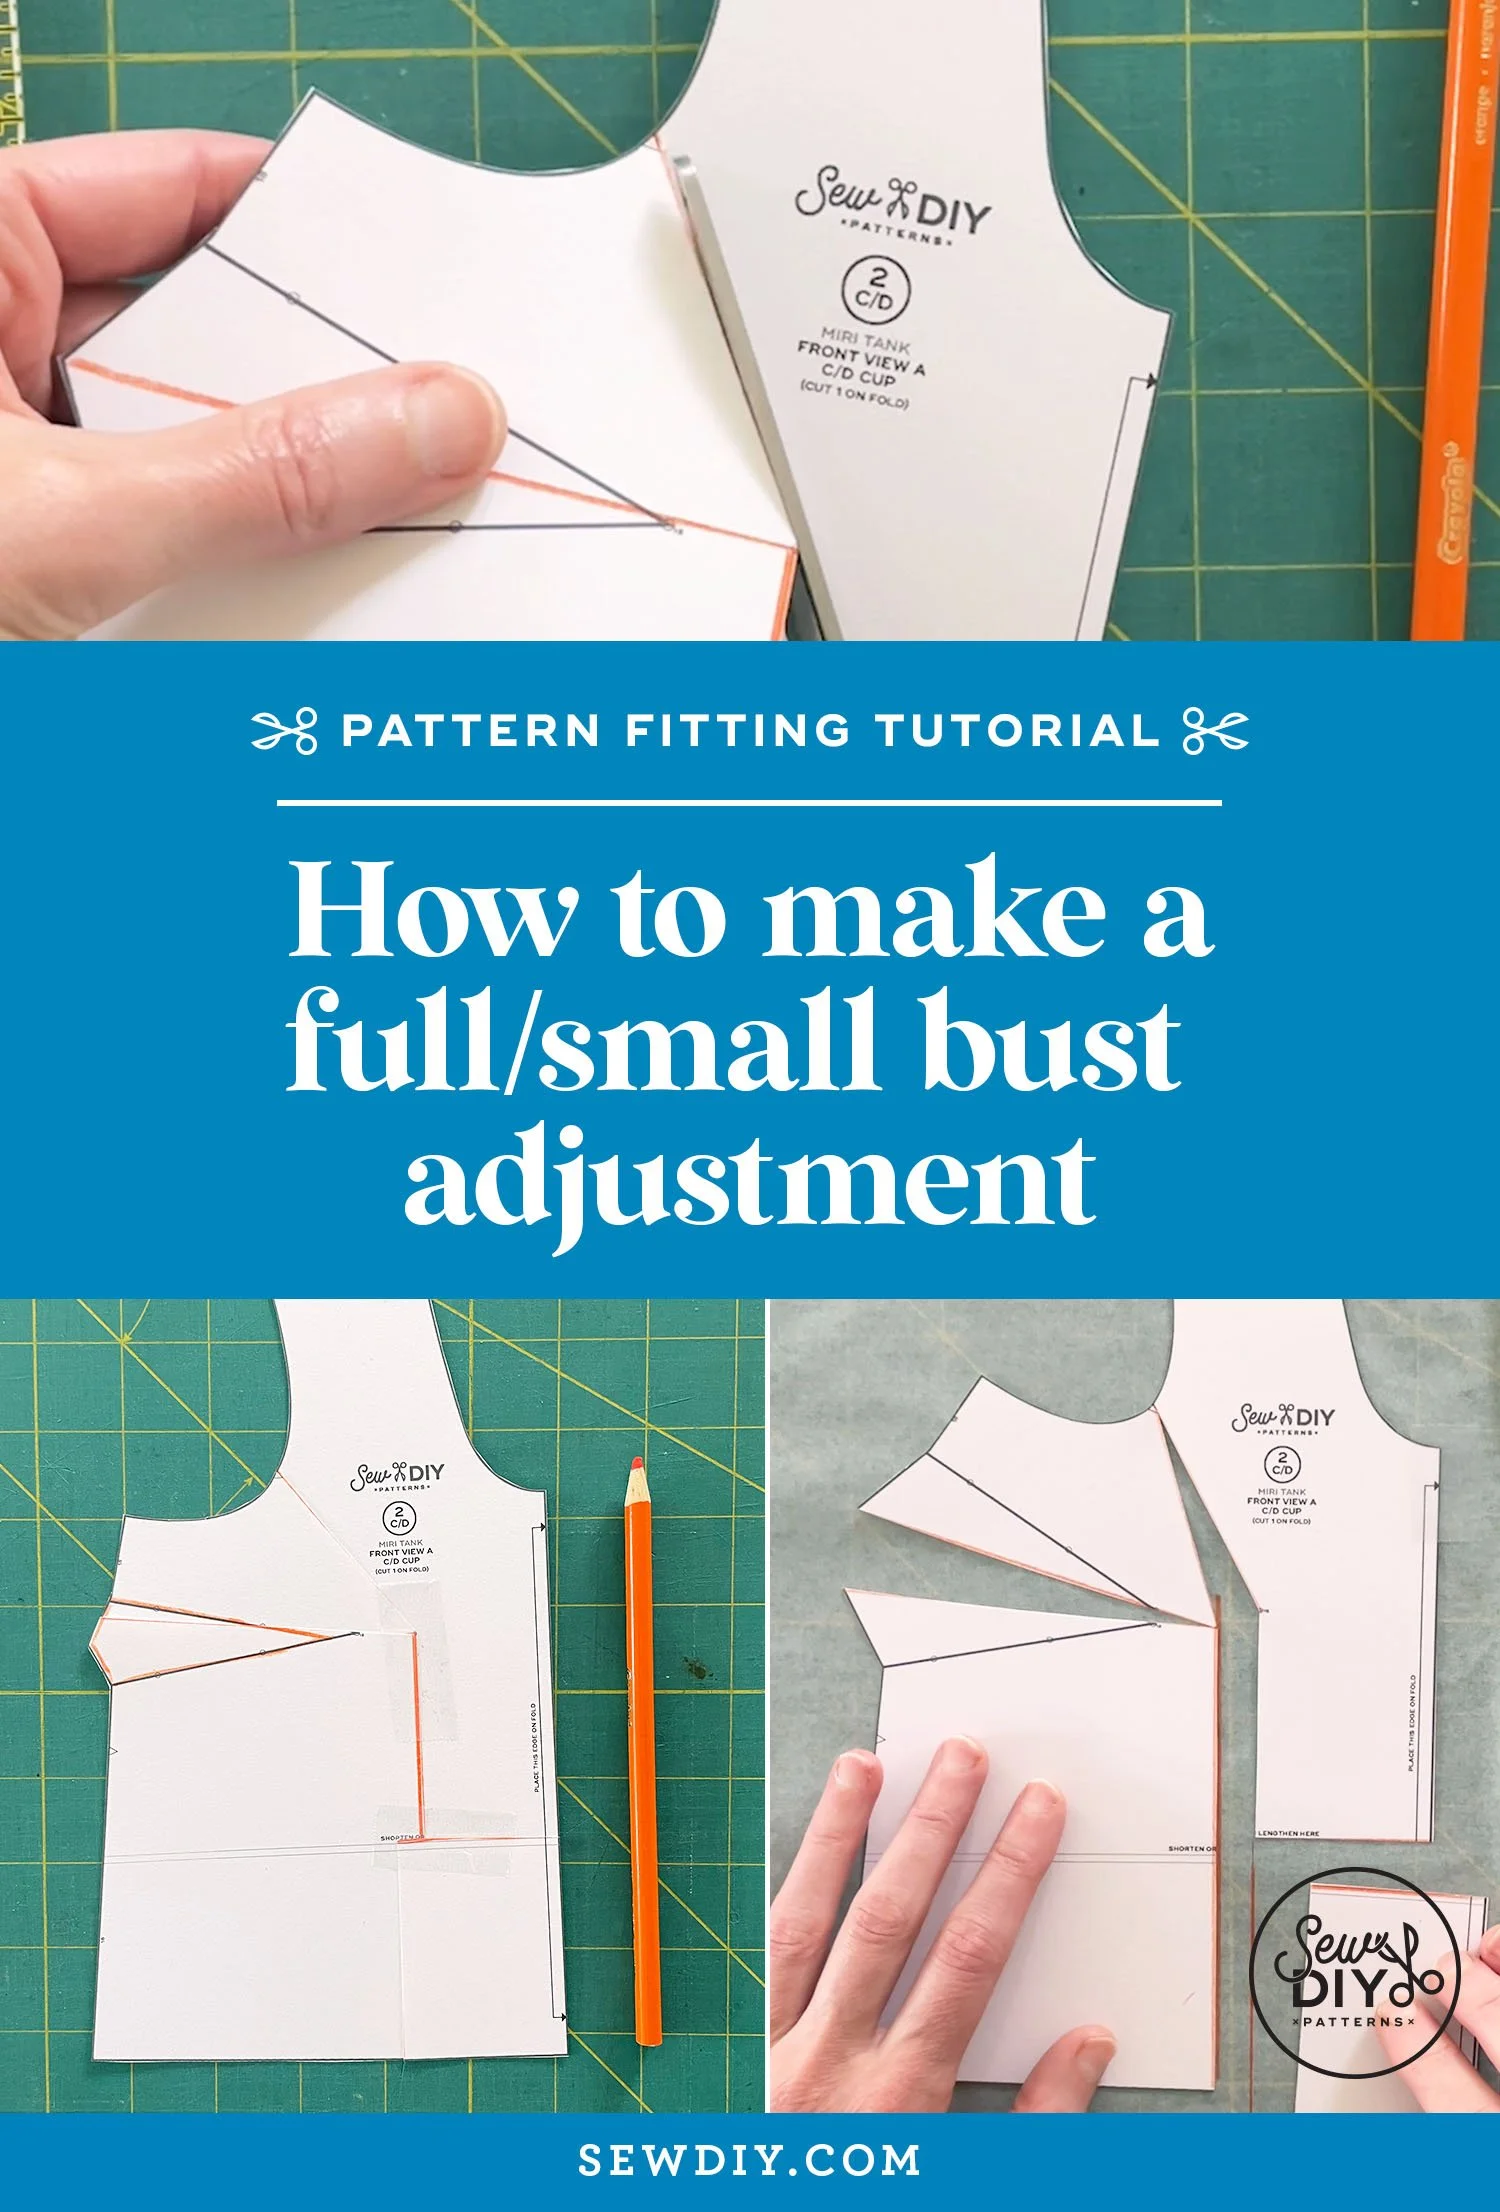
How to Make a Full Bust Adjustment
Scroll through the images above to see each step or watch the video below.
Step 1: Draw a line from the armpit to the bust apex, then straight down to the hem. Draw a second line from the bust apex through the center of the dart. Draw a third horizontal line from the vertical part of line 1 to the center front.
Step 2: Cut along the blue lines, leaving a small hinge at the armpit and the bust apex, as shown in the drawing.
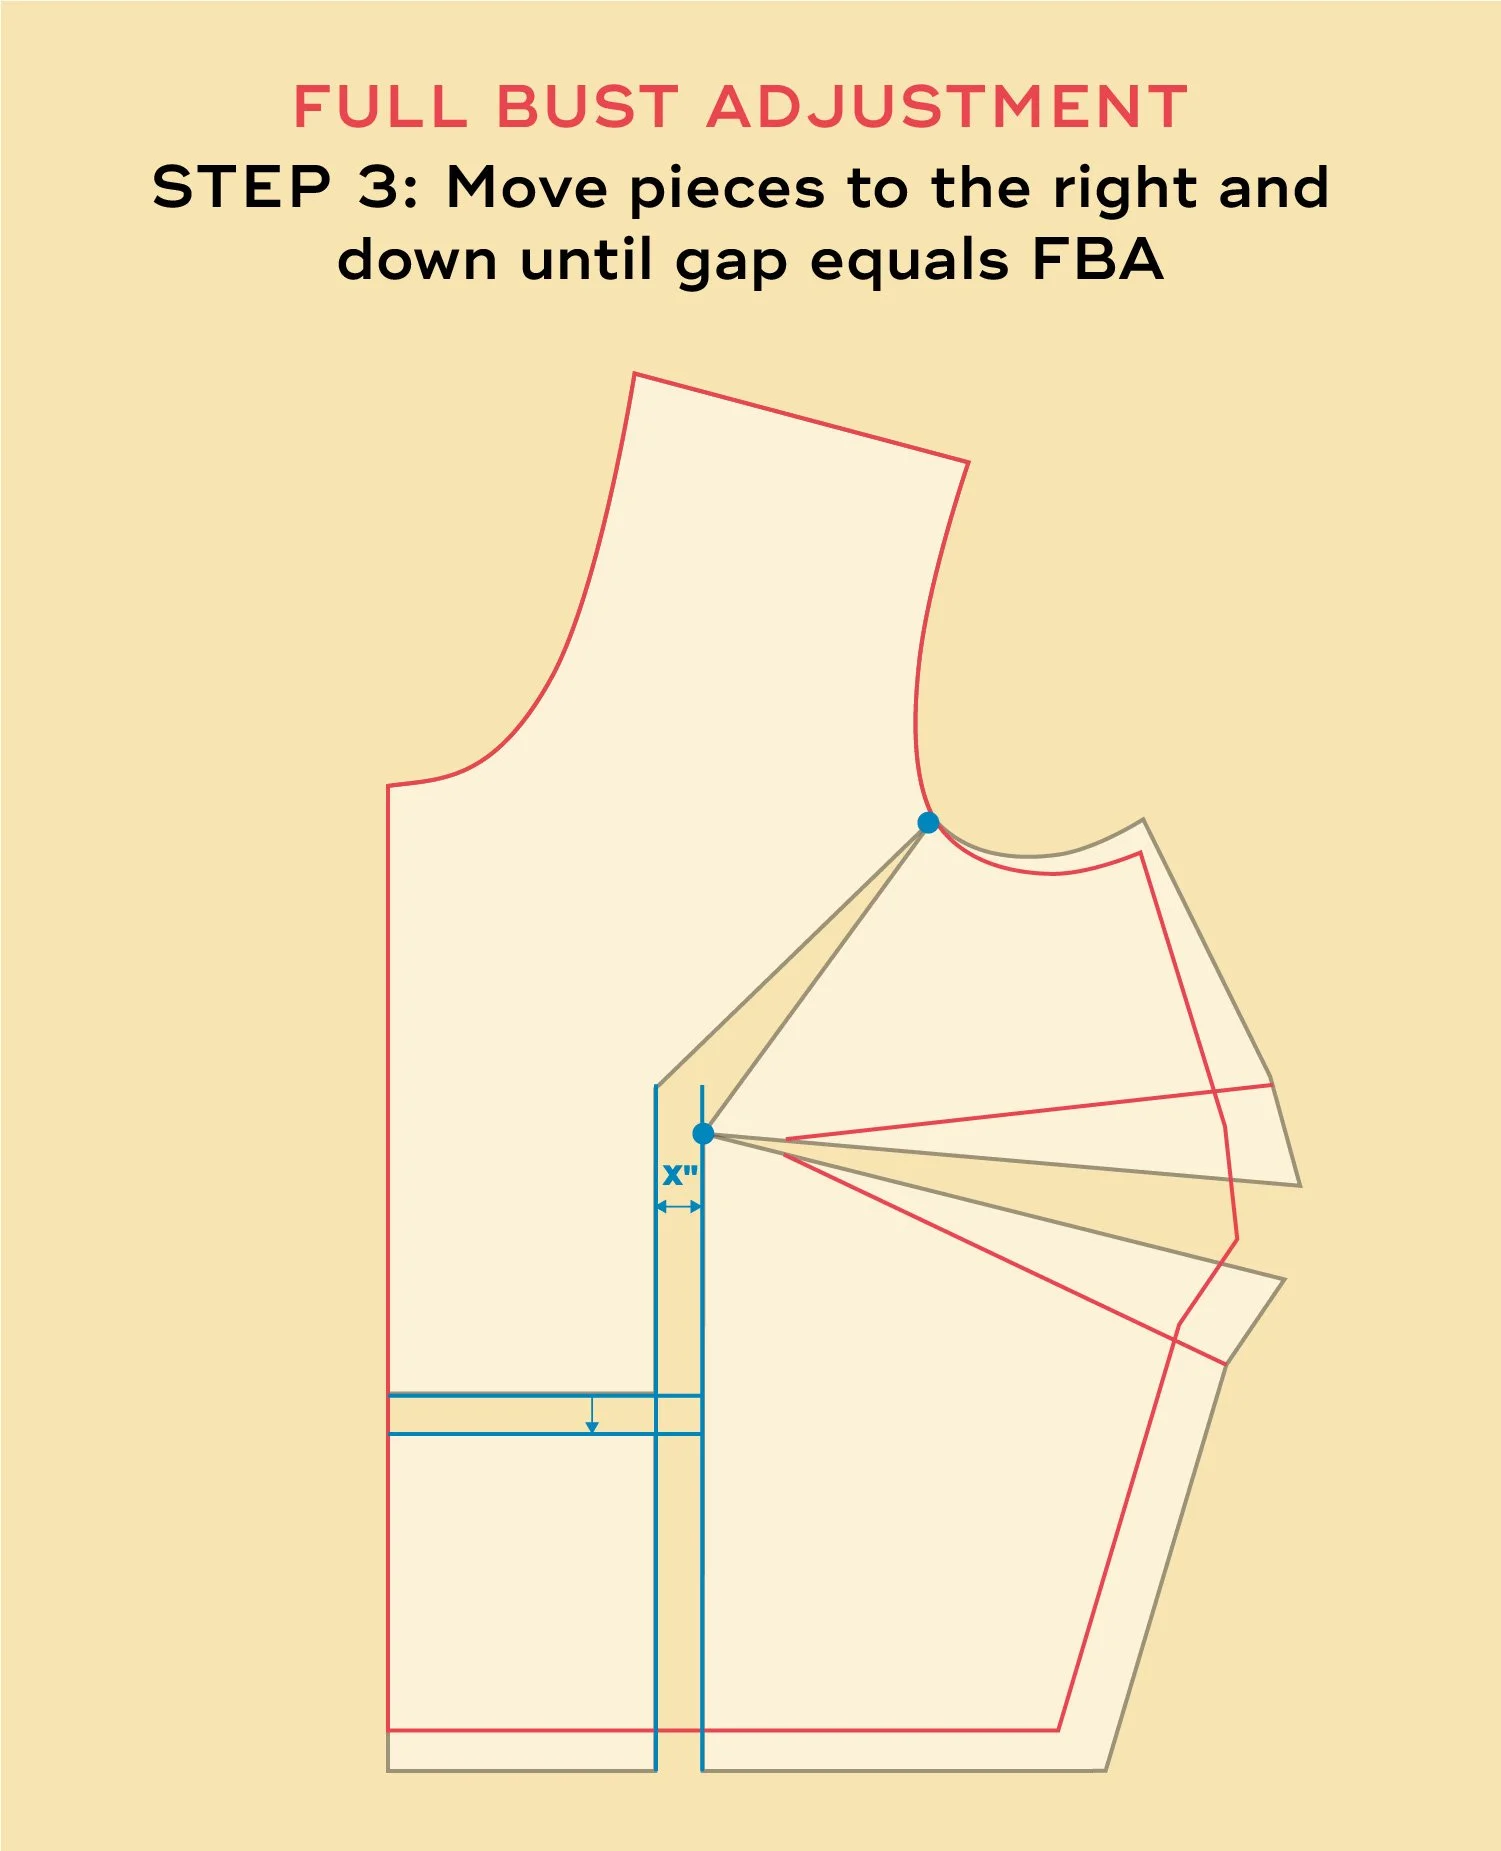
Step 3: Using the hinges move the right two sections to the right and down until the gap in the center equals your desired adjustment. Keep the bottom right section parallel to the center front/grainline. Move the bottom left section down until the hems are aligned.
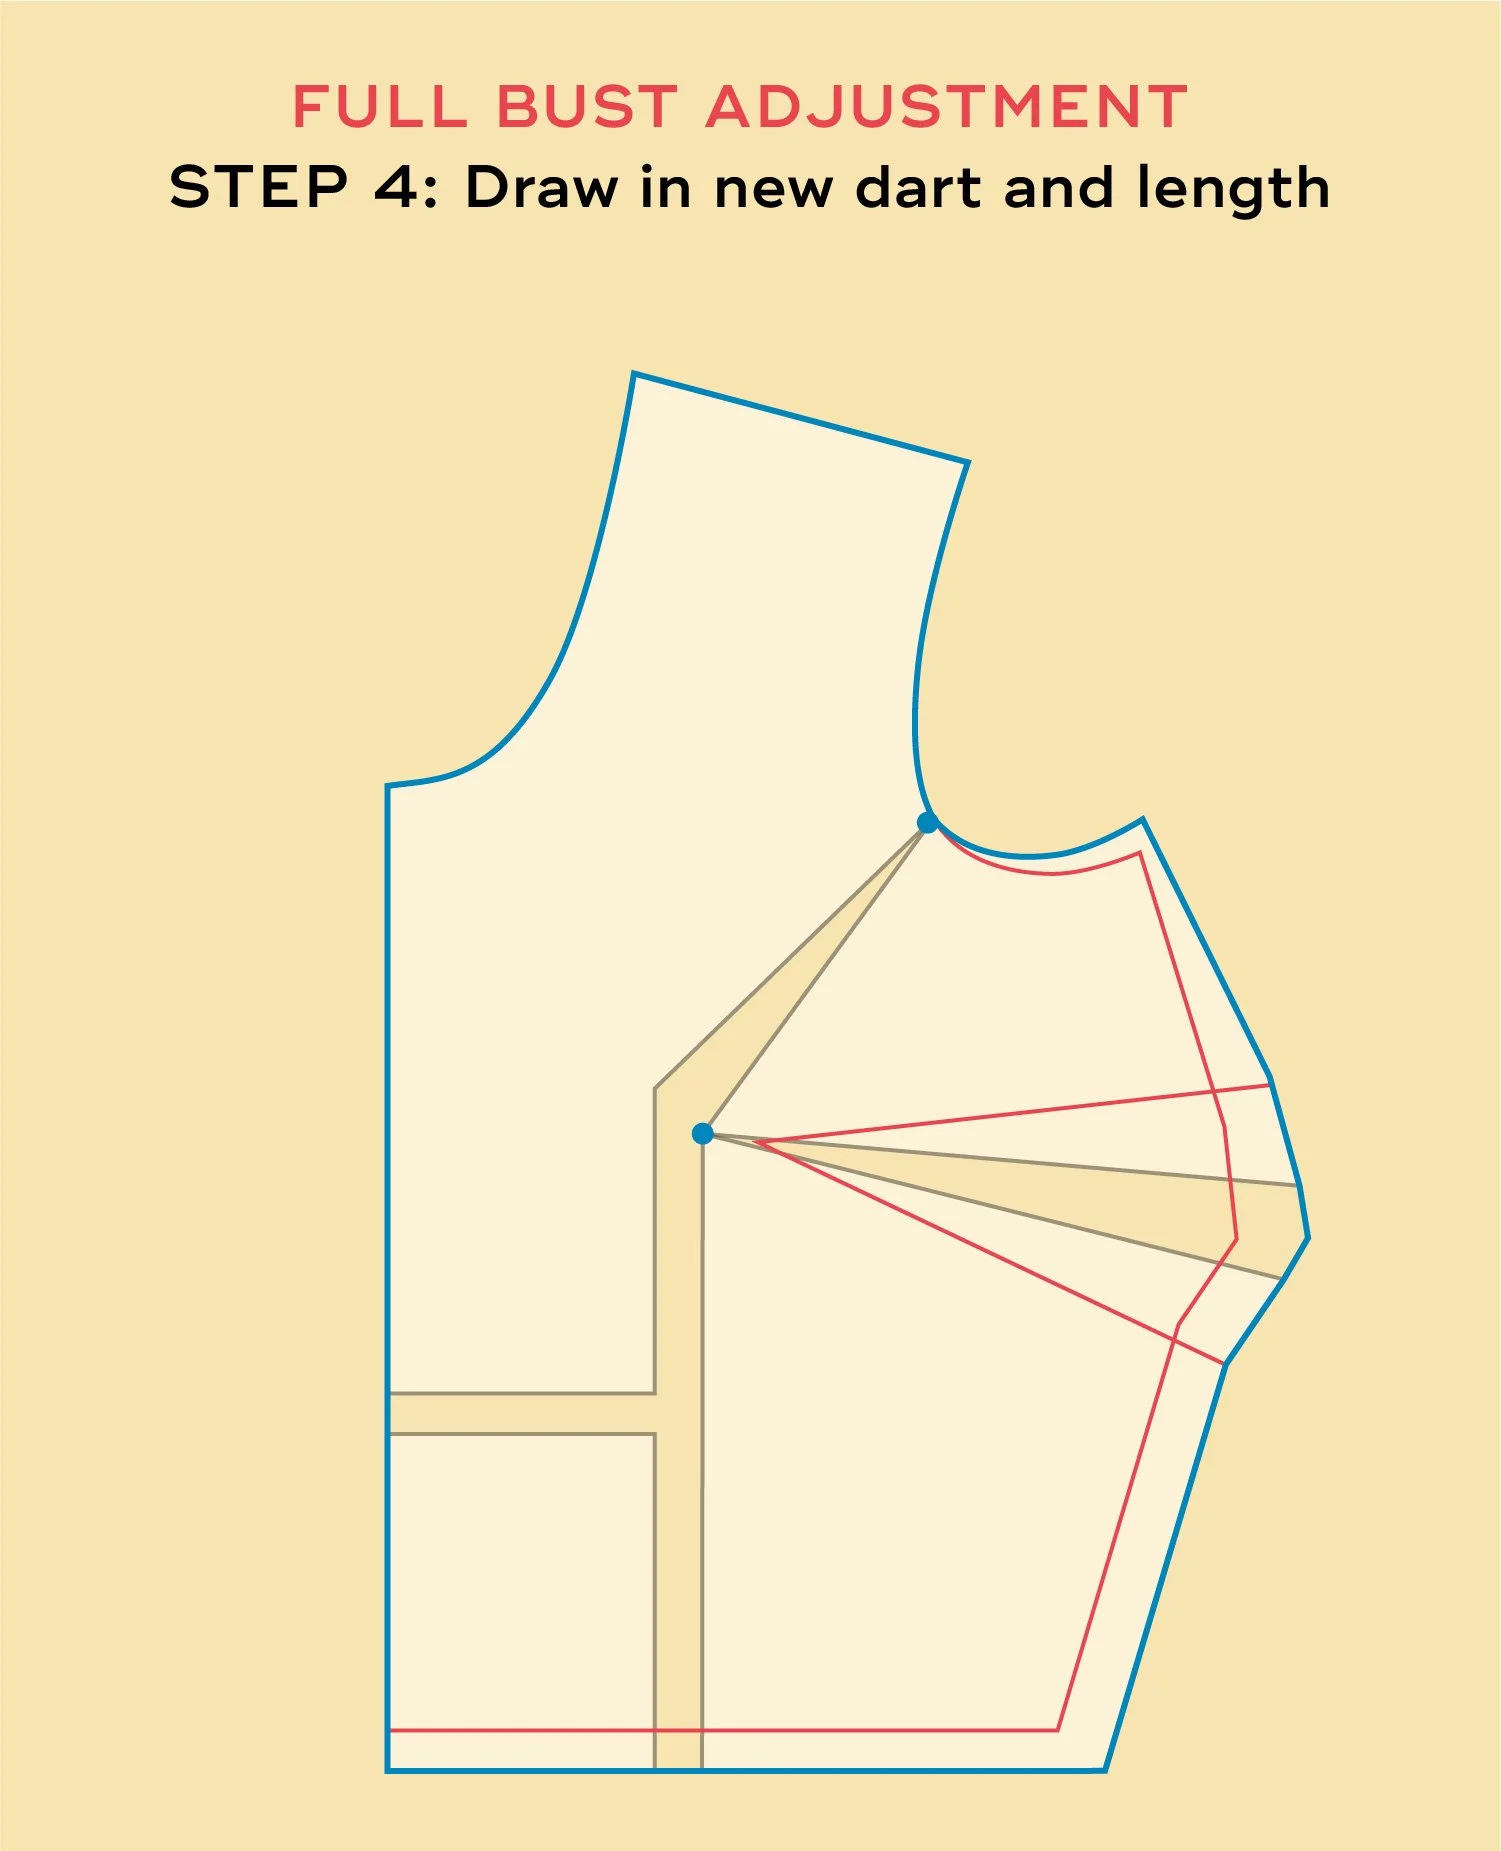
Step 4: Draw around the newly adjusted pattern and draw in the new dart lines. The dart will be bigger and the bodice will be longer. But when the dart is sewn, the side seam length is the same as before so you don’t need to make changes to the back pattern piece.
Watch the video below to see how to make this adjustment. Click here to watch on Vimeo.


How to Make a SMALL Bust Adjustment
Scroll through the images above to see each step or watch the video below.
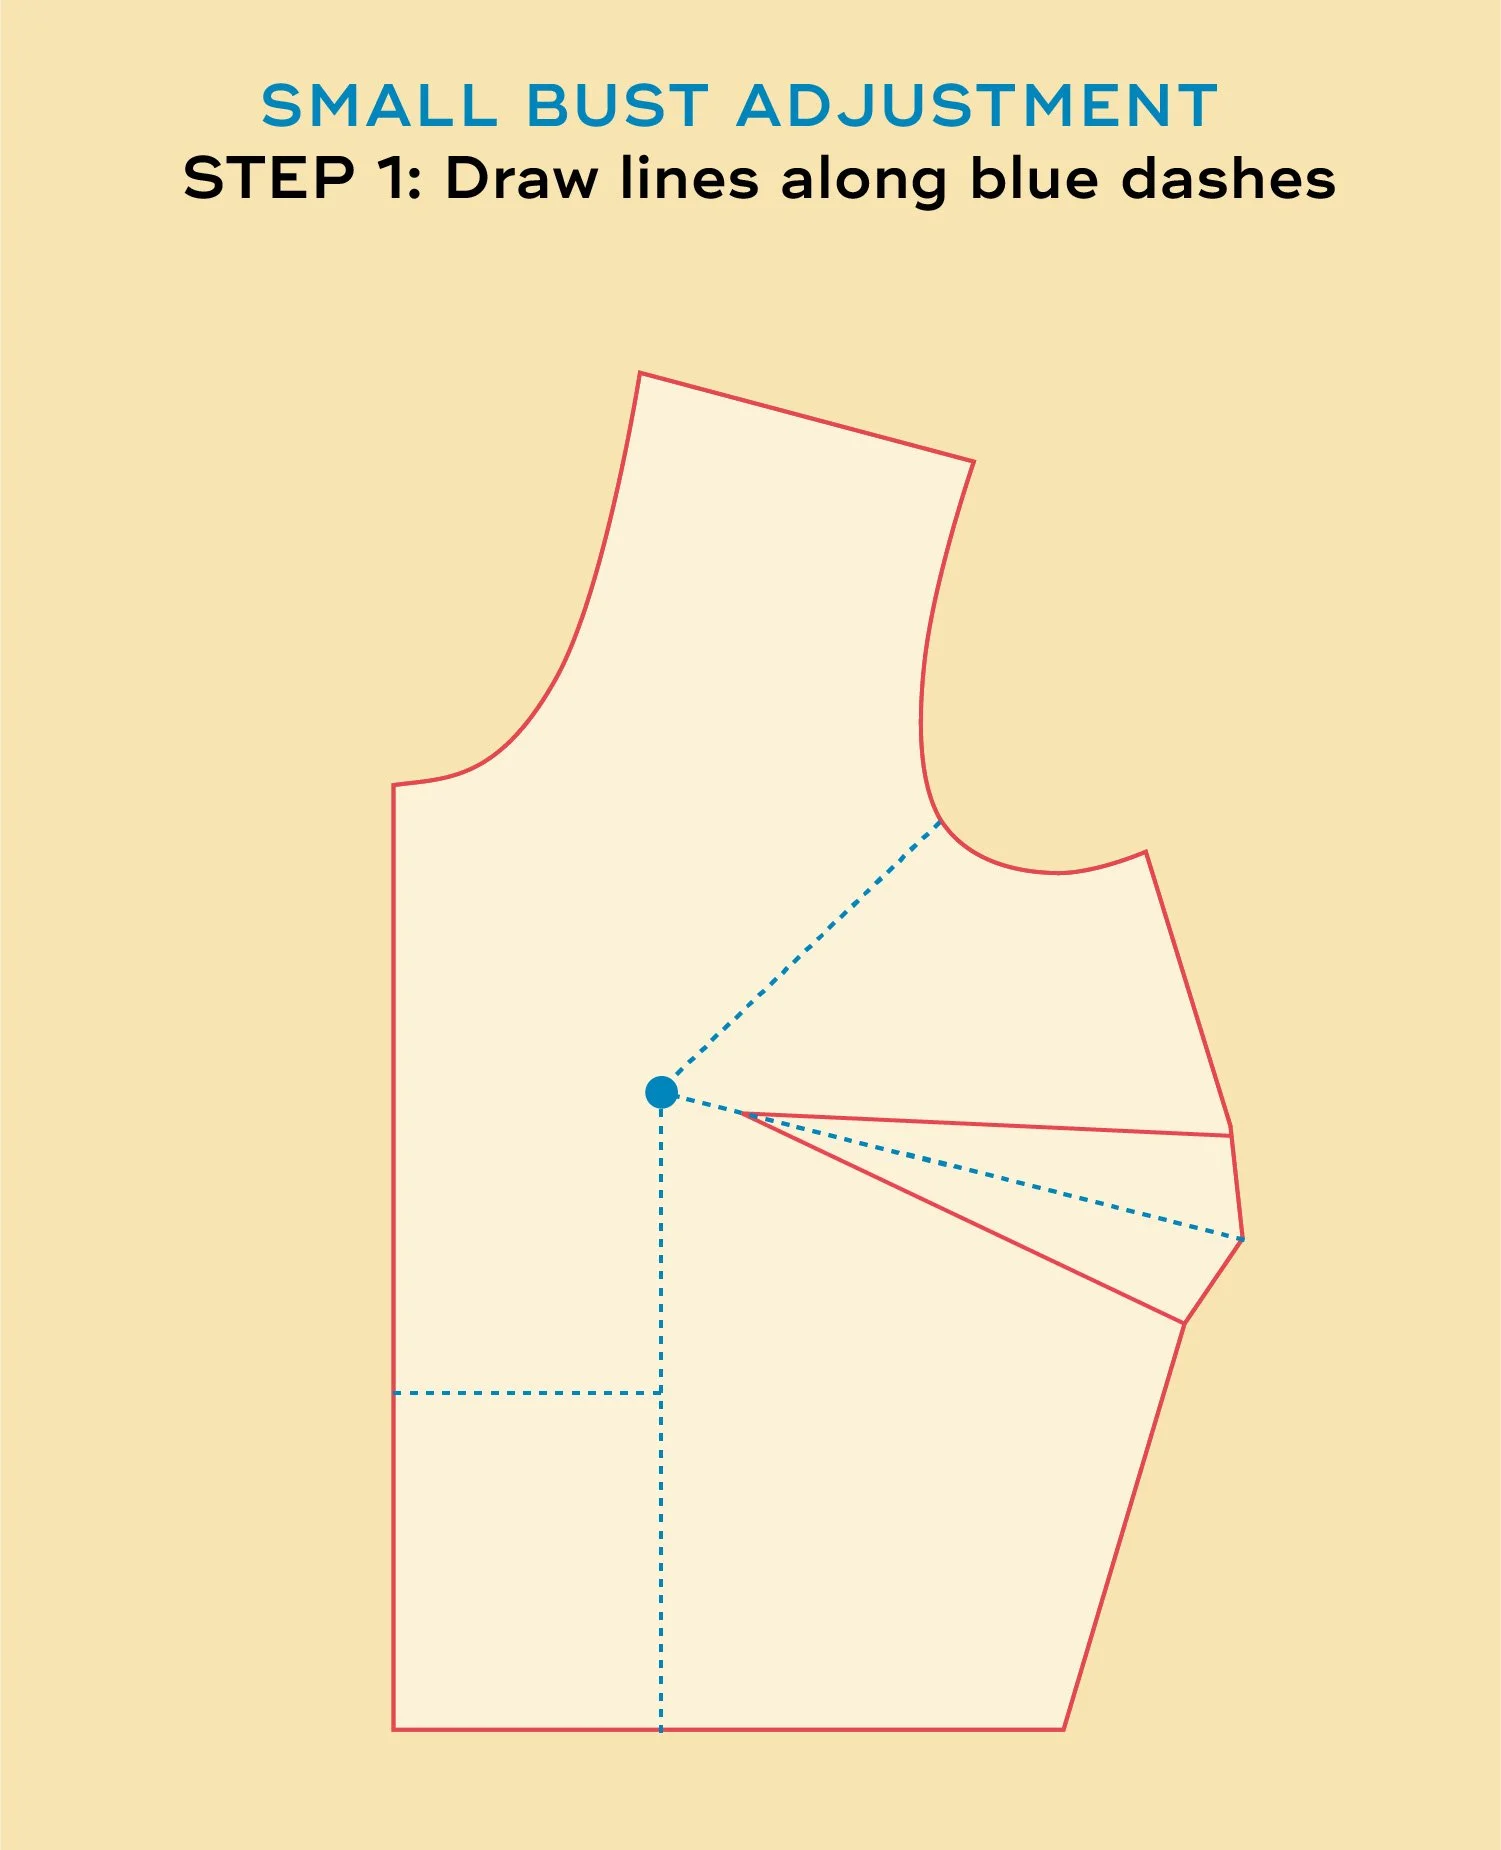
Step 1: Draw a line from the armpit to the bust apex, then straight down to the hem. Draw a second line from the bust apex through the center of the dart. Draw a third horizontal line from the vertical part of line 1 to the center front.
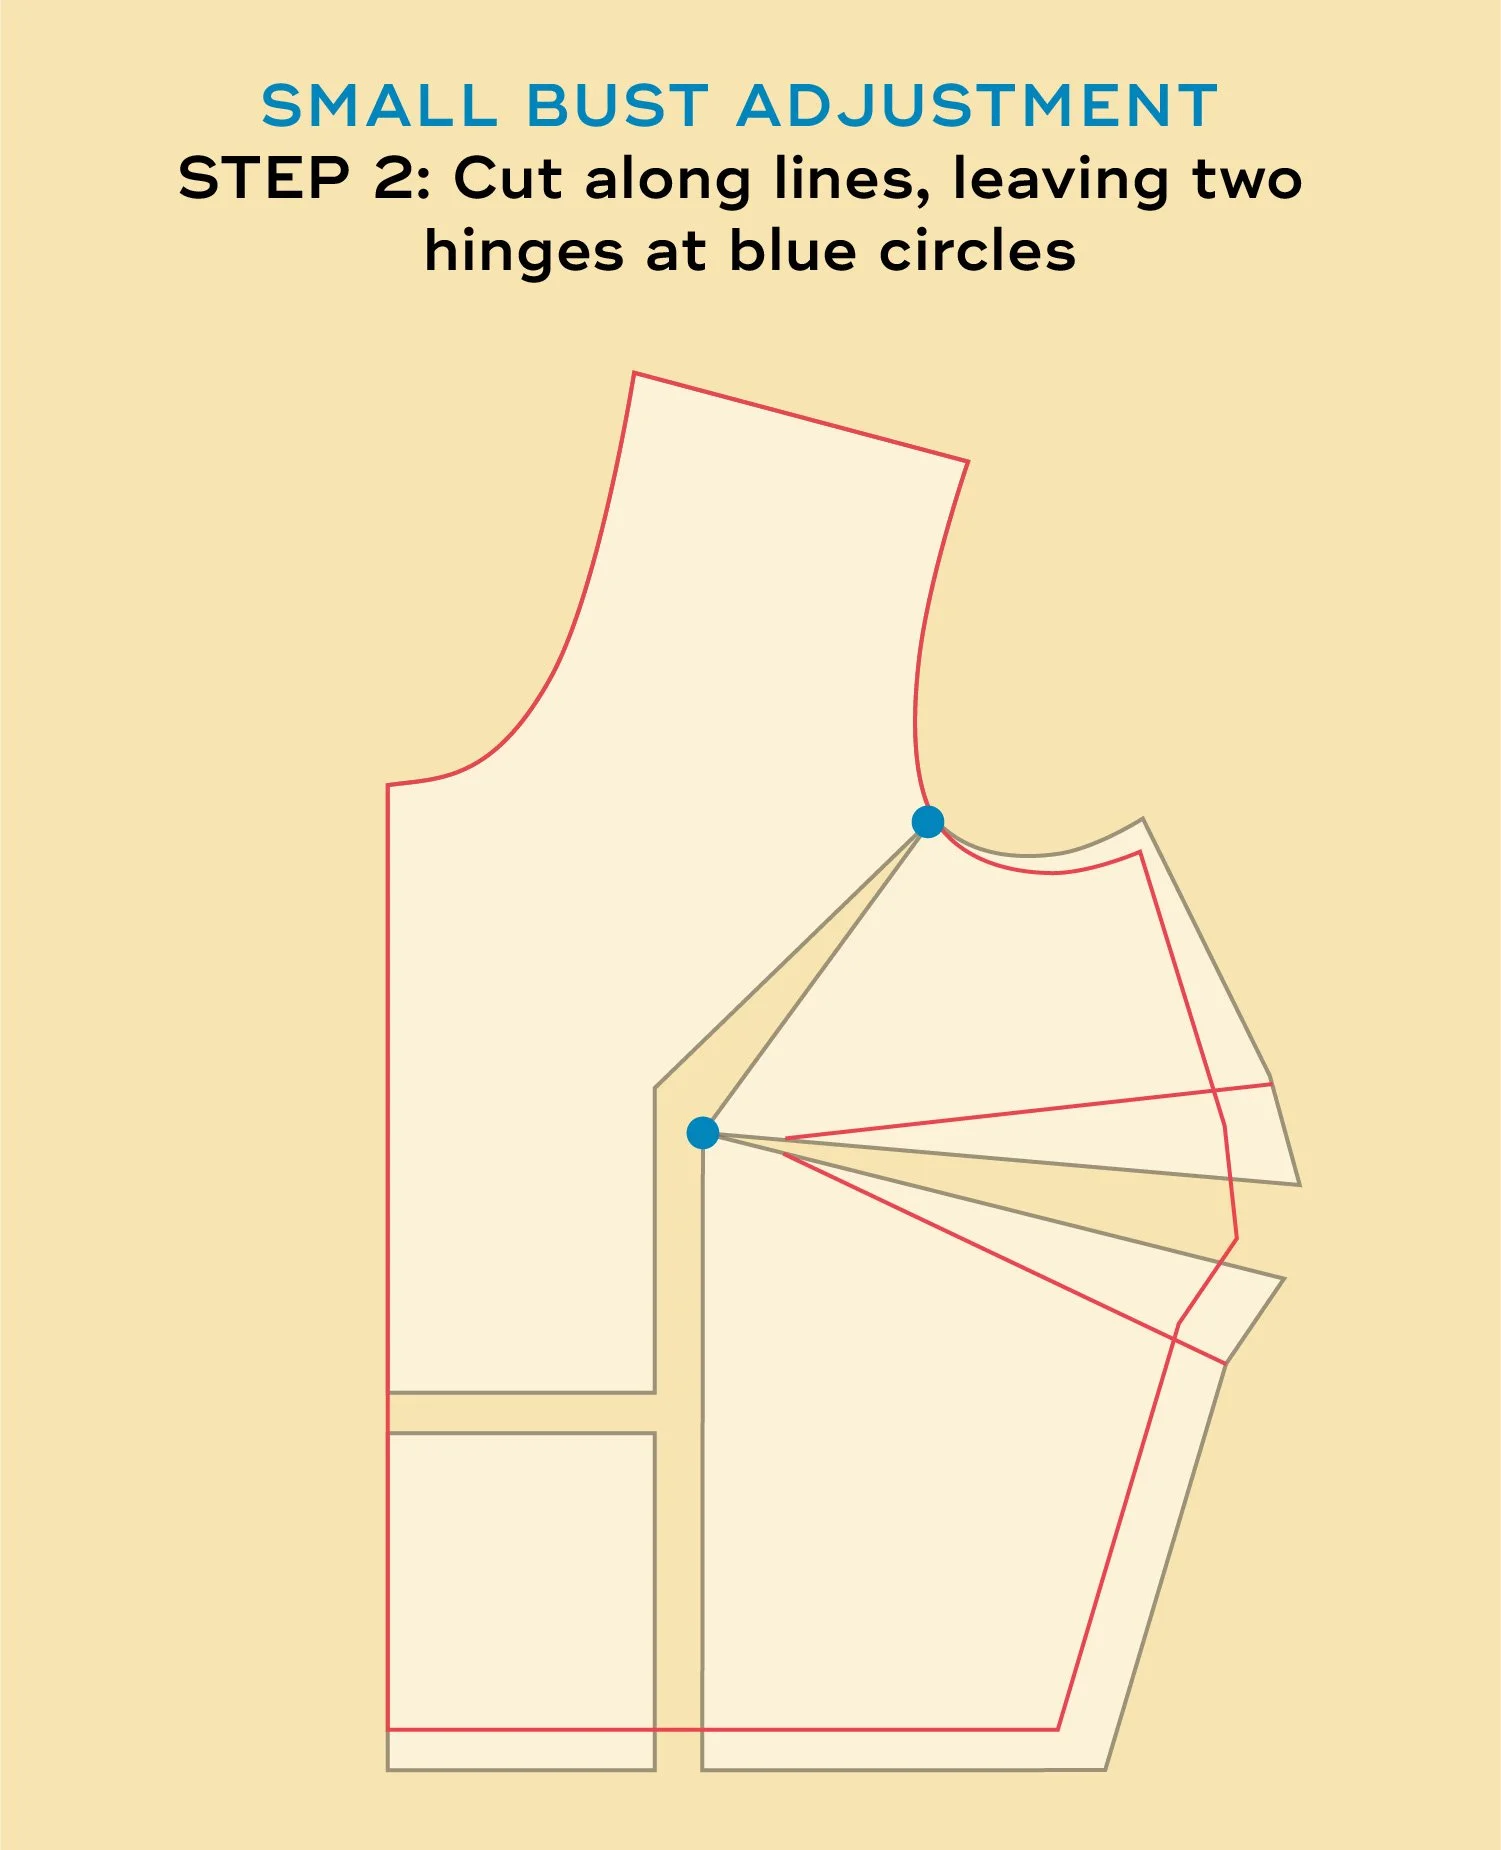
Step 2: Cut along the blue lines, leaving a small hinge at the armpit and the bust apex, as shown in the drawing.
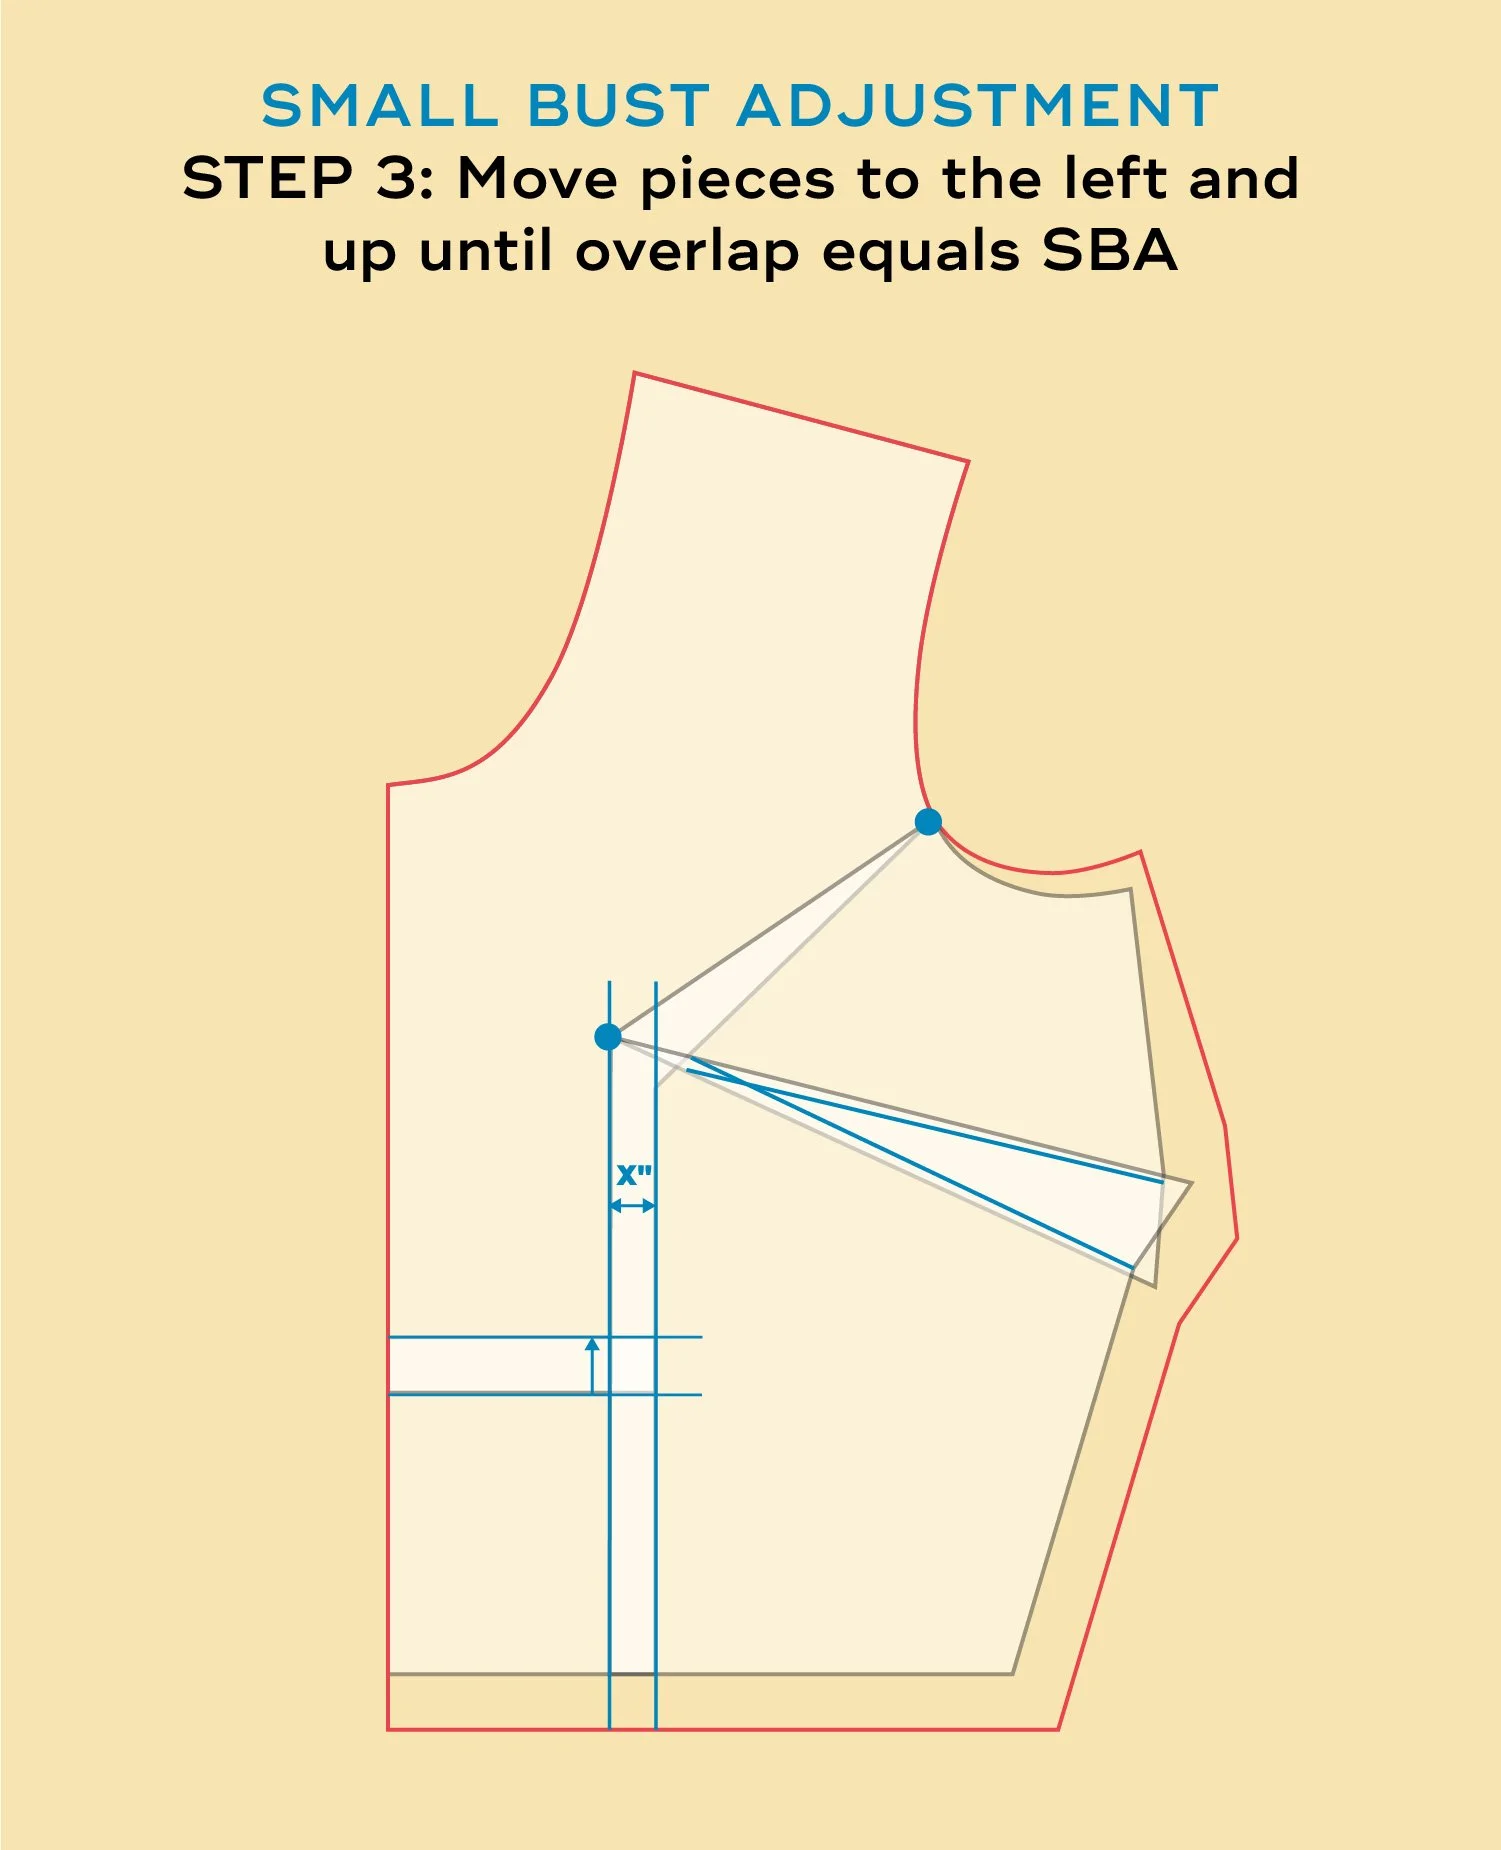
Step 3: Using the hinges move the right two sections to the left and up until the overlap in the center equals your desired adjustment. Keep the bottom right section parallel to the center front/grainline. Move the bottom left section up until the hems are aligned.
Step 4: Draw around the newly adjusted pattern and draw in the new dart lines, tracing over the previous lines. The dart will be smaller and the bodice will be shorter. Depending on how much the pattern is adjusted, the side seams may or may not be shorter. If the side seam length is shorter, you will also need to reduce the length of the back pattern piece to match the adjusted front. Measure the length of the front side seam (excluding the dart) and compare to the back pattern piece.
To see this adjustment in action, watch the video below or click here to watch on Vimeo.
Further Reading
If you have a very large bust, I recommend checking out Sew Busty and their tutorials for large full bust adjustments. If you are looking for more details on small bust adjustments, check out this post from Seamwork.
I hope that you found this tutorial helpful. Save the image below to Pinterest for future reference. Happy sewing!